Security
Trusted Certificate Generation with Windows
The instructions below will help you create a trusted certificate chain in Windows and configure HTTPS in NetEye 4 with the trusted certificate. There are also instructions for how to do this from within the NetEye server.
Requirements
The following requirements should be met before proceeding with configuration of the certificate:
A Windows Certification Authority should already be up and running, with a suitable Certificate Template.
The Certificate Template should meet recent encryption standards, for example:
RSA, SHA256, 4096bit
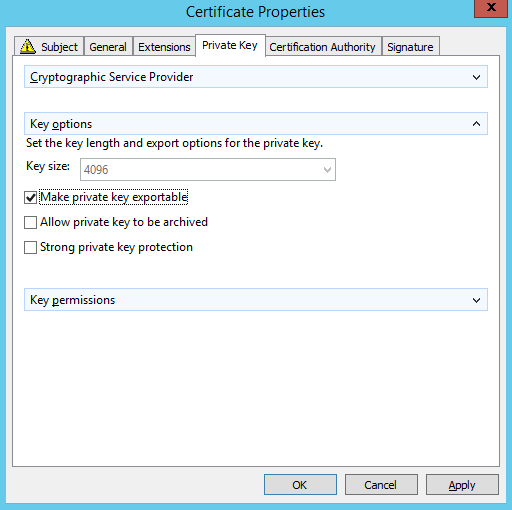
The private key should be marked as exportable
You have a Windows domain-joined Server/PC which is allowed to request certificates.
You have a Linux machine running NetEye where you can install the CA Chain Certificate. This is necessary for the server certificate to be trusted by the Apache web server.
Procedure
Step 1: Request a new certificate from a Windows domain-joined Server/PC:
Open the Microsoft Management Console ()
Within MMC, go to
In the popup dialog, navigate to , and then OK to close the dialog.
Expand , then right click on Certificates
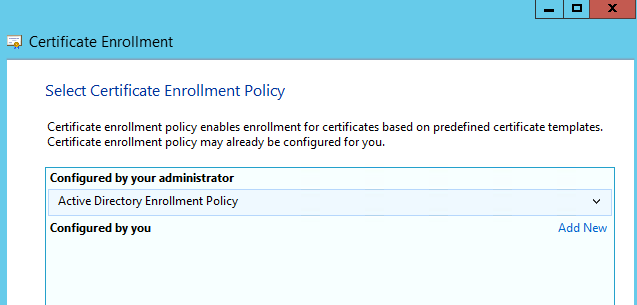
Select All Tasks, then Request new certificate (you may need to skip a “Before You Begin” screen first) and Next when “Active Directory Enrollment Policy” is selected as shown here:
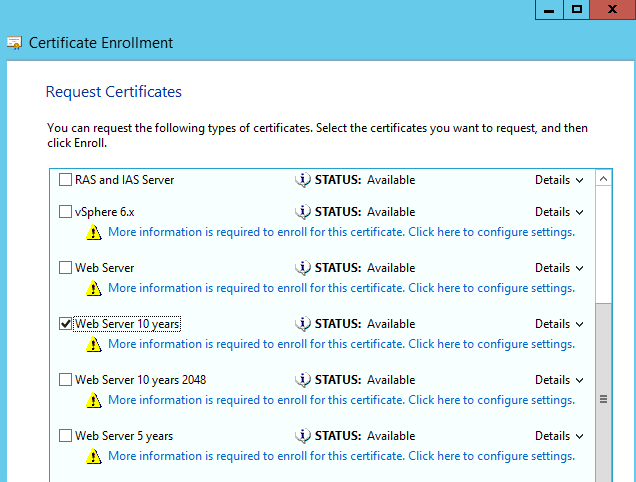
Select a Certificate Template and click on the link “More information is required to enroll for this certificate…”
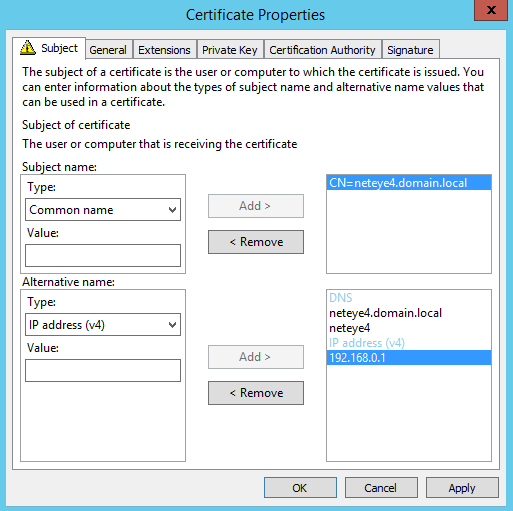
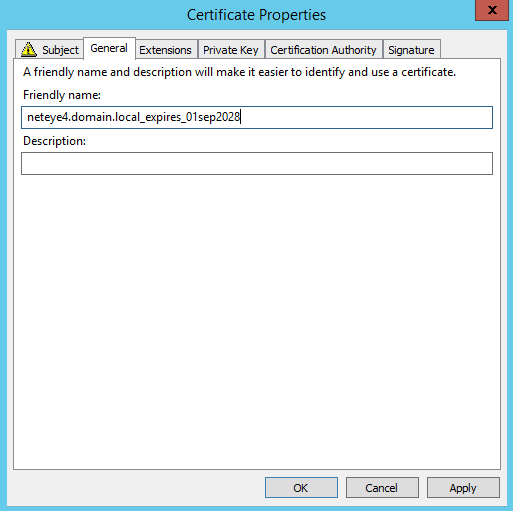
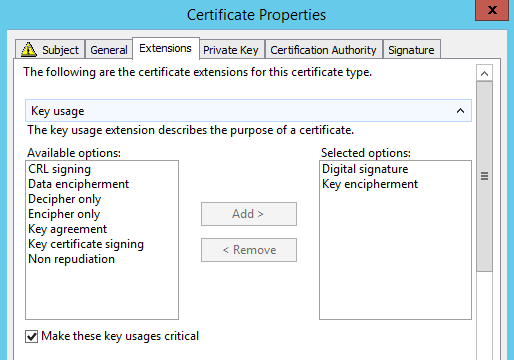
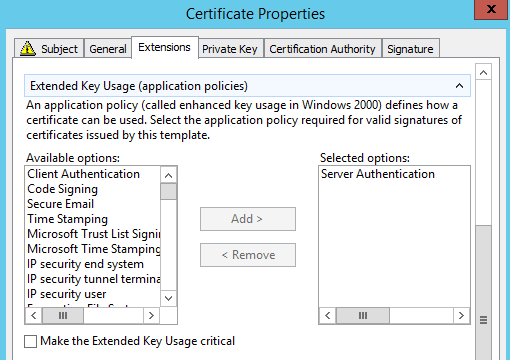
Fill-in the information for each tab in the Certificate Properties dialog as shown (the fields shown are mandatory; you can optionally add values like Country, Department, Organization, etc.):
Click OK and then Enroll and Finish.
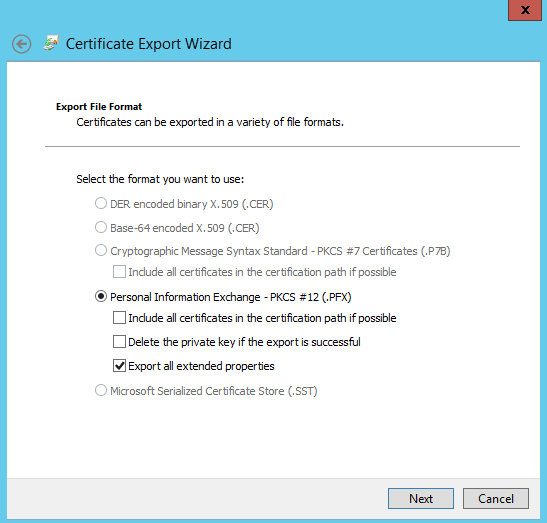
Step 2: Export the certificate with its private key in PFX format:
Right click on the certificate you just created in the center panel, then click on .
Select Yes, export the private key, click Next, and select PKCS #12:
Provide a password to protect the private key that goes with the certificate (a strong password is advised):

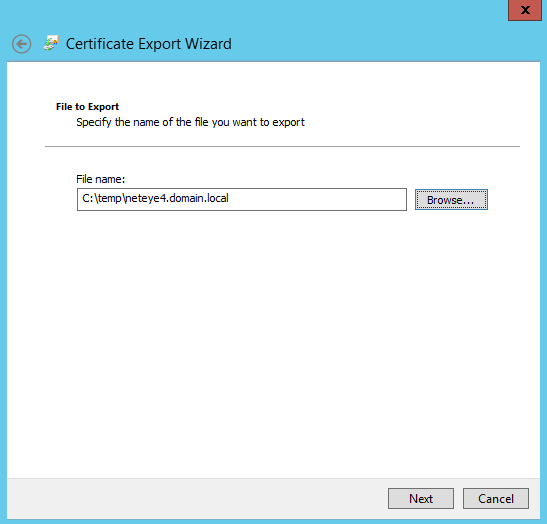
Then designate the path where the certificate should be stored:
Now click Next, and then Finish. You should see the message “The export was successful.”
Step 3: Export your CA Certificate(s) in Base64 format.
Note
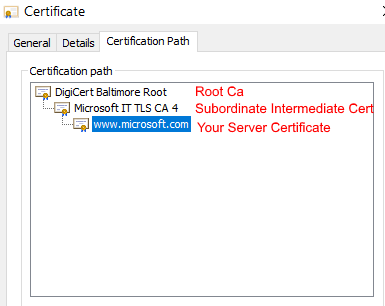
If the Certification Authority Infrastructure consists of multiple CAs (for example, Root CA > Subordinate Intermediate CA), you must export all of them and then combine them into a single Certificate.
Double click on your new certificate in the center panel. In the popup dialog, click on the Certification Path tab, which should display a Certificate Chain such as the one shown here:
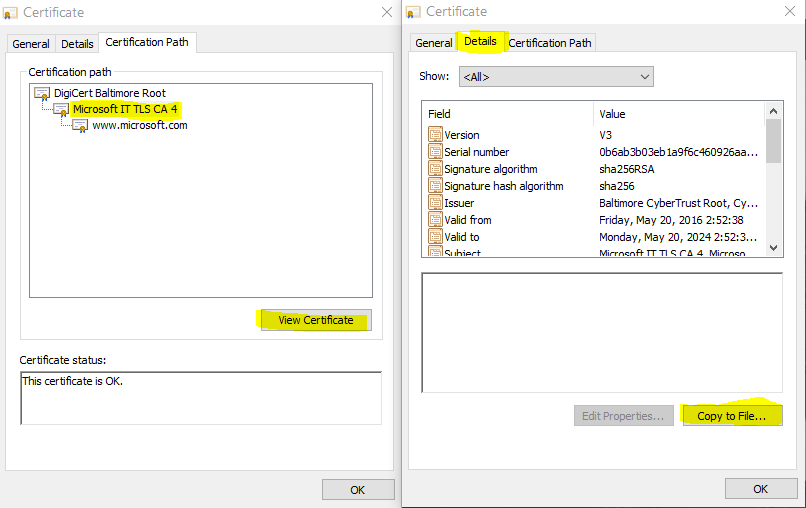
Select for instance the Intermediate Certificate, and then click on the View Certificate button. Then click on the Details > Copy to File:
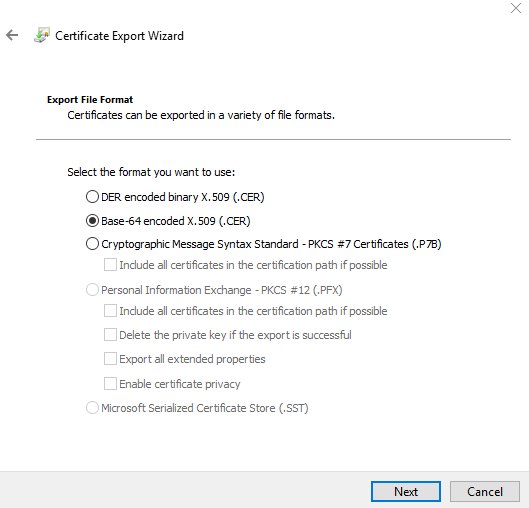
Instead of the “DER encoded binary” option, select “Base-64 encoded”:
In the next dialog, choose a path and filename to save the .CER file, then click Finish.
Repeat the procedure above for the Root CA instead of the intermediate certificate.
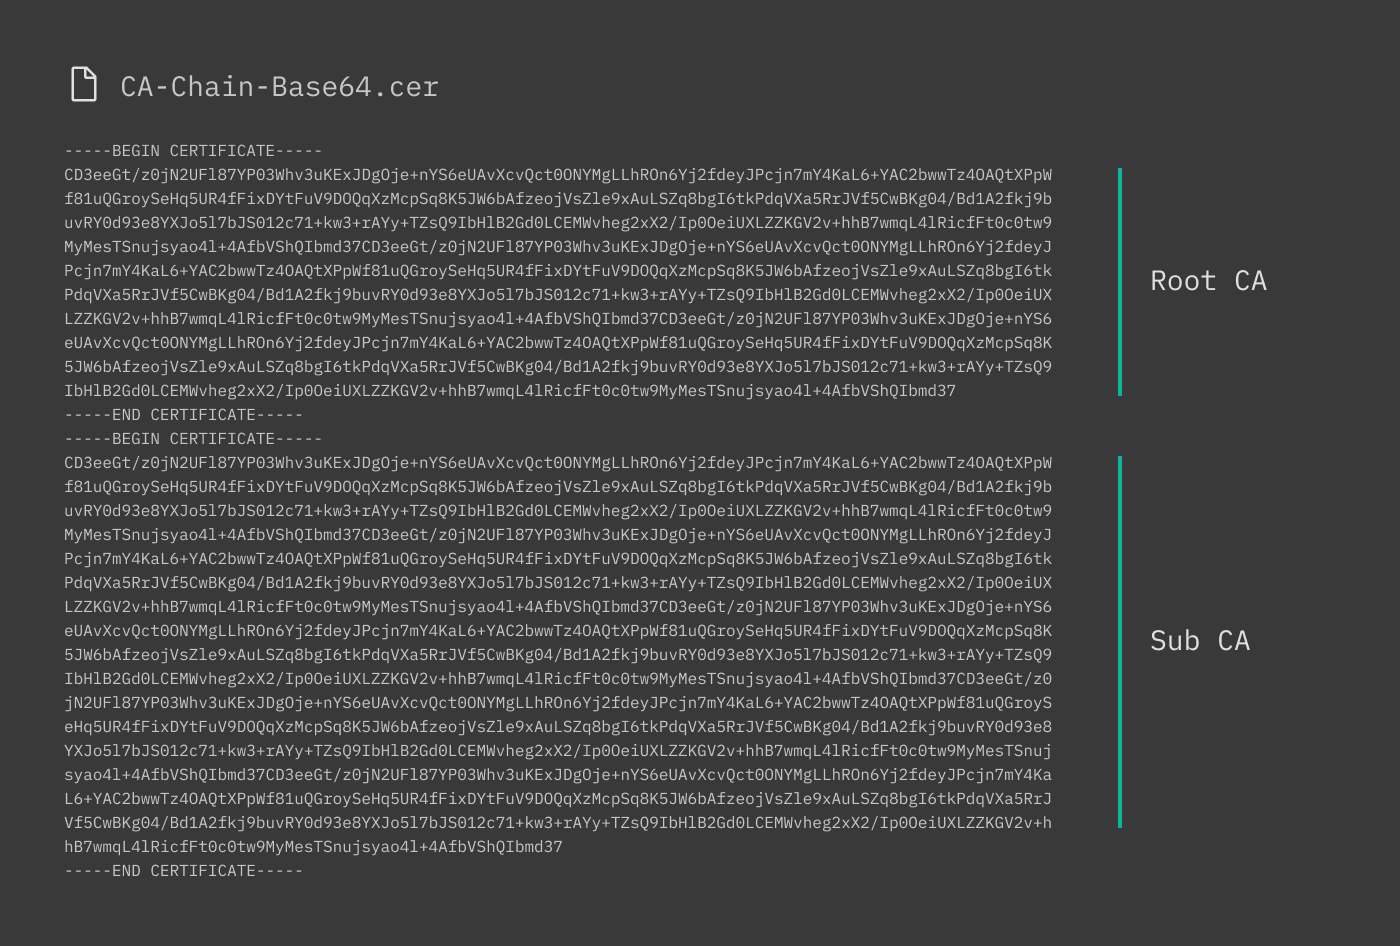
To create the certificate chain, open all of your saved CA certificates in a Text Editor and combine them into a single file, both respecting the proper order (Root/Parent before Subordinate/Child) and paying attention to not leave any blank lines between certificates as shown here:
Step 4: Copy the CA Chain certificate to the Linux server (NetEye 4) and adjust the Apache configuration:
Make a copy of the CA Chain certificate, rename and move both of them to the proper folder according to the settings in
/etc/httpd/conf.d/neteye-ssl.conffile:SSLCertificateChainFile /neteye/shared/httpd/conf/tls/certs/neteye_chain.crt SSLCACertificateFile /neteye/shared/httpd/conf/tls/certs/neteye_ca_bundle.crt
Step 5: Copy your PFX Server Certificate to the Linux server (NetEye 4), convert it, and adjust the Apache configuration:
Put the PFX certificate in a temporary directory, for example /tmp.
Extract the public part of the certificate. You will be asked for the Key Password, which is the one you entered when you exported your PFX from the Windows Machine:
# openssl pkcs12 -in {yourfile.pfx} -nokeys -out {certificate.crt}Extract the encrypted private key part of the certificate. You will be asked for the Key Password, which is the one you entered when you exported your PFX file from the Windows Machine. You will also be asked to enter a new Password for the newly generated private key (you can use the same password):
# openssl pkcs12 -in {yourfile.pfx} -nocerts -out {keyfile-encrypted.key}Now decrypt your private key:
# openssl rsa -in {keyfile-encrypted.key} -out {keyfile-decrypted.key}Rename your certificate and key and move them in the proper folder according to the settings in
/etc/httpd/conf.d/neteye-ssl.conffile:SSLCertificateFile /neteye/shared/httpd/conf/tls/certs/neteye_cert.crt SSLCertificateKeyFile /neteye/shared/httpd/conf/tls/private/neteye.key
Note
Both the certificate and key must be owned by root and only root must have full read and write access to the files. Also, certificate and key are located in shared directory. Therefore, in a cluster environment, they should be changed only on the node running the httpd resource.
Finally, restart Apache.
HTTPS Configuration
Beginning with version 4.2, NetEye has been configured to use HTTPS throughout, using a self-signed certificate based on Apache’s mod_ssl. This certificate is generated automatically during the NetEye install process.
However, it is recommended to create and install as soon as possible a new trusted certificate consisting of the self-signed certificate chained with a valid, external CA certificate.
The importance of using trusted certificates, is clear also from this example use case: if you use the Director’s Self-Service API to first connect to an external Icinga2 agent, the Kickstart initialization script may fail if it determines it cannot trust the self-signed certificate alone. While this restriction can be bypassed as an emergency measure, this is a highly insecure practice and is strongly discouraged.
The following steps will help you configure your NetEye installation to create and deploy a more secure certificate that can be trusted externally and/or in your domain. If you would prefer to create a certificate chain from within Windows, step by step instructions are available in the dedicated section.
Step 1: Obtain Your Signed Certificate from a Certificate Authority
The instructions below assume you already have a valid certificate from an external Certificate Authority (CA). Then for each server/machine you will need to:
Create a private key
Generate a certificate signing request (CSR)
Send or upload the private key and CSR to the CA
Retrieve the certificate signed by the CA
When NetEye is first installed, it configures the initial self-signed certificates in the following directories:
File |
Directory |
|---|---|
neteye_cert.crt |
/neteye/shared/httpd/conf/tls/certs/ |
neteye.key |
/neteye/shared/httpd/conf/tls/private/ |
neteye_chain.crt |
/neteye/shared/httpd/conf/tls/certs/ |
neteye_ca_bundle.crt |
/neteye/shared/httpd/conf/tls/certs/ |
neteye-ssl.conf |
/etc/httpd/conf.d/ |
Note
Certificate and key are located in shared directory. Therefore, in a cluster environment, they should be changed only on the node running the httpd resource.
Because the private key is so fundamentally important to your network’s security, you should strongly consider creating a new one. You can create the private key and the CSR file in the appropriate directory with a single command, after moving to the correct directory:
# cd /neteye/shared/httpd/conf/tls/private/
# openssl req -newkey rsa:4096 -nodes -keyout hostname.fqdn.key -out hostname.fqdn.csr
Generating a 4096 bit RSA private key
..................................................................................................++
..................................................++
writing new private key to 'hostname.fqdn.key'
-----
You are about to be asked to enter information that will be incorporated
into your certificate request.
What you are about to enter is what is called a Distinguished Name or a DN.
There are quite a few fields but you can leave some blank
For some fields there will be a default value,
If you enter '.', the field will be left blank.
-----
Country Name (2 letter code) [XX]:IT
State or Province Name (full name) []:BZ
Locality Name (eg, city) [Default City]:Bolzano
Organization Name (eg, company) [Default Company Ltd]:Company
Organizational Unit Name (eg, section) []:Monitoring
Common Name (eg, your name or your server's hostname) []:hostname.fqdn
Email Address []:mail@company.com
Please enter the following 'extra' attributes
to be sent with your certificate request
A challenge password []:
An optional company name []:
The hostname.fqdn.key file is your private key which should be kept secure and not given to anyone. The hostname.fqdn.csr file is what you should send to the Certificate Authority when requesting your SSL certificate (you may need to paste its contents into the web form of the CA).
Note
If you have a large number of systems to monitor, it makes sense to automate this process. For instance, you can keep multiple keys and CSRs manageable by using the host’s FQDN as part of the filename for both the private key and the CSR. And rather than manually answer the CSR questions one by one, you can create an external configuration file (usually called openssl.cnf) that is invoked with the -extfile parameter.
Relevant links:
Step 2: How to Create the Trusted Certificate
The certificate that the CA returns to you (let’s call it countersigned.crt) will be the (self-signed) certificate you sent them, countersigned with the CA’s key. You can then use this new trusted certificate in applications (e.g., browsers or the Icinga2 agent) that in turn trust the CA you used.
To be used with the Icinga2 agent, this certificate should be in PEM format. To check, you can look at the certificate file:
# cat countersigned.crt
-----BEGIN CERTIFICATE-----
MIID3jCCAsagAwIBAgICPnowDQYJKoZIhvcNAQELBQAwgaMxCzAJBgNVBAYTAi0t
...
-----END CERTIFICATE-----
If you do not see BEGIN CERTIFICATE, you will need to export the certificate to PEM format (you can use other tools besides openssl as long as they generate a certificate in PEM format):
# openssl x509 -in countersigned.crt -outform PEM -out countersigned.pem
Step 3: Install the Certificates on the Web Server
You must then rename your certificates and key and move them in the proper folder according to the settings in file /etc/httpd/conf.d/neteye-ssl.conf:
<VirtualHost _default_:443>
SSLEngine on
SSLCertificateFile /neteye/shared/httpd/conf/tls/certs/neteye_cert.crt
SSLCertificateKeyFile /neteye/shared/httpd/conf/tls/private/neteye.key
SSLCertificateChainFile /neteye/shared/httpd/conf/tls/certs/neteye_chain.crt
SSLCACertificateFile /neteye/shared/httpd/conf/tls/certs/neteye_ca_bundle.crt
</VirtualHost>
SSLCertificateFile: Your trusted certificate countersigned by the CA, from countersigned.crt (or countersigned.pem if you exported it in .pem format) to neteye_cert.crt
SSLCertificateKeyFile: Your private key, renamed from hostname.fqdn.key to neteye.key
SSLCertificateChainFile: Certificate chain of the server certificate. If you don’t have a chain you can copy the file neteye_cert.crt naming it neteye_chain.crt
SSLCACertificateFile: The CA’s public certificate named neteye_ca_bundle.crt
Note
Do not change setting in file /etc/httpd/conf.d/neteye-ssl.conf because they will be overwritten during update procedure possibly causing NetEye outages.
Step 4: Restart Apache
Finally, restart the HTTPD service so it reloads the configuration files above with the new trusted certificates. If you are on a single-node instance use:
# systemctl restart httpd.service
If you are on a cluster use:
# pcs resource restart httpd