Basics
In this section we present two important functionalities common to all NetEye setups: Quick navigation, a GUI feature that allows instant lookup across all the installed modules, and recurring jobs, a CLI feature that allow to set up period tasks on NetEye.
Quick navigation
Quick navigation is provided by the Lampo module, which is designed to allow you to quickly locate a wide variety of NetEye module items, including hosts, host groups, services, service groups, comments on monitored objects, maps, analytics dashboards and module sections. It helps you narrow down search results by presenting the most relevant actions and objects, even after just a few keystrokes.
To bring up Lampo, you can either press the “/” shortcut key (as long as you are not editing a text field or click on the “Quick navigation” action at the top of the screen.
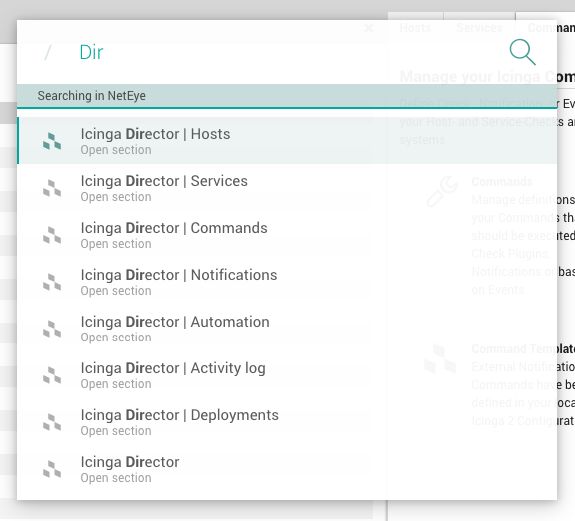
Once the search box appears, you can start typing (Fig. 3). Initial results will appear instantly, and will be updated as you continue typing. At any point when you see the desired search result in the box below, you can stop typing and click on that result to take you to the desired destination.

Fig. 3 The Lampo module-wide quick navigation interface.
To cancel or close Lampo, press “Escape”, or click outside the Lampo search box.
You can navigate the search box and results by using the keyboard, mouse or both. For instance, you can scroll through the result list by using the up/down arrow keys or mouse wheel. Both the “Enter” key and a left mouse click will select a search result, and you can autocomplete the search box by pressing the “Tab” key. Finally, you can type “?” to see some shortcuts to more easily use Lampo.
Content Shortcuts
The following table describes some pre-configured, targeted shortcuts that can make searching even faster.
Search Prefix |
Parameter |
|---|---|
service-config |
service name |
service-status |
hostname or IP |
servicegroup-config |
servicegroup name |
host-config |
hostname or IP |
host-status |
hostname or IP |
hostgroup-config |
hostgroup name |
geomap-config |
map name |
geomap-visualization |
map name |
map |
map name |
ito-analytics |
dashboard title |
eventhandler-[ruletype]-config |
Trap, Email, SMS or Syslog |
For instance, if you type the letters “etc” while Lampo is open, it will find the “Eventhandler Trap Configuration”, along with other results. But if you already know what you are looking for, you can instead type “e-t-c” and the configuration panel shortcut will be put at the top of the list.
Lampo Compatible Modules
As of today the Lampo search is provided for the following modules:
Analytics
Director
EventHandler
GeoMap
Monitoring
NagVis
SLM
Recurring Jobs
In NetEye, recurrent jobs which need to be executed repeatedly at specific times can be scheduled using Systemd Timers.
Similar to a cronjob, each Timer has a calendar
event
defining the points in time when it will be triggered. Each Timer also
has a related Systemd Service Unit which will be started
(systemctl start $UNIT) whenever the timer reaches its next
execution time.
The list of active Timers for the current node can be shown using
systemctl list-timers giving you an overview over active timers on
this node:
[root@neteye02 ~]# systemctl list-timers
NEXT                         LEFT     LAST                         PASSED   UNIT           ACTIVATES
Wed 2020-02-19 09:23:00 CET  46s left Wed 2020-02-19 09:22:00 CET  12s ago  myTimer.timer  myService.service
[...]
Note
In a cluster environment you will need to execute the command on each node, to get an overview over all timers of NetEye, as some of them are bound to specific services. Additionaly there can be local timers, with one active copy on each cluster node.
Self-signed root CA
The NetEye install process creates a self-signed root Certificate Authority in /root/security/. This CA is synchronized throughout the cluster.
The common CA is trusted automatically during installation with neteye_secure_install, leveraging the update-ca-trust script to update certificate authorities provided by the system. Once the CA is in place, each module on each cluster node can request its certificate which is then signed by the common CA.
By default, the NetEye CA is stored in /root/security/ and trust settings are set in /usr/share/pki/ca-trust-source/. That directory contains CA certificates and trust settings in the PEM file format, and these are interpreted as a default priority. This setting allows the administrator to override the CA certificate list. Of course, for correct trust behavior, the NetEye CA should not be overwritten.
Additional information on the behavior of the update-ca-trust script can be found in its manpage: update-ca-trust(8).
Certificates Storage
Each component that uses certificates, stores them in its conf
folder, under the directory certs.
For example, Elasticsearch stores the certificates in the path
/neteye/local/elasticsearch/conf/certs/
The certs folder contains the public certificates, while the private
keys are stored inside certs/private/.
For example, the public certificate of the Elasticsearch admin is stored in
/neteye/local/elasticsearch/conf/certs/admin.crt.pem, while its private key is stored in/neteye/local/elasticsearch/conf/certs/private/admin.key.pem
Some components export the certificates in PKCS 12 bundles (.pfx
files) inside the folder certs/private/. These bundles contain the
private key together with its corresponding certificate. If not
differently specified, the password to decrypt the pfx files is
blank (i.e. empty password).
For example, Tornado exports its certificate and private key to PKCS 12 format inside the file
/neteye/shared/tornado/conf/certs/private/tornado.pfx. This can be decrypted by using an empty password:openssl pkcs12 -in /neteye/shared/tornado/conf/certs/private/tornado.pfx -nodes -password pass:

