Nodes
Install an Alyvix Node
In order to start using Alyvix Service, first you have to install an Alyvix Node as recommended in the official Alyvix Service user guide.
Note
NetEye supports Alyvix Service version >= 2.5.0. Please make sure your Alyvix Node is up to date before proceeding with the installation.
As a part of the installation procedure, you will have to perform mandatory security configuration. Appropriate certificate, JWT and role mapping files you will need are provided in Alyvix Node Authentication.
After the installation has been completed, you can proceed to configuring the Alyvix Node in the Director Module.
Alyvix Network Architecture
Before you start configuring the Alyvix Node in NetEye, it is important that you decide on the type of your network architecture and the type of environment you would like to work in, i.e. single- or multi-tenant.
There are four types of Alyvix Nodes for you to choose from when configuring an Alyvix Node intended to run the service. Thus, it is important that you are familiar with the Architecture of Alyvix Nodes at the moment of carrying out Install an Alyvix Node step, so that you can already define which type of a Role Mappings is to be later applied at step Configure an Alyvix Node.
Note
In case you prefer to set up your infrustructure as a multi-tenant environment, you need to create one or multiple Tenants in addition to the Master Tenant, which serves as a default one. In order to do that, use the neteye tenant config create. For more information please see The neteye Command section.
For NetEye to be able to reach the Alyvix Service, port 443 is to be opened, while the Alyvix should reach NetEye through port 4222. For a deeper insight into the Network Architecture please refer to the diagrams in Architecture of Alyvix Nodes section.
Alyvix Node Authentication
NetEye and the Alyvix nodes need to communicate securely, thus HTTPS certificates must be installed and JWT authentication must be configured for each Alyvix node.
Certificates
Each Alyvix node needs to have HTTPS certificates installed to enable secure communication with NetEye.
We strongly recommend following the same procedure as for the installation of the certificates on NetEye itself. The HTTPS Configuration section explains the procedure in details.
Another, not recommended, way to install the certificates on the Alyvix nodes is to create the certificates via a script provided by NetEye. The script generates server certificates signed by the internal Root CA of NetEye, which will then be trusted only by your NetEye machines.
Warning
Installing the certificates via the NetEye script is not recommended and it is only intended as a temporary solution.
The script is located under /usr/share/neteye/scripts/security/generate_server_certs.sh
and it accepts the following positional parameters:
Distinguished name. Example /C=IT/ST=Bolzano/L=Bolzano/O=Global Security/OU=Neteye/CN=*.neteyelocal
Server DNS(s), separated by whitespaces, for which the certificate must be valid
IP(s), separated by whitespaces, for which the certificate must be valid
Filename with which the certificate will be saved on file system
[Optional] Output folder, which defines the location of the certificates (defaults to
./)
Example usage:
bash /usr/share/neteye/scripts/security/generate_server_certs.sh \
"/C=IT/ST=Bolzano/L=Bolzano/O=GlobalSecurity/OU=AlyvixNodes/CN=example03.lan" \
"example03.lan" 192.168.0.100 "example03" "/root/certs"
The generated certificates must be copied and renamed inside the Alyvix nodes according to the documentation. For the details on where to store the certificates on the Alyvix nodes, please consult the official Alyvix documentation.
JWT Authentication
When performing a request from NetEye to the Alyvix node, Alyvix needs a way to authenticate the request.
JSON Web Tokens (JWT) are used to authenticate the requests to the Alyvix nodes. JWT is an open industry standard defined in RFC 7519 that provides a compact and self-contained way for securely transmitting information between parties as a JSON object.
Every request to Alyvix will contain the JWT Authorization Header with the JWT
token retrieved from NetEye. The JWT is calculated using the RS512 algorithm
(see RFC 7518#section-3.3) and the
key pair, which is stored on the NetEye host under
/neteye/shared/icingaweb2/conf/modules/neteye/jwt-keys.
In order for Alyvix to verify the JWT token, copy the public key file
/neteye/shared/icingaweb2/conf/modules/neteye/jwt-keys/multipurpose-jwt.pub
inside each Alyvix node. For more information please refer to the
official Alyvix documentation.
Role Mappings
For Alyvix to correctly evaluate the permissions defined in the JWT and thus correctly authenticate the user of the JWT, the following mappings need to be copied inside each Alyvix node. For more information, please refer to the official Alyvix documentation. Please select the proper mapping based on the architecture of the Alyvix node to be configured.
Role mappings for Multitenant - Tenant Shared
{
  "role": {
      "admin" : [
        [
          "$.permissions[?(@ == '*')]"
        ]
      ],
      "editor": [
        [
          "$.permissions[?(@ == 'module/alyvix/*')]"
        ],
        [
          "$.permissions[?(@ == 'module/alyvix/edit')]"
        ]
      ],
      "viewer": [
        [
          "$.permissions[?(@ == 'module/alyvix')]"
        ]
      ]
  },
  "tenants": "$.restrictions.neteye_tenants"
}
Role mappings for Multitenant - Tenant Specific
Note
Please replace every occurrence of <tenant_name> in the mapping below
with the actual Tenant name before copying the mapping into the Alyvix nodes.
{
  "role": {
      "admin": [
        [
          "$.permissions[?(@ == '*')]"
        ],
        [
          "$.permissions[?(@ == 'module/alyvix/*')]",
          "$.restrictions.neteye_tenants[?(@ == '<tenant_name>')]"
        ]
      ],
      "editor": [
        [
          "$.permissions[?(@ == 'module/alyvix/edit')]",
          "$.restrictions.neteye_tenants[?(@ == '<tenant_name>')]"
        ]
      ],
      "viewer": [
        [
         "$.permissions[?(@ == 'module/alyvix')]",
         "$.restrictions.neteye_tenants[?(@ == '<tenant_name>')]"
        ]
      ]
  },
  "tenants": "$.restrictions.neteye_tenants"
}
Role mappings for Single Tenant - Direct to Master and for Single Tenant - Via Satellite
{
  "role": {
      "admin": [
        [
          "$.permissions[?(@ == '*')]"
        ],
        [
          "$.permissions[?(@ == 'module/alyvix/*')]",
          "$.restrictions.neteye_tenants[?(@ == 'master')]"
        ]
      ],
      "editor": [
        [
          "$.permissions[?(@ == 'module/alyvix/edit')]",
          "$.restrictions.neteye_tenants[?(@ == 'master')]"
        ]
      ],
      "viewer": [
        [
         "$.permissions[?(@ == 'module/alyvix')]",
         "$.restrictions.neteye_tenants[?(@ == 'master')]"
        ]
      ]
  },
  "tenants": "$.restrictions.neteye_tenants"
}
Configure an Alyvix Node
To begin monitoring an Alyvix node, the node must first be created in the Director Module as an Icinga Host, setting the Hostname and the Host address, see Fig. 144.
Moreover, select the preferred option in the Alyvix node field under the section. For more information regarding this setting, please refer to Architecture of Alyvix Nodes.
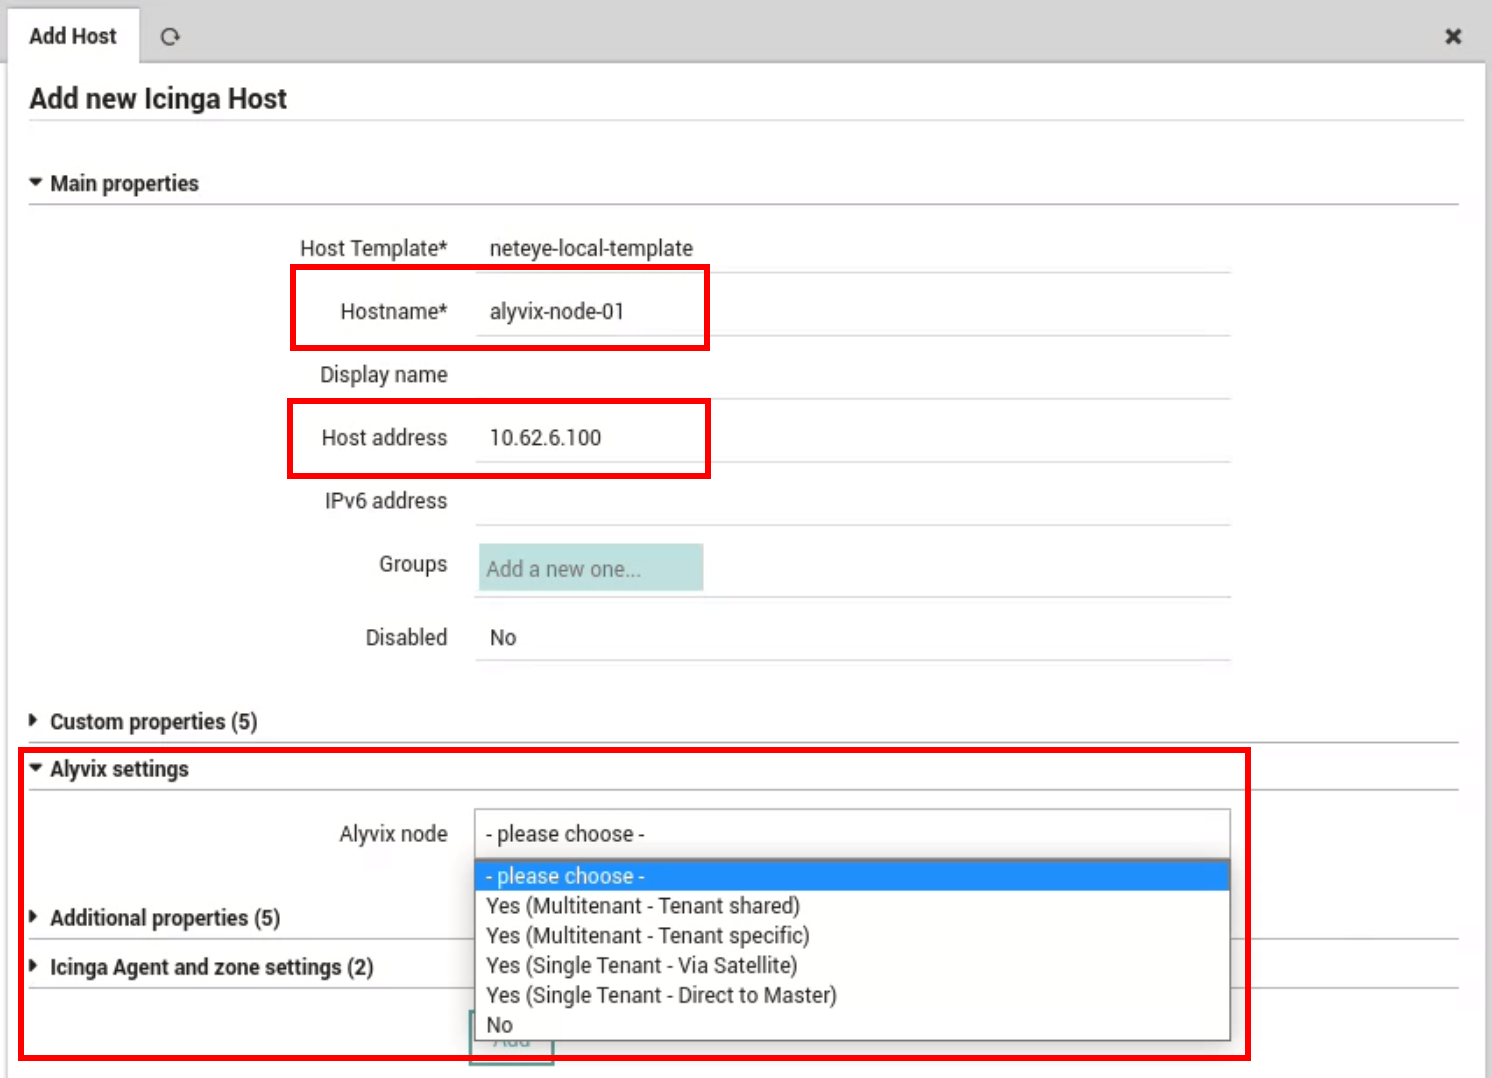
Fig. 144 Creation of a Host as an Alyvix node
Once all the settings have been configured, a deployment is needed. A newly created Node is to appear in the Nodes list, where you can manage its details, and in the Dashboard.
Visualize Nodes
The Alyvix node list can be visualized by visiting the page. The following fields are displayed for each node:
Name: The name of the Alyvix node set previously during the Host creation
- Tenant: The Tenant which the node belongs to. In case of a multitenant tenant-shared node, an icon
is displayed instead of the tenant names.
Sessions status: The list of sessions with the status. Possible status values are:
 Disconnected (Alyvix service is not able to connect to a specific session)
 Running (Alyvix service is connected to the session and the session is running)
 Waiting (Alyvix service is connected to the session and is ready to run assigned test cases)
 Stopped (Alyvix service is connected to the session and is not going to run test cases)
Health: The Host status monitored by NetEye. Next to the health status is a link that opens the host page in the monitoring module.
License: The status of the license can be: Disabled, Active, Expiring or Expired. See more on this in the License Tab.
Alyvix version: The version of Alyvix that is running on the node
Apart from the node details, a summary provides the following information:
Total nodes: The overall number of nodes
License alerts: The number of licenses that are not in the Active status
Health alerts: The number of nodes with the host status DOWN or UNREACHABLE
For an easier lookup of the relevant information related to the nodes and their execution, it is possible to search the table, by using the search bar, and sort the various columns, clicking their name.
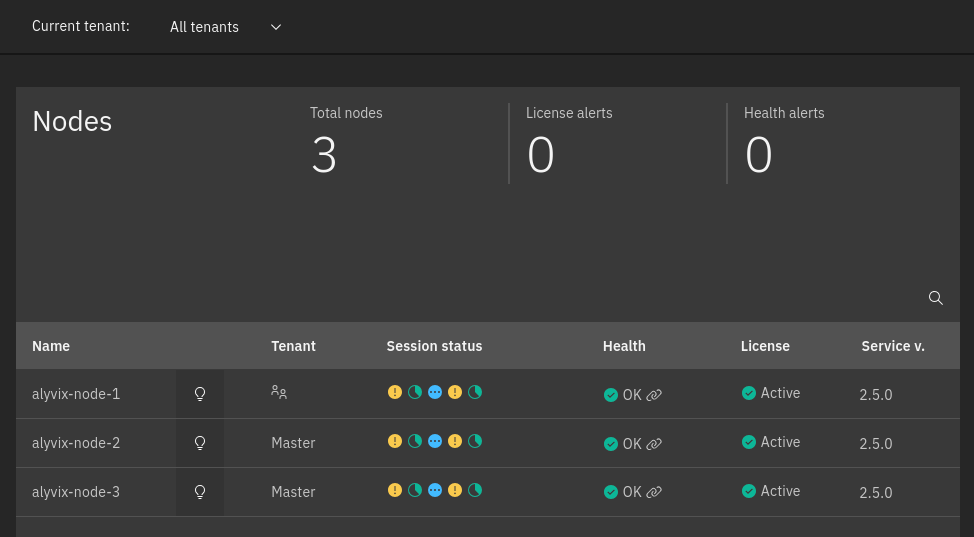
Fig. 145 The Alyvix nodes page
Manage Node Details
From the nodes page, available at , it is possible to click a particular node in the list to visualize its details. The details panel, shown in Fig. 146, is then rendered on the right-hand side of the table, displaying the details of the node, grouped in three different tabs.
Sessions Tab
A session on an Alyvix node is defined by the following properties:
Name: The domain and the session username separated by a
\. E.g.WP\MyUsernameTestcase waiting period: Number of minutes before scheduling the next test case
Workflow waiting period: Number of minutes before restarting the workflow
Display dimensions
Width: the width of the screen resolution in pixels
Height: the height of the screen resolution in pixels
Zoom: the zoom percentage
Tenant: the Tenant to which the session refers. This setting is only applicable to Multitenant - Tenant Shared nodes, and it is only used for the collection of the performance metrics. Furthermore, this setting can be edited only by NetEye users with the Super Admin role. For more information regarding the roles and permissions on the Alyvix module, please refer to the User Roles section.
Note
Currently no validation is applied to the Tenant name value when it’s being modified and in order for the changes to take effect, the neteye alyvix-node setup command should be used.
Password: the password used by the session in conjunction with the username
The Sessions tab, shown in Fig. 146, contains:
The New session button, which allows a user to create a new session
A counter, that reports how many licensed sessions have been consumed out of the available ones
The sessions table, in which each row represents a separate session defined on the node. Each session on the node can be edited or deleted by selecting the preferrable action in the More options menu for a particular session. When editing a session a user can:
Modify the sessions properties in the Settings tab. Please note that the Name cannot be changed
Manage the session workflow in the Workflow tab
A change in the session workflow status can also be applied to multiple sessions, by selecting the corresponding rows in the tab and applying the desired action.
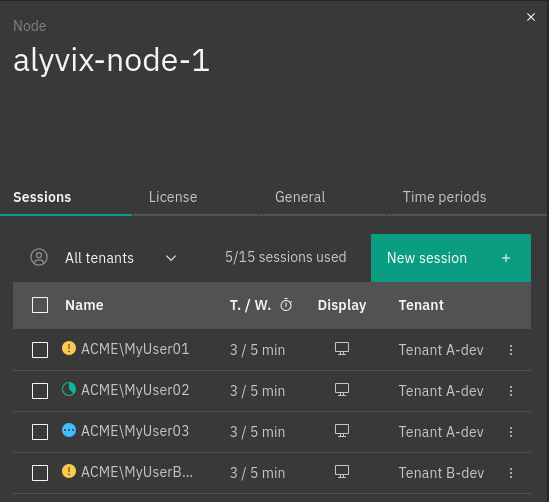
Fig. 146 The session list of a node
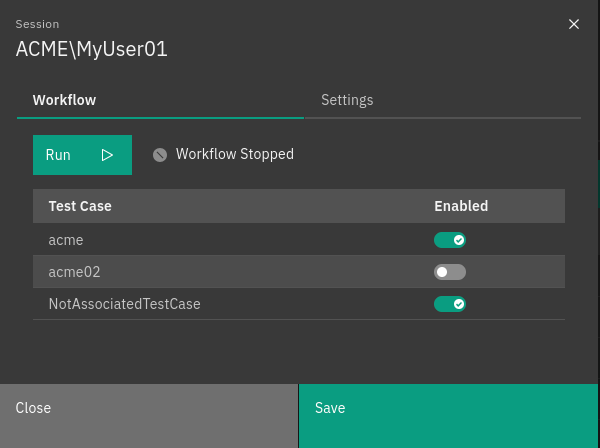
Fig. 147 Session workflow
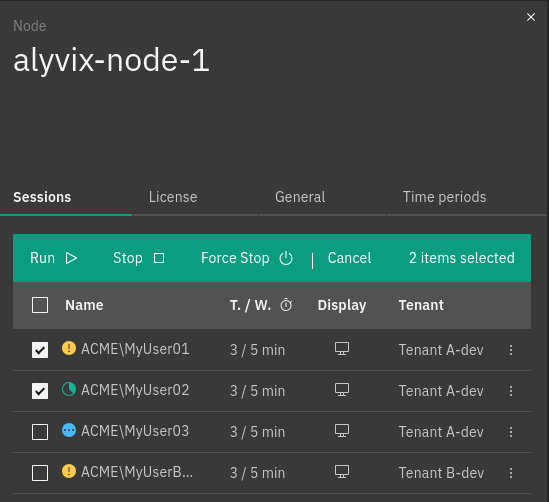
Fig. 148 Control multiple sessions workflow
License Tab
The Alyvix license should be activated individually for each node. The License tab contains the following details about the license of a particular node:
Status: the status of the license: Disabled, Active, Expiring or Expired
Subscription plan: the subscription plan currently in use
Expiration date: the expiration date of the license
Remaining days: days left before license expiration
Licensed sessions: the number of sessions available with the subscription plan currently in use
A new session can only be started with the license being in an Active or Expiring status.
Disabled license status is usually displayed for new users that have not activated their license yet. This can be done in the License tab. Download the request key in order to obtain a new activation key for the selected node. Once the request key has been downloaded, please contact your Alyvix provider in order to obtain the activation key file, which can then be uploaded directly in the node’s License tab.
One month prior to the end of the licensing period the license status is changed to Expiring. The licensing period is defined by the contract with the Alyvix Service provider and cannot be controlled from NetEye. In the case of an Expiring license please contact your Alyvix provider in order to extend your license and be able to seamlessly use Alyvix Module.
You can alternatively contact Alyvix team at info@alyvix.com for more information.
General Settings Tab
The General Settings tab reports the private key for the selected node and the retention period, in hours, for the successful test cases, failed test cases and for the service logs. Moreover, a toggle enables the capture of annotated screenshots also for successful test case runs. You can also edit settings in the General tab.
Time periods Tab
The Time periods tab reports the list of all time periods currently stored on the Alyvix Node.
In case a time period is not synced with its definition in the Director, one of the following two statuses will be reported:
 Modified (The time period is present in the Director, but its definition does not match the one of the Alyvix Node)
 Deleted (The time period was deleted from the Director but the associated Test Cases are still run based on it)
Furthermore, the Sync with NetEye button allows allows you to update the time periods present on the Alyvix Node based on their definition in the Director.
Note
In case of deleted time periods, a replacement time period should be specified, using the associated dropdown. If you choose to apply the default replacement Any (default), after the sync the Test Cases associated with it will be executed at all times.
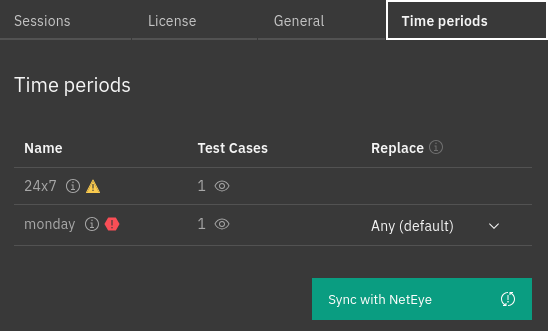
Fig. 149 The time periods stored on the Alyvix Node