Templates
Templates allow you to inherit properties from parent objects to their children, allowing you to add and change configurations for hundreds of monitored objects with a single click. In Icinga2, every monitored object must have at least one parent template. Thus before adding hosts and services, you must first create host templates and service templates, respectively.
Host Templates
To create a new host template, go to Icinga Director > Host objects > Host Templates. If you are starting with an empty installation, you will see a blank panel with actions labelled “back”, “Add” and “Tree”. Otherwise, you will also see the pre-installed NetEye host templates. You can click “Add” to create a new template as shown on the left side of Fig. 14. Each template will have its own row in the “Template Name” table, and you can use the “Tree” action to switch between Table (flat) and Tree (inheritance) views of the templates.
In an empty installation, the first template will automatically be the top-level host template. Otherwise you will see a “+” icon to the right of the template’s row that will allow you to create a monitored host that is an instance of that host template. The circular arrow icon instead will show you the history panel for that template and let you initiate deployment if desired.
Once you click “Add”, the host template panel will appear to the right. This panel can be used both to add a new template as well as modify an existing template. In the latter case, the green button at the bottom of the panel will change from “Add” to “Store”. At the top is a “Deploy” action if you prefer to immediately write out the template configuration, and a “Clone” action to create a copy of an already-created template.
To create a new host template, fill in the following fields (in general you can click on the title of a field to see instructions in a dialog at the bottom of the panel):
Main Properties:
Name: The name of the template which will appear in the template panel and can be referenced when defining hosts.
Imports: The parent template of the current template if it is not the root.
Groups: Here you can add a host group if you have defined one.
Check command: The default check command for the host as a whole (typically “hostalive” or “ping”)
Custom properties: If you have defined custom fields in the “Fields” tab at the top, they will appear here, otherwise this section will not be visible.
Check execution: Here you can define the parameters for when a command check is run.
Additional properties: Allows you to set URLs and an icon which will appear in the monitoring view.
Agent and zone settings: Allows you to choose whether the host uses agent-based monitoring or not. For more information, see the Monitoring Environment section, or the official documentation, which describes distributed monitoring setups in great detail.
Finally, click on “Add” or “Store” to store the template in working memory. You must deploy the template to effect any changes in your monitoring environment.
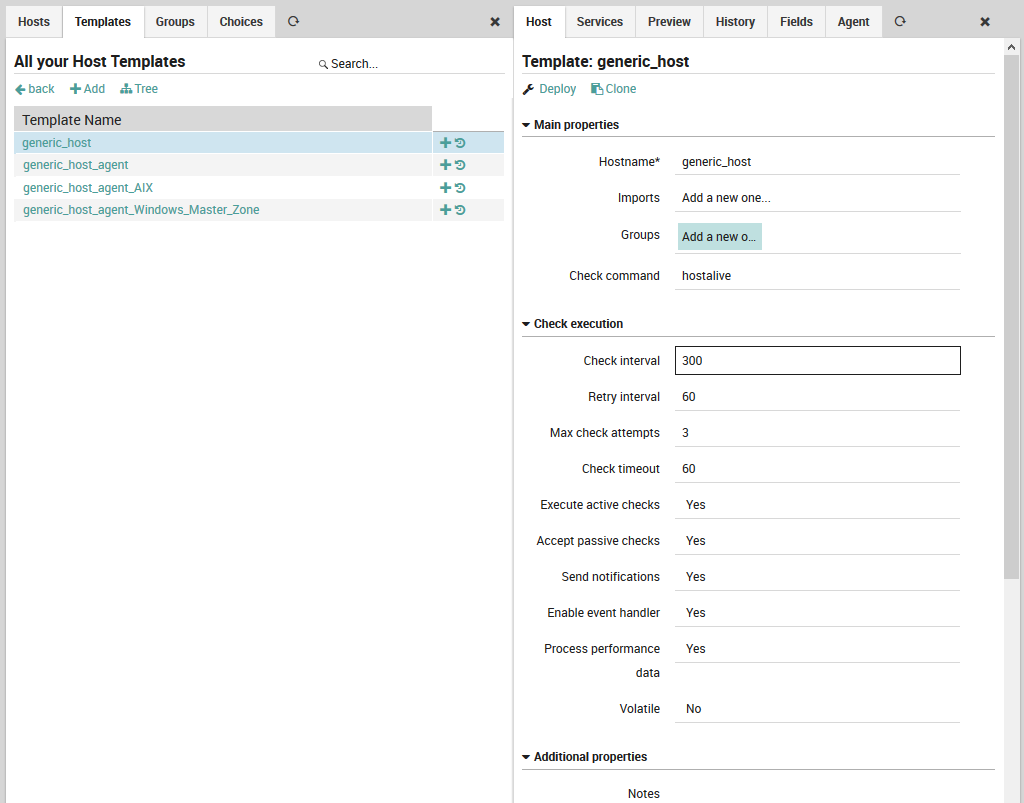
Fig. 14 Creating a host template
Host templates support inheritance, so we can arrange host templates in an hierarchy. The host templates panel at the left of Fig. 15 shows the Tree view of all host templates. In the example in the template panel to the right, the template for “generic_host_agent”, you can see that the “Imports” field has been set to “generic_host”, and in fact in the host templates panel generic_host_agent can be found under generic_host in the hierarchy.
Because this template inherits from another, the default values for checks are inherited from the values we filled in the generic_host template in Fig. 14. In addition, the source of inheritance is mentioned for each field. If we were to override some of the values in this template, and then create a third host template under this one, then the fields in the third host template would reflect whether they were inherited from generic_host or generic_host_template.
There is a subtle case, however, in which inheritance is not working and involves the host group. We clarify this with an example.
Suppose a ACME_host_template host template exists, which has defined
a group ACME-all-hosts. We define now a template
ACME-host-Bolzano-template which inherits ACME_host_template
(and therefore also group ACME-all-hosts). Finally, we create also a
Role which has a director/filter/hostgroups restriction on the
ACME-all-hosts host group.
At this point, against the expectation, users with non-administrative access and possessing this Role, when adding a new host using template ACME-host-Bolzano-template will not be able to see that the host they create are member of group ACME-all-hosts.
In order to let these hosts appear as part of the ACME-all-hosts host group, you need to assign the host group ACME-all-hosts directly to the ACME-host-Bolzano-template host template.

Fig. 15 Tree view of an intermediate host template
Beyond the Host tab, there are five additional tabs which are described briefly here:
Services: Add a service template or service set that will be inherited by (1) every host template under this template and (2) host defined by this template.
Preview: View the configuration as it will be written out for Icinga2.
History: See a list of past deployments of this template. By clicking on “modify”, you can see what changed from the previous version, see the complete previous version, and you can even restore the previous version.
Fields: Create custom fields (and variables for their values) that can be filled in on the host template under the section “Custom properties”. The custom field panel will let you name the field, force a field’s value to be set, and determine whether to show a field based on a user-definable condition.
Agent: Create a self-service API key that will allow Icinga2 to integrate Icinga agents installed on the monitored hosts.
Command Templates
To create a new command template, go to Icinga Director > Commands > Command Templates. The command templates panel (Fig. 16) is similar to that for hosts: it lists all command templates either in a table or tree view, and allows you to add a new command template.
Unlike hosts and services, you can create commands that do not inherit from a command template. However, command templates can be especially useful when you need to share a common set of parameters across many similar command definitions. Also unlike hosts and services, you can inherit one command check from another command check without every creating a command template.
There is also a third category of commands called “External Commands”, which is a library of pre-defined commands not created in Director, and thus not modifiable (although you can add new parameters). External commands include ping, http and mysql.
Clicking on “Add” brings up the command template creation panel on the right. As with host templates, left-clicking on a field name will display a brief description at the bottom of the screen, the green “Add” or “Store” button at the bottom of the panel will change the configuration in memory, the “Deploy” action lets you immediately write out the template configuration, and the “Clone” action will create a copy of an existing template.
The following fields are found in the command template creation panel (Fig. 16):
Command type: Choose a particular command type. These are described in the official Icinga2 documentation.
Plugin Commands: Plugin check command, Notification plugin command, and Event plugin command.
Internal Commands: Icinga check command, Icinga cluster check command, Icinga cluster zone check command, Ido check command, Random check command, and Crl check command.
Command name: Here you can define the name you prefer for the command template.
Imports: Choose a command template to inherit from (leave this blank to create a top-level template).
Command: The command to be executed, along with an optional file path.
Timeout: An optional timeout.
Disabled: This allows you to disable the given check command simultaneously for all hosts implementing this command template.
Zone settings: Select the appropriate cluster zone. For small monitoring setups, this value should be “master”.
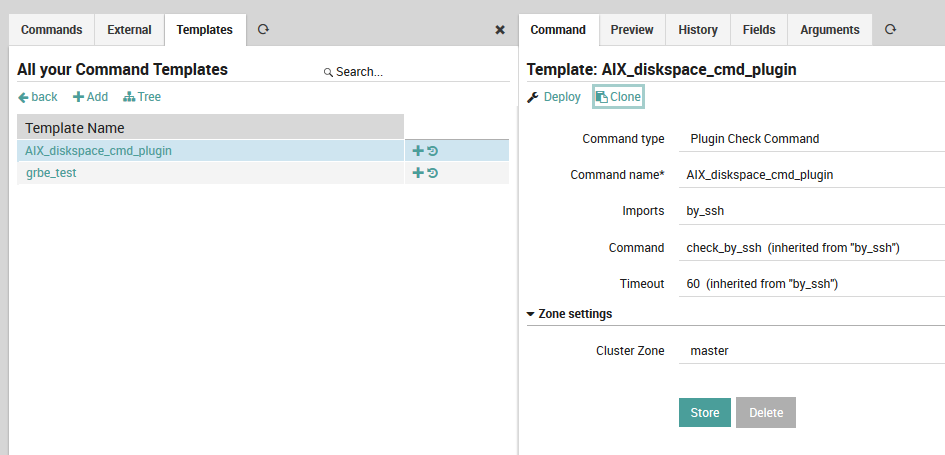
Fig. 16 Adding a new command template
Like the host template panel, here there are additional tabs for Preview, History, and Fields. There is also an Arguments tab (Fig. 17) to allow you to customize the arguments for a particular command. You must create a new command arguments configuration for each argument (using pre-defined command templates can thus save you a significant amount of time).
The most important fields are (click on any field title to see its description at the bottom of the panel):
Name: The name of the argument as it will appear in the command, e.g.
--hostname.Value type: Use type String for standard variables like
$host$.Value: A numeric value, variable, or pre-defined function.
Position: The position of this argument relative to other arguments, expressed as an integer.
More information can be found at the official Icinga2 documentation.
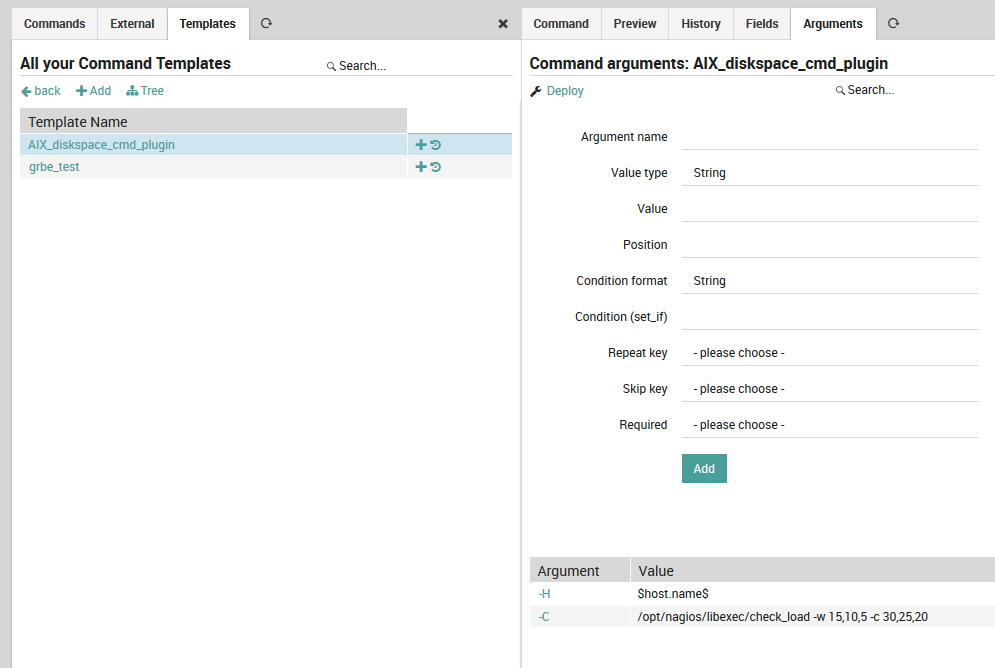
Fig. 17 Adding arguments to a command
Service Templates
To create a new service template, go to Icinga Director > Monitored Services > Service Templates. The services templates panel (Fig. 18) is similar to that for hosts and commands: it lists all service templates either in a table or tree view, and allows you to add a new service template. As for the other templates, clicking the “+” icon at the right of the row will display a panel to add a monitored service as an instance of the corresponding service template, and the circular arrow action will show you that service template’s history panel (activity log).
The new service template panel (Fig. 18) asks you to fill in the following fields:
Name: The name of this service template.
Imports: Specify the parent service template, if one is desired.
Check command: A check to run if it is not overridden by the check for a more specific template or service object, typically from the Icinga Template Library
Run on agent: Specifies whether the check is active or passive.

Fig. 18 Creating a service template
As Fig. 18 shows, the check commands on lower-level service templates and monitored services are typically much more detailed. Here, a custom field holds the command to be executed over an SSH connection to a host running AIX.
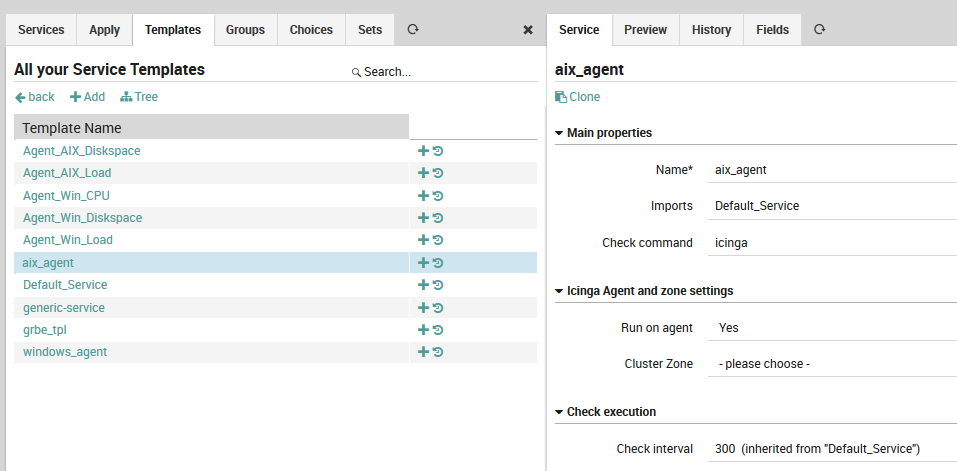
Fig. 19 A low-level service template.
Templates to support Multi-Tenancy
Data security is a major concern in multi-tenancy environments, where sensitive information used in the monitoring configuration of one tenant must not be visible to other tenants after a deployment.
This kind of isolation cannot be solved by the director-global zones because they are not adequate for separation of sensitive information, due to the fact that their contents are distributed among all master, satellites, and agent nodes. Multi-tenancy environments must implement another strategy which is to create a host template for each zone owned by the tenant.
With this strategy, the host template data will be sealed inside the only zone owned by the tenant and will not be visible to other tenants.
Please refer to the How To section that explains how to create a template for each zone to support the multi-tenancy.
Template Configuration
To create host template to support multi-tenancy, please go to the
, click on the “+”
icon and fill the required fields along with the Cluster Zone information which
should be an Icinga Zone belongs to a tenant:
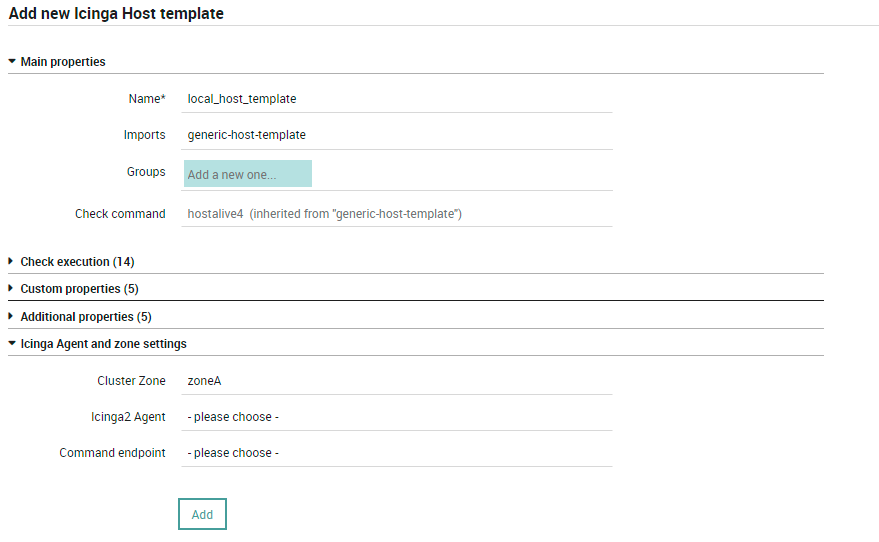
Fig. 20 Creating a host template with Cluster Zone
Finally, click on “Add” to store the template in working memory. You must deploy the template to push the changes in your monitoring environment.
Warning
No sensitive data must be stored on service templates. Please use the host templates for this purpose.
When there is more than one Icinga Zone for a single tenant, you will need to create duplicate
host templates, which are identical except for the Cluster Zone value.
Let’s understand it with an example:
Suppose in a multi-tenancy environment, one of the tenant (i.e., tenantA) has 3
satellites Sat_CloudA, Sat_CloudAA and Sat_Internal and they are in the following
zones:
Zone
cloud=Sat_CloudAandSat_CloudAAZone
local=Sat_Internal
Now, let’s assume they all are checking the same service which requires the same credentials.
In that case, you need 2 identical host templates i.e., cloud-template and local-template
except for Cluster Zone value which will be cloud for cloud-template and
local for local-template.
This additinal configuration is required, because there is no way for the director to deploy a
host template that contains sensitive information in both zones (cloud and local) while
maintaining data secrecy.
Note
You don’t have to touch the service templates since they must not contain sensitive data.
Working with Apply for rules - tcp ports example
This example wants to show you how to make use of Apply For rule for
services.
First you need to define a tcp_ports data field of type Array
assigned to a Host Template. Refer to Working with fields section to setup a data field. You also
need to define a tcp_port data field of type String, we will
associate it to a Service Template later.
Then, please go to the Dashboard and choose the
Monitored services dashlet:
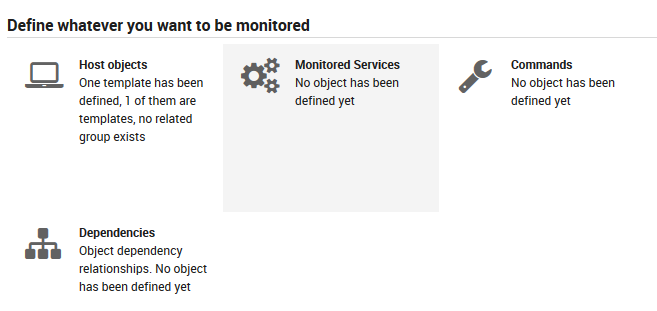
Fig. 21 Dashboard - Monitored services
Then create a new Service template with check command tcp:

Fig. 22 Define service template - tcp
Then associate the data field tcp_port to this Service template:
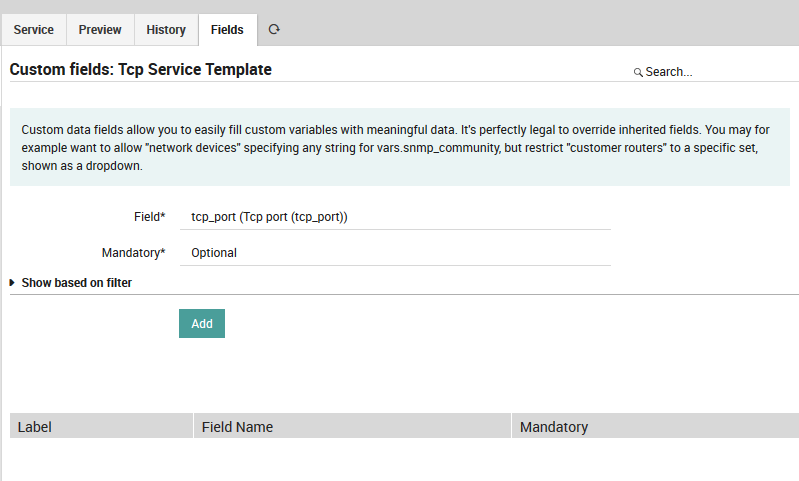
Fig. 23 Associate field to service template - tcp_port
Then create a new apply-rule for the Service template:
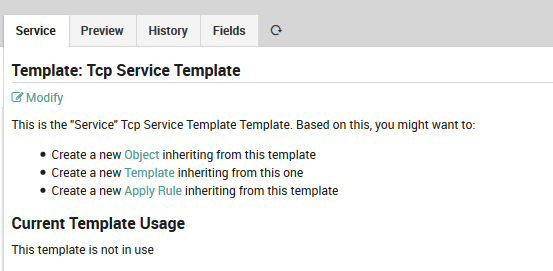
Fig. 24 Define apply rule
Now define the Apply For property, select the previously defined
field tcp_ports associated to the host template. Apply For rule
define a variable config that can be used as $config$, it
corresponds to the item of the array it will iterate on.
Set the Tcp port property to $config$:
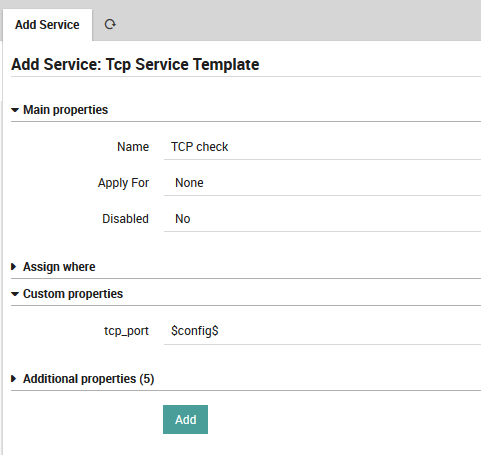
Fig. 25 Add field to template
(Side note: if you can’t see your tcp_ports property in
Apply For dropdown, try to create one host with a non-empty
tcp_ports value.)
That’s it, now all your hosts defining a tcp_ports variable will be
assigned the Tcp Check service.