Import Monitored Objects
Automated Import
Automatically importing hosts, users and groups of users can greatly speed up the process of setting up your monitoring environment if the resources are already defined in an external source such as an application with export capability (e.g., vSphere, LDAP) or an accessible, structured file (e.g., a CSV file). You can view the Icinga2 documentation on importing and synchronizing.
The following import capabilities (source types) are part of NetEye Core:
CoreApi: Import from the Icinga2 API
Sql: Import rows from a structured database
REST API: Import rows from a REST API at an external URL
LDAP: Import from directories like Active Directory
Two other import source types are optional modules that can be enabled or disabled from the Configuration > Modules page:
Import from files (fileshipper): Import from plain-text file formats like CSV
VMware: Import hosts/VMs from VMware/vSphere
You can import objects such as hosts or users (for notifications) by selecting the appropriate field for import. For example in LDAP for the field “Object class” you can select “computer”, “user” or “user group”.
The import process retrieves information from the external data source, but by itself it will not permanently change existing objects in NetEye such as hosts or users. To do this, you must also invoke a separate Synchronization Rule to integrate the imported data into the existing monitoring configuration. This integration could either be adding an entirely new host, or just updating a field like the IP address.
For each synchronization rule you must decide how every property should map from the import source field to your field in Neteye (e.g., from dnshostname to host_name). You can also define different synchronization rules on the same import method so that you can synchronize different properties at different times.
To trigger either the import or synchronization tasks, you must press the corresponding button on their panels. Neteye also allows you to schedule background tasks (Jobs) for import and synchronization. You can thus create regular schedules for importing hosts from external sources, for instance importing VMs from vSphere every morning at 7:00AM, then synchronizing them with existing hosts at 7:30AM. As with immediate import and synchronization, you must define a separate job for each task.
To begin importing hosts into NetEye, select Director > Import data sources as in Fig. 37.
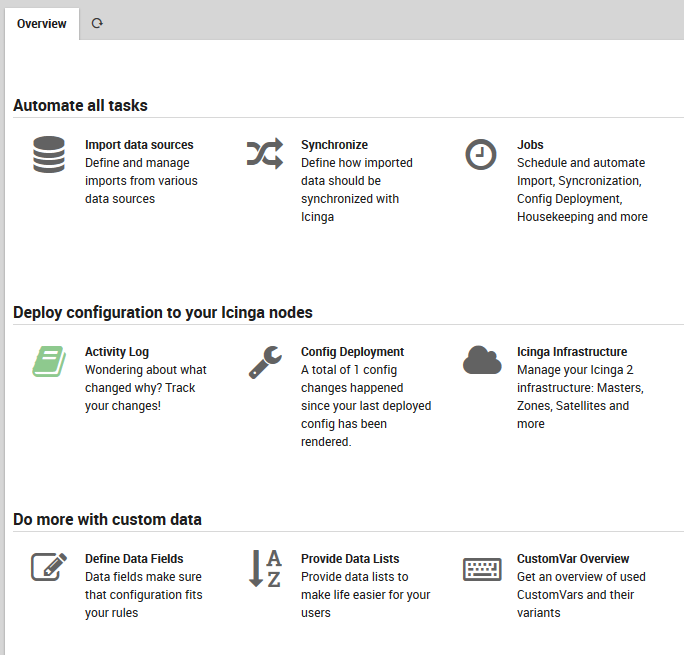
Fig. 37 The Automation menu section within Director.
The Import Source
The “Import source” panel containing all defined Imports will appear. Click on the “Add” action to see the “Add import source” form (Figure 2). Enter a name that will be associated with this configuration in the Import Source panel, add a brief description, and choose one of the source types described above. The links above will take you to the expanded description for each source type.
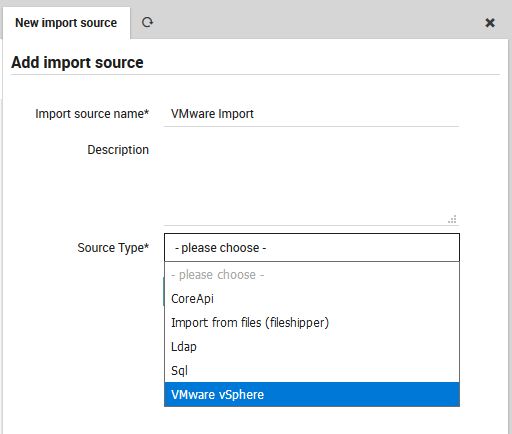
Fig. 38 Adding a new import configuration for VMware/vSphere.
Once you have finished filling in the form, press the “Add” button to validate the new import source configuration. If successful, you should see the new import source added as a row to the “Import source” panel. If you click on the new entry, you will see the additional tabs and buttons in Fig. 39 with the following effects:
Check for changes: This button checks to see whether an import is necessary, i.e. whether anything new would be added.
Trigger Import Run: Make the importable data ready for synchronization.
Modify: This panel allows you to edit the original parameters of this import source.
Modifiers: Add or edit the property modifiers, described in the section below.
History: View the date and number of entries of previous import runs.
Preview: See a preview of the hosts or users that will be imported, along with the effects of any property modifiers on imported values.
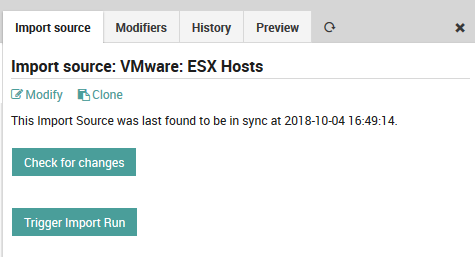
Fig. 39 Import source panels
Figure 3: Additional tabbed panels and actions for the newly defined import source.
Property Modifiers
Properties are the named fields that should be fetched for each object (row) from the data source. One field (column) must be designated as the key indexing column (key column name) for that data source, and its values (e.g., host names) must be unique, as they are matched against each other during the synchronization process to determine whether an incoming object already exists in NetEye. For instance, if you are importing hosts, the key indexing column should contain fully qualified domain names. If these values are not unique, the import will fail.
From the form you can select among these options:
Property: The name of a field in the original import source that you want to modify.
Target Property: If you put a new field name here, the modified value will go into this new field, while the original value will remain in the original property field. Otherwise, the property field will be mapped to itself.
Description: A description that will appear in the property table below the form.
Modifier: The property modifier that will be used to change the values. Once you have created and applied property modifiers, the preview panel will show you several example rows so that you can check that your modifiers work as you intended. Fig. 40 shows an example modifier that sets the imported user accounts to not expire.
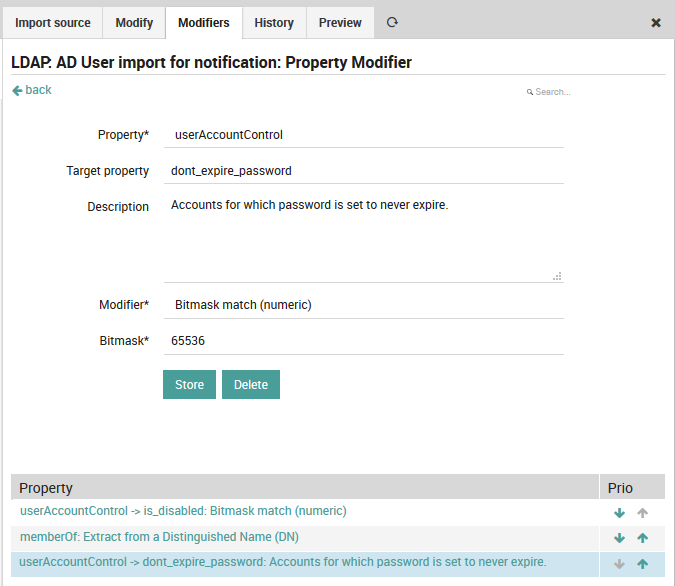
Fig. 40 A property modifier to set imported user accounts as having no expiration.
These modifiers can be selected in the Modifiers drop down box as in Fig. 41. Some of the more common modifiers are:
Modifier |
Source (Property) |
Target |
Explanatio n/Example |
|---|---|---|---|
Convert a latin1 string to utf8 |
guest.guest State |
isRunning |
Change the text encoding |
Get host by name (DNS lookup) |
name |
address |
Find the IP address automatica lly |
Lowercase |
dnshostname |
(none) |
Convert upper case letters to lower |
Regular expression based replacement |
state |
(none) |
/prod.*/i |
Bitmask match (numeric) |
userAccount Control |
is_ad_cont roller |
8192: SERVER_TRU ST_ACCOUNT |
Note
For a description of Active Directory Bitmasks, please see this Microsoft documentation.
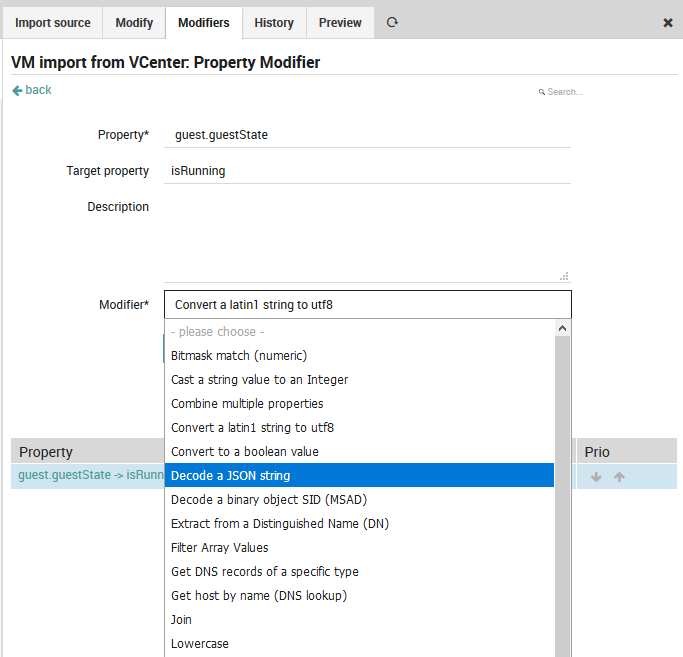
Fig. 41 Available property modifiers
Once you have created the new property modifier, it will appear under the “Property” list at the bottom of the Modifiers panel (see Fig. 40).
Note
Here you can also order the property modifiers. Every modifier that can be applied to its property will be applied, so if you have multiple modifiers for a single property then be aware that they will be applied in the order shown in the list. For instance, if you add two regex rules, the second (lower) rule will be applied to the results of the first (higher).
Synchronization Rules
When rows of data are being imported, it is possible that the new objects created from those rows will overlap with existing objects already being monitored. In these cases, NetEye will make use of Synchronization Rules to determine what to do with each object. You can choose from among the following three synchronization strategies, known as the Update Policy:
Merge: Integrate the fields one by one, where non-empty fields being imported win out over existing fields.
Replace: Accept the new, imported object over the existing one.
Ignore: Keep the existing object and do not import the new one.
In addition, you can combine any of the above with the option to Purge existing objects of the same Object Type as you are importing if they cannot be found in the import source.
Each synchronization rule should state how every property should map from the import source field to your field in Neteye (e.g., dnshostname -> host_name).
To begin, go to Director > Synchronize from the main menu and press the green “Add” action in the Sync rule panel in Fig. 42.
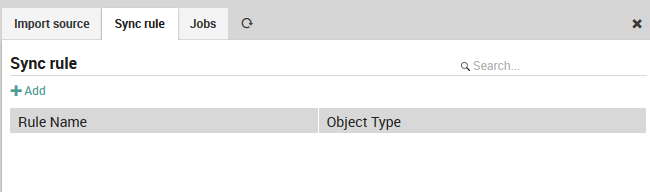
Fig. 42 The Sync Rule panel showing existing synchronization rules.
Now enter the desired information as in Fig. 43, including the name for this sync rule that will distinguish it from others, a longer description, the Object type for the objects that will be synchronized, an Update Policy from the list above, whether to Purge existing objects, and a Filtering Expression. This expression allows you to restrict the imported objects that will be synchronized based on a logical condition. The official Icinga2 documentation lists all operators that can be used to create a filter expression.
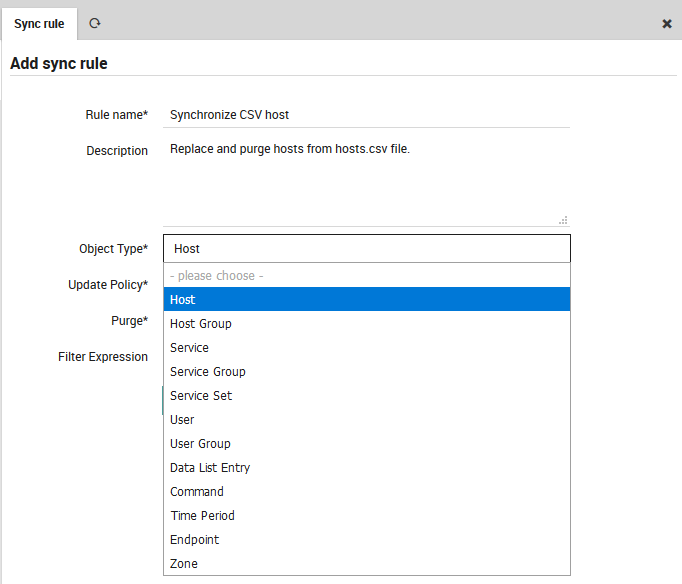
Fig. 43 Choosing the Object Type for a synchronization rule.
Now press the “Add” action. You will be taken to the Modify panel of the synchronization rule, which will allow you to change any parameters should you wish to. You should also see an orange banner (Fig. 44) that reminds you to define at least one Sync Property before the synchronization rule will be usable.

Fig. 44 Adding a new sync rule
Figure 8: Successfully adding a new synchronization rule.
The color of the banner is related to the status icon in the “Sync rule” panel:
Icon |
Banner/Meaning |
|---|---|
Black question mark |
This Sync Rule has never been run before. |
Orange cycling arrows |
There are changes waiting since the last time you ran this rule. |
Green check |
This Sync Rule was correctly run at the given date. |
Red “X” |
This Sync Rule resulted in an error at the given date. |
Synchronization Rule Properties
A Sync Property is a mapping from a field in the input source to a field of a NetEye object. Separating the mapping from the sync rule definition allows you to reuse mappings across multiple import types.
To add a sync property, click on the “Properties” tab (Fig. 45) and then on the “Add sync property rule” action. (Existing sync properties are shown in a table at the bottom of this panel, and you can edit or delete them by clicking on their row in the table.)
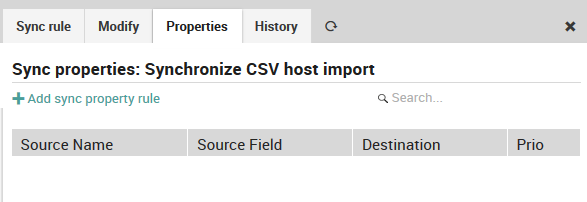
Fig. 45 Adding a first sync property.
Fig. 46 shows the first step, adding a Source Name, which is one of the Import sources you defined in Fig. 38. If you have multiple sources, then this drop down box will be divided automatically into those sources that have been used in a synchronization rule versus those that haven’t.
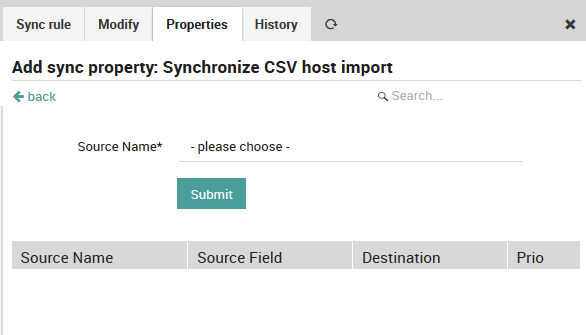
Fig. 46 Setting the Import Source
Next, choose the destination field (Fig. 47), which corresponds to the field in NetEye where imported values will be stored. Destination fields are the pre-defined special properties or object properties of existing NetEye objects. Note that some destination field values like custom variables will require you to fill in additional fields in the form.
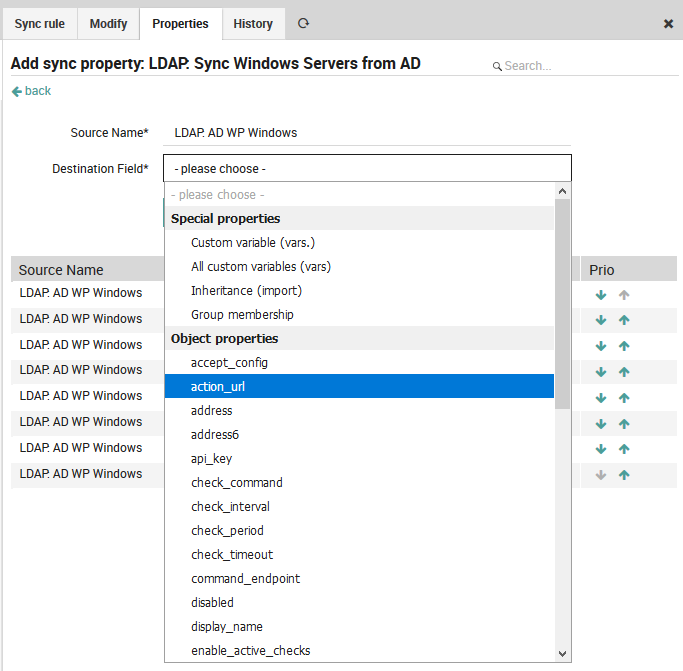
Fig. 47 Setting the Destination Field
If you cannot find the appropriate destination field to map to, consider creating a custom field in the relevant Host Template.
Finally, choose the source column (Fig. 48), which is the list of fields found in the input source.
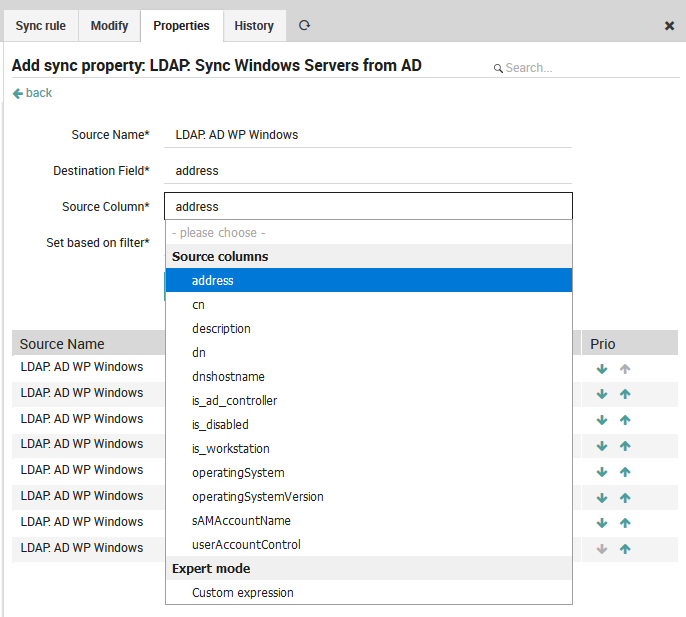
Fig. 48 Setting the Source Column
Note
Remember that the key column name is used as the ID during the matching phase. The automatic sync rule does not allow you to directly add any custom expressions to it.
Once you have finished entering the sync properties for a synchronization rule, you can return to the “Sync rule” tab to begin the synchronization process. As in Fig. 49, this panel will give you details of the last time the synchronization rule was run, and allow you to both check whether a new synchronization will result in any changes, as well as to actually start the import by triggering the synchronization rule manually.

Fig. 49 Preparing to trigger synchronization with our new rule.
Jobs
Both Import Source and Sync Rules have buttons (Fig. 39) that will let you perform import and synchronization at any moment. In many cases, however, it is better to schedule regular importation, i.e., to automate the process. In this case you should create a Job that automatically runs both import and synchronization at set intervals.
The “Jobs” panel is available from Director > Jobs. Clicking on the “Add” action will take you to the “Add a new Job” panel (Fig. 50) Here you will see four types of jobs, only two of which relate to importation and synchronization:
Config: Generate and eventually deploy an Icinga2 configuration.
Housekeeping: Cleans up Director’s database.
Import: Create a regularly scheduled import run.
Sync: Create a regularly scheduled synchronization run.
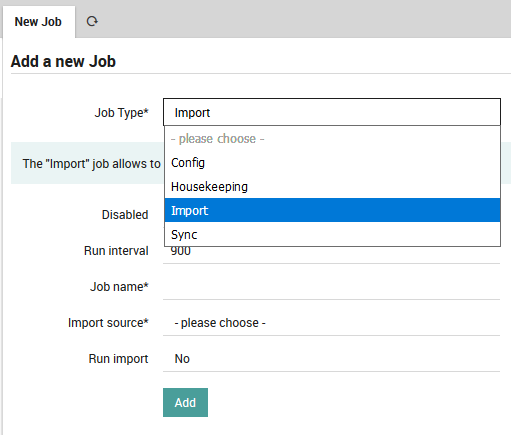
Fig. 50 Choosing the type of job
Select either the Import or Sync type. The following fields are common to both:
Disabled: Temporarily disable this job so you don’t have to delete it.
Run interval: The number of seconds until this job is run again.
Job name: The title of this job which will be displayed in the “Jobs” panel.
If you choose Import, you will see these additional fields:
Import source: The import to run, including the option to run all imports at once.
Run import: Whether to apply the results of the import (Yes), or just see the results (No).
If instead you choose Sync, you will see these other fields:
Synchronization rule: The sync rule to run, including the option to run all sync rules at once.
Apply changes: Whether to apply the results to your configuration (Yes), or just see the results (No).
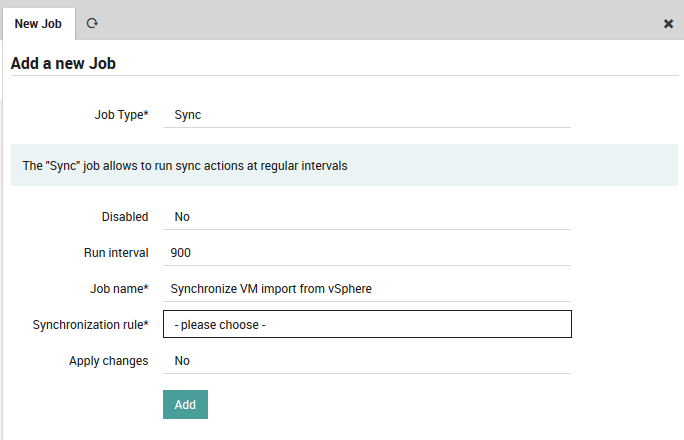
Fig. 51 Filling in the values for a sync job
Once you press the green “Add” button, you will see the “Job” panel which will summarize the recent activity of that job, and the “Config” panel, which will let you change your job parameters.
LDAP/AD Import Source configuration
The LDAP/AD interface allows you to import hosts and users directly from a directory configured for the Lightweight Directory Access Protocol, such as Active Directory.
The documentation below assumes that you are already familiar with importing and synchronization in Director.
Before creating an LDAP import source, you will need to configure a Resource representing the connection to the LDAP server. Resources have multiple purposes:
Import of LDAP groups
Import of hosts
Import of users for notifications
A resource is created once for each external data source, and then reused for each functionality it has. Some resource types are:
Local database / file
LDAP
An SSH identity
In general, you will need to set up a resource for import when you need to know its access methods in order to connect to it. For LDAP, you will need the host, port, protocol, user name, password, and base DN. To create a resource for your LDAP server, go to Configuration > Application > Resources as shown in Fig. 52.

Fig. 52 Adding LDAP server as a resource.
Select the “Create a New Resource” action, which will display the “New Resource” panel. Enter the values for your organization (an example is shown in Fig. 53), then validate and save the configuration with the buttons below the form. Your new resource should now appear in the list at the left.

Fig. 53 Configuring the vCenter connection details.
To create a new LDAP import source using the new resource, go to Director > Import data sources, click on the “Add” action, then enter a name and description for this import source. For “Source Type”, choose the “Ldap” option.
As soon as you’ve chosen the Source Type, the form will expand (Fig. 54), asking you for more details. Specify values for:
The object key (key column name)
The resource you created above
The DC and an optional Organizational Unit from where to fetch the objects
The type of object to create in NetEye (typically “computer”, “user” or “group”)
An LDAP filter where you can restrict the results, for instance: * To exclude non-computer types * To exclude disabled elements * With a RegEx to filter for specific DNS host names
A list of all LDAP fields to import in the “Properties” box, with each field name separated by a comma
Fig. 54 shows an example LDAP import configuration. Finally, press the “Add” button.
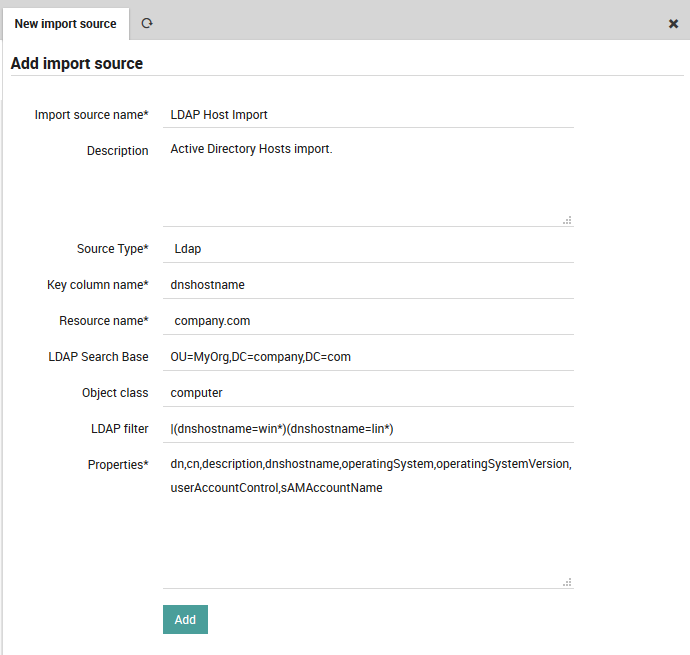
Fig. 54 Configuring the LDAP import configuration details.
Your new import source should now appear in the list to the left, and you can now perform all of the actions associated with importation as described in the section on automation.
You will also need to define a Synchronization Rule for your new LDAP import source. This will allow you to create helpful property modifiers that can change the original fields in a regular way, for instance:
Resolve host names from IP addresses
Check if a computer is disabled
Standardize upper and lower case
Flag workstations or domain controllers
Import and Synchronization
Icinga Director offers very powerful mechanisms when it comes to fetching data from external data sources.
The following examples should give you a quick idea of what you might want to use this feature for. Please note that Import Data Sources are implemented as hooks in Director. This means that it is absolutely possible and probably very easy to create custom data sources for whatever kind of data you have. And you do not need to modify the Director source code for this, you can ship your very own importer in your very own Icinga Web 2 module. Let’s see an example with LDAP.
Import Servers from MS Active Directory
Create a new import source
Importing data from LDAP sources is pretty easy. We use MS Active Directory as an example source:
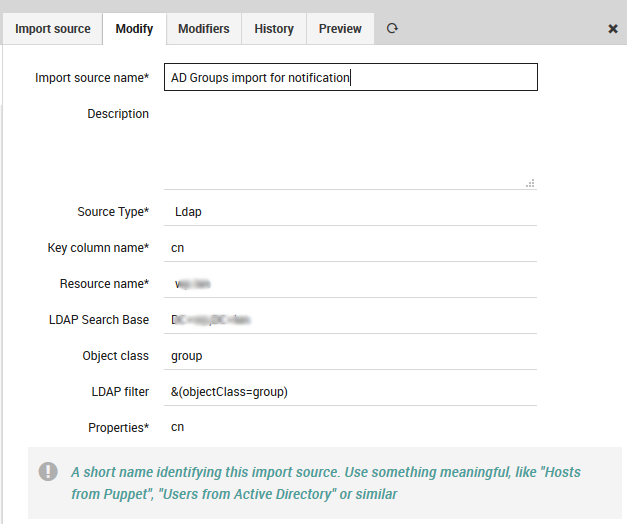
Fig. 55 Import source
You must formerly have configured a corresponding LDAP resource in your Icinga Web. Then you choose your preferred object class, you might add custom filters, a search base should always be set.
The only tricky part here are the chosen Properties. You must know them and you are required to fill them in, no way around this right now. Also please choose one column as your key column.
In case you want to avoid trouble please make this the column that corresponds to your desired object name for the objects you are going to import. Rows duplicating this property will be considered erroneous, the Import would fail.
Property modifiers
Data sources like SQL databases provide very powerful modifiers themselves. With a handcrafted query you can solve lots of data conversion problems. Sometimes this is not possible, and some sources (like LDAP) do not even have such features.
This is where property modifiers jump in to the rescue. Your computer names are uppercase and you hate this? Use the lowercase modifier:
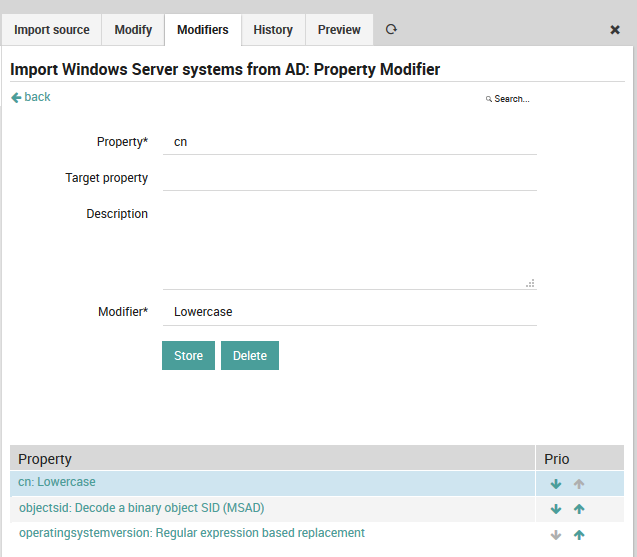
Fig. 56 Lowercase modifier
You want to have the object SID as a custom variable, but the data is stored binary in your AD? There is a dedicated modifier:

Fig. 57 SID modifier
You do not agree with the way Microsoft represents its version numbers? Regular expressions are able to fix everything:
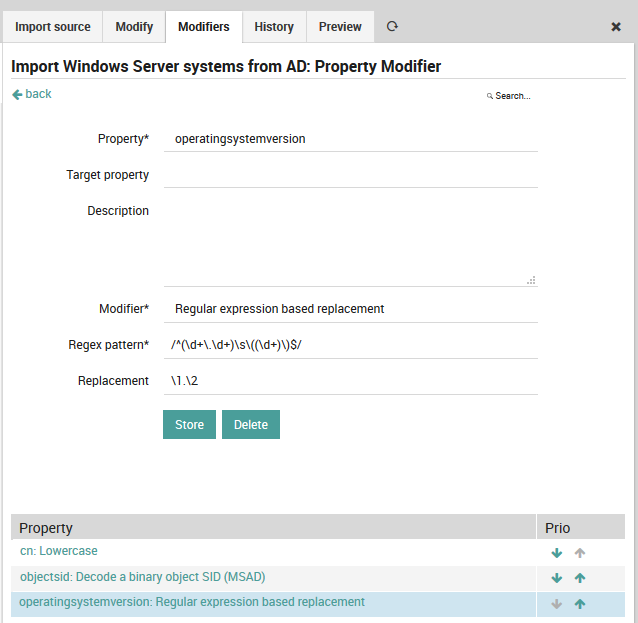
Fig. 58 Regular expression modifier
Synchronization
The Import itself just fetches raw data, it does not yet try to modify any of your Icinga objects. That’s what the Sync rules have been designed for. This distinction has a lot of advantages when it goes to automatic scheduling for various import and sync jobs.
When creating a Synchronization rule, you must decide which Icinga objects you want to work with. You could decide to use the same import source in various rules with different filters and properties.
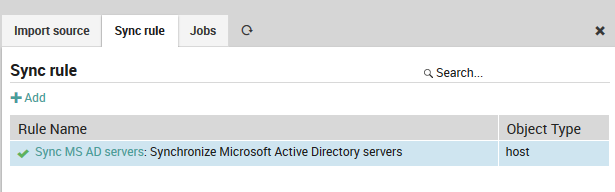
Fig. 59 Synchronization rule
For every property you must decide whether and how it should be synchronized. You can also define custom expressions, combine multiple source fields, set custom properties based on custom conditions and so on.
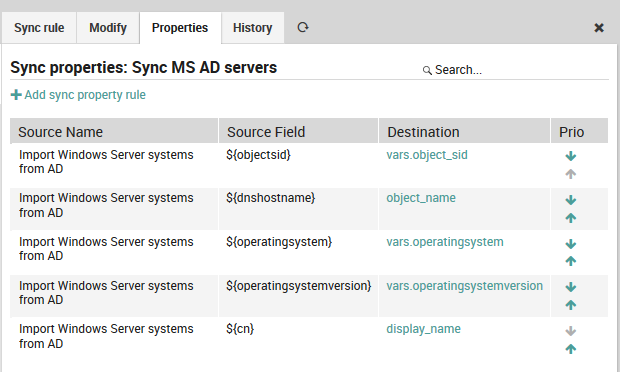
Fig. 60 Synchronization properties
Now you are all done and ready to a) launch the Import and b) trigger your synchronization run.
Use Text Files as an Import Source
The FileShipper interface allows you to import objects like hosts, users and groups from plain-text file formats like CSV and JSON.
The documentation below assumes that you are already familiar with Importing and Synchronization in Director. Before using FileShipper, please be sure that the module is ready by:
Enabling it in Configuration > Modules > fileshipper.
Creating paths for both the configuration and the files:
$ mkdir /neteye/shared/icingaweb2/conf/modules/fileshipper/
$ mkdir /data/file-import
And then defining a source path for those files within the following configuration file:
$ cat > /neteye/shared/icingaweb2/conf/modules/fileshipper/imports.ini
[NetEye File import]
basedir = "/data/file-import"
Adding a new Import Source
From Director > Import data sources, click on the “Add” action, then enter a name and description for this import source. For “Source Type”, choose the “Import from files (fileshipper)” option as in Fig. 61. The form will then expand to include several additional options.
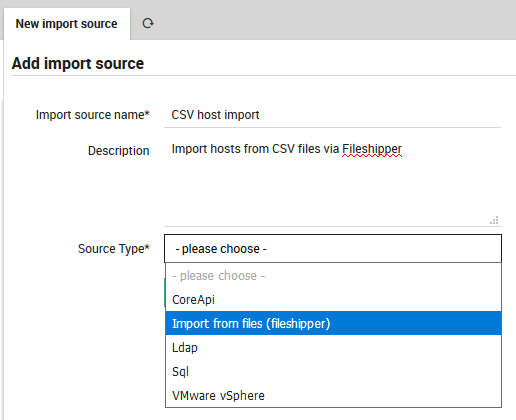
Fig. 61 Add a Fileshipper Import Source
Choose a File Format
Next, enter the name of the principal index column from the file, and choose your desired file type from File Format as in Fig. 62.
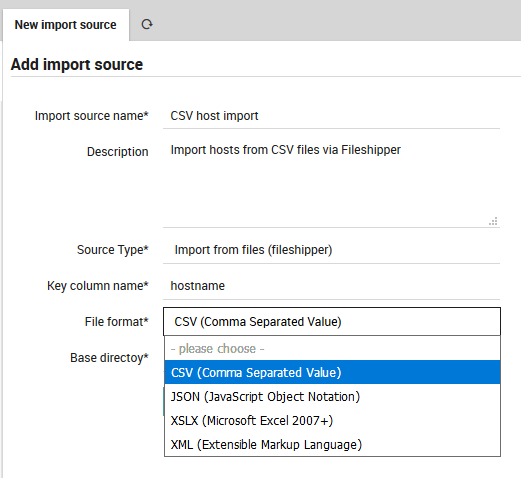
Fig. 62 Choosing the File Format.
If you would like to learn more about the supported file formats, please read the file format documentation.
Select the Directory and File(s)
You will now be asked to choose a Base Directory (Fig. 63).
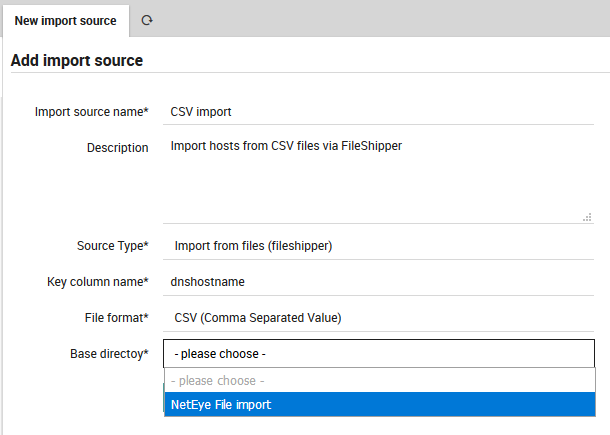
Fig. 63 Choosing the Base Directory.
The FileShipper module doesn’t allow you to freely choose any file on your system. You must provide a safe set of base directories in Fileshipper’s configuration directory as described in the first section above. You can include additional directories if you wish by creating each directory, and then modifying the configuration file, for instance:
[NetEye CSV File Import]
basedir = "/data/file-import/csv"

[NetEye XSLX File Import]
basedir = "/data/file-import/xslx"
Now you are ready to choose a specific file (Fig. 64).
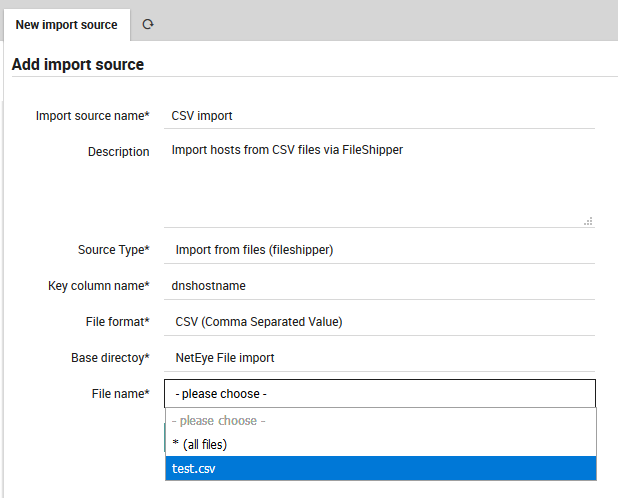
Fig. 64 Choosing a specific file or files.
Note
For some use-cases it might also be quite useful to import all files in a given directory at once.
Once you have selected the file(s), press the “Add” button. You will then see two additional parameters to fill for the CSV files: the delimiter character and field enclosure character (Fig. 65). After filling them out, you will need to press the “Add” button a second time.
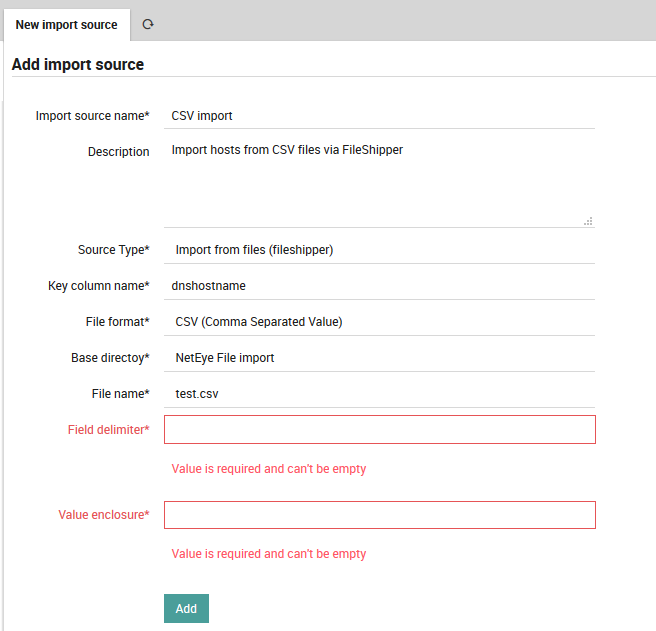
Fig. 65 Add extra parameters.
The new synchronization rule will now appear in the list (Fig. 66). Since you have not used it yet, it will be prefixed by a black question mark.

Fig. 66 The newly added import source.
Now follow the steps for importing at the page on Importing and Synchronization in Director. Once complete, you can then look at the Preview panel of the Import Source to check that the CSV formatting was correctly recognized. For instance, given this CSV file:
dnshostname,displayname,OS
ne4north1.company.com,NE4 North Building 1,Windows
ne4north2.company.com,NE4 North Building 2,Linux
then Fig. 67 shows the following preview:
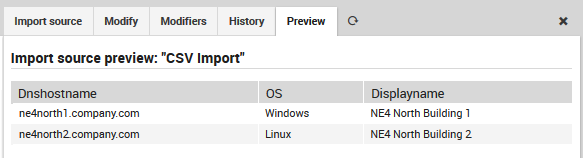
Fig. 67 Previewing the results of CSV import.
If the preview is correct, then you can proceed to Synchronization, or set up a Job to synchronize on a regular basis.
Supported File Formats
Depending on the installed libraries the Import Source currently supports multiple file formats.
CSV (Comma Separated Value)
CSV is a not so well defined data format, therefore the Import Source has to make some assumptions and ask for optional settings.
Basically, the rules to follow are:
a header line is required
each row has to have as many columns as the header line
defining a value enclosure is mandatory, but you do not have to use it in your CSV files. So while your import source might be asking for
"hostname";"ip", it would also accepthostname;ipin your source filesa field delimiter is required, this is mostly comma (
,) or semicolon (;). You could also opt for other separators to fit your very custom file format containing tabular data
Sample CSV files
Simple Example
"host","address","location"
"csv1.example.com","127.0.0.1","HQ"
"csv2.example.com","127.0.0.2","HQ"
"csv3.example.com","127.0.0.3","HQ"
More complex but perfectly valid CSV sample
"hostname","ip address","location"
csv1,"127.0.0.2","H\"ome"
"csv2",127.0.0.2,"asdf"
"csv3","127.0.0.3","Nott"", at Home"
JSON - JavaScript Object Notation
JSON is a pretty simple standardized format with good support among most scripting and programming languages. Nothing special to say here, as it is easy to validate.
Sample JSON files
Simple JSON example
This example shows an array of objects:
[{"host": "json1", "address": "127.0.0.1"},{"host": "json2", "address": "127.0.0.2"}]
This is the easiest machine-readable form of a JSON import file.
Pretty-formatted extended JSON example
Single-line JSON files are not very human-friendly, so you’ll often meet pretty- printed JSON. Such files also make perfectly valid import candidates:
{
  "json1.example.com": {
    "host": "json1.example.com",
    "address": "127.0.0.1",
    "location": "HQ",
    "groups": [ "Linux Servers" ]
  },
  "json2.example.com": {
    "host": "json2.example.com",
    "address": "127.0.0.2",
    "location": "HQ",
    "groups": [ "Windows Servers", "Lab" ]
  }
}
Microsoft Excel
XSLX, the Microsoft Excel 2007+ format is supported since v1.1.0.
XML - Extensible Markup Language
When working with XML please try to ship simple files as shown in the following example.
Sample XML file
<?xml version="1.0" encoding="UTF-8" ?>
<hosts>
  <host>
    <name>xml1</name>
    <address>127.0.0.1</address>
  </host>
  <host>
    <name>xml2</name>
    <address>127.0.0.2</address>
  </host>
</hosts>
YAML (Ain’t Markup Language)
YAML is anything but simple and well defined, however it allows you to write the same data in various ways. This format is useful if you already have files in this format, but it’s not recommended for future use.
Sample YAML files
Simple YAML example
---
- host: "yaml1.example.com"
  address: "127.0.0.1"
  location: "HQ"
- host: "yaml2.example.com"
  address: "127.0.0.2"
  location: "HQ"
- host: "yaml3.example.com"
  address: "127.0.0.3"
  location: "HQ"
Advanced YAML example
Here’s an example using Puppet for database configuration. as an example, but this might work in a similar way for many other tools.
Instead of a single YAML file, you may need to deal with a directory full of files. The Import Source documentation shows you how to configure multiple files. Here you can see a part of one such file:
--- !ruby/object:Puppet::Node::Facts
  name: foreman.localdomain
  values:
    architecture: x86_64
    timezone: CEST
    kernel: Linux
    system_uptime: "{\x22seconds\x22=>5415, \x22hours\x22=>1, \x22days\x22=>0, \x22uptime\x22=>\x221:30 hours\x22}"
    domain: localdomain
    virtual: kvm
    is_virtual: "true"
    hardwaremodel: x86_64
    operatingsystem: CentOS
    facterversion: "2.4.6"
    filesystems: xfs
    fqdn: foreman.localdomain
    hardwareisa: x86_64
    hostname: foreman
vSphereDB Import Source configuration
The vSphereDB interface allows you to import hosts directly from a vCenter server.
The documentation below assumes that you are already familiar with importing and synchronization in Director. Before using the vSphereDB import interface, ensure that:
the module has been enabled under
at least one Connection to a vCenter was configured in the VMD Module
To create a new VMware vSphereDB import source, go to , click on the Add action, then enter a name and description for this import source. As Source Type, choose the VMware vSphereDB option as in Fig. 68.
Fig. 68 Choosing the VMware vSphereDB option.
As soon as you’ve chosen the correct Source Type, it will ask you for more details, including the type of Objects you want to import and the vCenter Connection to use for the the import, as shown in Fig. 69.
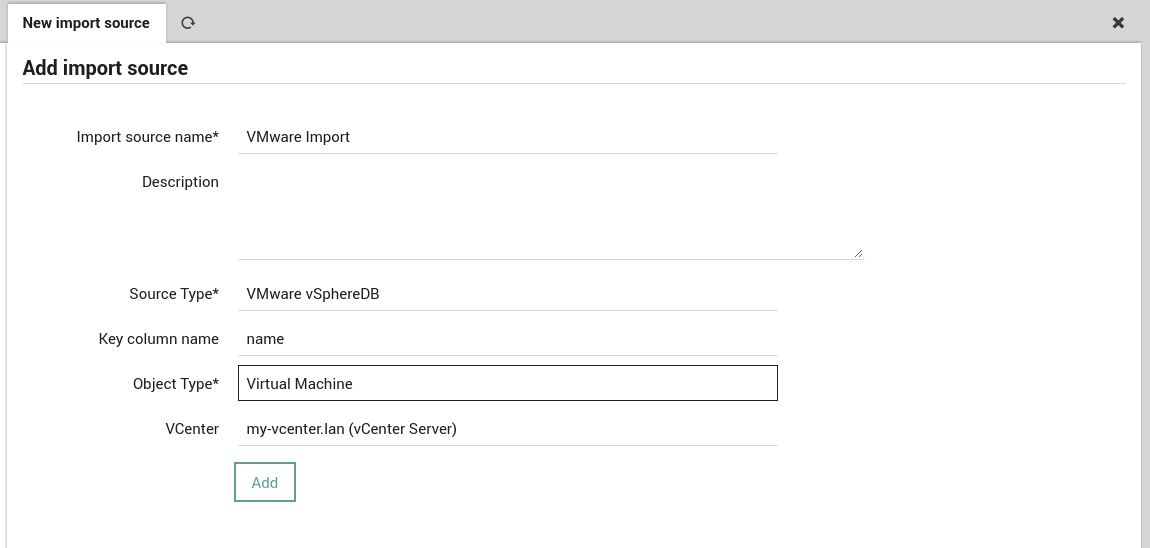
Fig. 69 Configuring the parameters for the VMware vSphereDB source.
That’s it. Once you’ve confirmed that you want to add this new Import Source, you’re all done with the configuration.
Note
As described on the importing page, the value of the key column name is used as the ID during the matching phase.
You can now click on the Preview tab to see what the results look like (See Fig. 70) before deciding whether to run the full import.
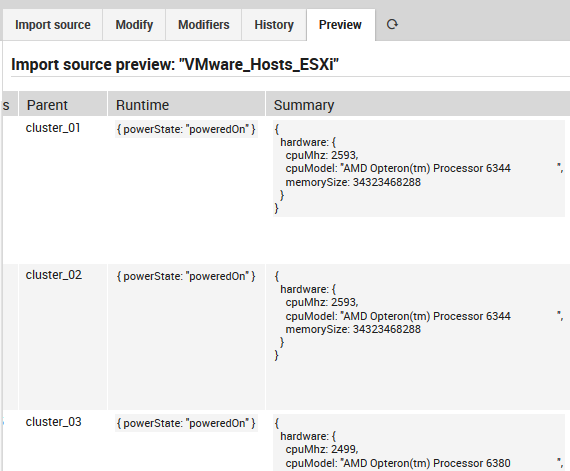
Fig. 70 Previewing the results of importing from the source
Be sure to define a Synchronization Rule for your new import source, as explained in the related Director documentation.
If you prefer to use the Icinga2 CLI commands instead of the web interface, see VSphere CLI reference documentation.