Log Manager Host Configuration
Once you have filled out the General Settings and defined the required Safed templates, you can begin configuring hosts to use Safed.
Go to Director > Host objects > Hosts and select a host with a Safed Agent installed. Under the “Custom properties” section, you will see a field marked “Safed Profile” (Fig. 180). Select one of the general configuration templates you defined. Then click on the “Store” button at the bottom of the panel.

Fig. 180 Configuring a host for use with Safed.
If you have a large number of hosts that you would like to configure for use with Safed, you can save time by pre-defining the “Safed Profile” field on the appropriate host template in Director. Also in “Custom properties” is the “Additional IP addresses” field: if you have a host with multiple IP addresses, Log Manager will need to send the configuration to all of them.
If you need to configure a host with no installed agents for sending logs to NetEye Log Manager, you need to select the “No agent” option in the host Safed profile configuration field. If a host is configured as “No agent“, you will still need to deploy the Rsyslog configuration to accept the logs from that host.
Once you have added a general configuration template to all those hosts that will use Safed, you will first need to redeploy the hosts in Director. Then go to Log Manager > Host where you will see a list of all hosts (Fig. 180) that are ready for Safed deployment. There are five actions you can perform, two of which affect all hosts:
The “Deploy to N Host(s)” action will distribute the Safed configuration(s) simultaneously to all Safed Agents on the registered hosts list that do not have the most up-to-date configuration. The following icingacli command will carry out this action for scripting:
icingacli logmanager commit safedAgents
The “Deploy Server Configuration” action will write out the configuration for the Centralized Syslog Server, allowing it to know which hosts it should accept logs from. The configuration also forwards relevant fields such as which hostgroup a host belongs to so that they can be used for sorting and filtering with Elasticsearch and Log Analytics. The following icingacli command will carry out this action for scripting:
icingacli logmanager commit server
Then for each row in the table, these actions will only affect the host in that row:
Click on the host’s name to go to that host’s configuration panel in Director.
Click on the “Airplane” icon ( ) in the “Options” column to deploy the appropriate Safed configuration to that particular host.
Click on the “Compass” icon ( ) to go to the host’s Log Check panel.
Additionally, the “Retention Policy” column shows the number of days that that host is configured to retain logs, and the last cutoff date before which logs will be automatically deleted.

Fig. 181 Deploying Safed configurations to hosts
Deploying Safed Configurations to Hosts
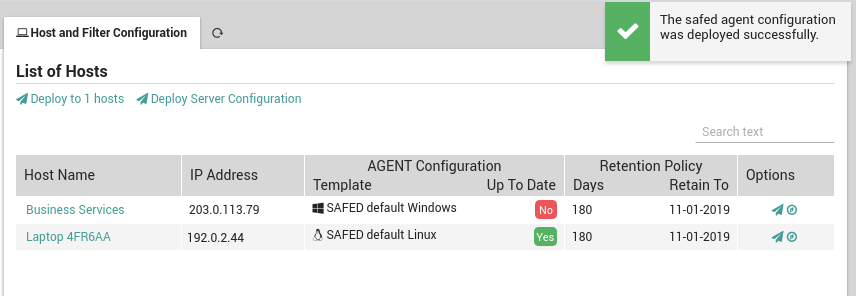
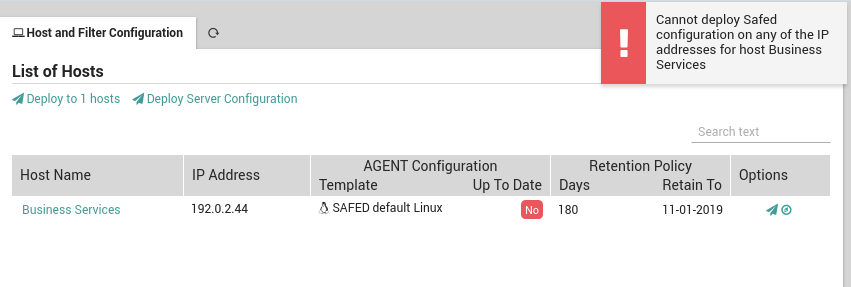
To deploy the Safed configuration(s), click on either the “Deploy to N Host(s)” action (or the “Airplane” icon for a single host). If all host(s) successfully receive the new Safed configurations, you will see a green banner at the top right of the screen. Otherwise, a red banner (Fig. 182) will appear that describes the problem. This occurs when at least one host could not be configured, in which case all the remaining hosts after the failed host will not receive the new configuration. You should then proceed to resolve the problem and deploy again as described in the section below so that all hosts can be properly updated.

Fig. 182 A red banner indicating Safed cannot configure a host.
In addition, another warning will occur if one or more hosts have not been completely configured. For instance, when creating a host in Director it is not mandatory to include the host’s IP address. However, Log Manager requires an IP address in order to send the configuration to the host. Thus in addition to the error above, you will see the message “No ip assigned” in the IP address field as shown in Fig. 183.

Fig. 183 A red message in the host’s row indicating an IP address is missing.
Redeploying a Partial Safed Configuration Deployment
If a deployment does not run to completion, it can be difficult to know which hosts have received the new configuration and which have not. NetEye uses a checksum technique to keep track of which hosts have received the latest general configuration template assigned to them in their host configuration at Log Manager > Safed Agent.
Whenever a general configuration template is created or updated, a checksum is calculated and stored with the template. Then once a template is deployed to one or more hosts, the Log Manager waits for responses from those hosts. When a response from a host is received indicating the configuration change was successful, the Log Manager associates the checksum with that host.
Thus selecting the action “Deploy to N Host(s)” will cause the template to be deployed to all those hosts whose checksum does not match the template’s checksum, i.e., those that do not have the latest configuration.

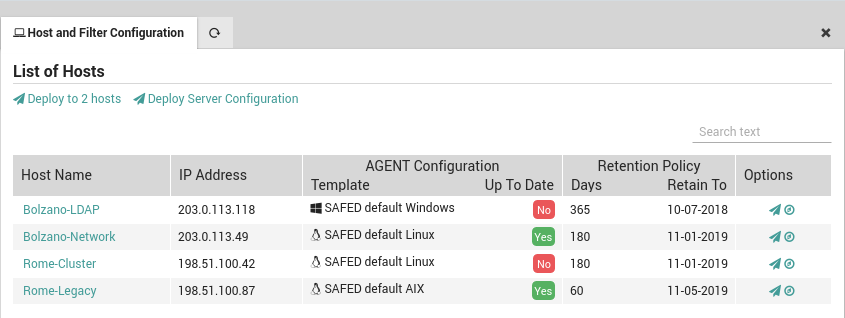
Fig. 184 Deploying to a subset of hosts.
You can review whether or not an agent configuration on a given host is up to date by looking at the appropriate column marked with a green “yes” or a red “no” as shown in Fig. 184.

