Infrastructure
Deployment
In Icinga2, configuration changes are stored in working memory until they are deployed, i.e., the Icinga2 configuration is generated and distributed to all agents in the zone. Initiating a deploy action will check configuration validity, recording the details of the outcome. There are two principal elements, both reachable from the main Director menu:
Deployment: Manage the actions around deploying a new configuration.
Activity Log: Look at the deployment history, and carry out actions on that history.
Deploying a Configuration
To deploy a modified configuration, go to Director > Deployments. There you will see the Deployments tab (Fig. 17) that shows all recent successful (green check) and failed (red ‘X’) deployment attempts along with the date and time of those actions. Clicking on the link will take you to the “Deployment details” panel that additionally contains any warnings that may have been issued, and a ‘Configuration’ link that will show you which configuration files were modified when the deployment occurred.
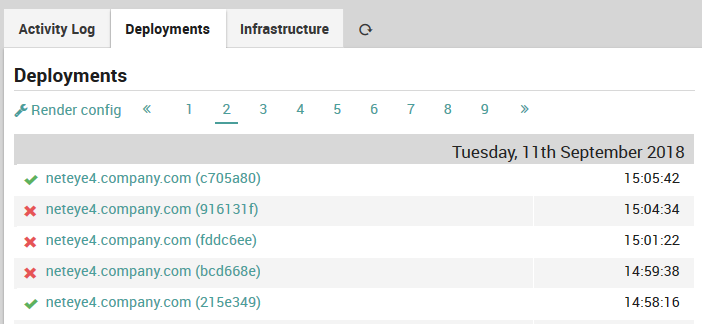
Fig. 17 The deployments outcome panel
Now click on the Render config action, which displays the “Generated config” panel, a summary of the newly generated configuration (Fig. 18). This panel contains a list of the files involved in the configuration changes, including a summary of the number of objects per file by type (objects, templates, or apply rules), and the new size of that file.
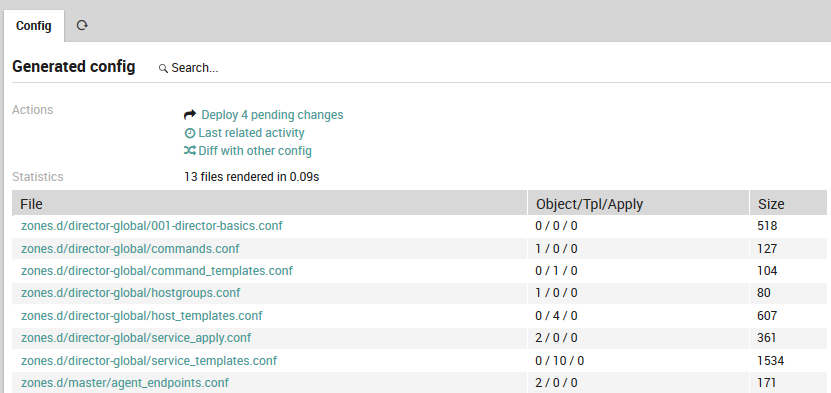
Fig. 18 Deployment outcome panel
You will now see three new actions:
Deploy pending changes: Implement the deployment, which distributes the configuration to all Icinga2 agents. You can distribute the deployment even if there are no changes to make.
Last related activity: Show differences between the current configuration and the most recent configuration before the current one.
Diff with other config: Compare any two configurations using their unique identifiers (the numbers in parentheses in Fig. 17). The current configuration is inserted by default.
Activity Log
The Activity Log Panel (Fig. 19) lets you look at the history of successful deployments, and carry out actions on items in that history.
The My changes action lets you switch from showing the history of all changes to the view showing only those changes you made. You can then click on All changes to return to viewing changes made by all users.
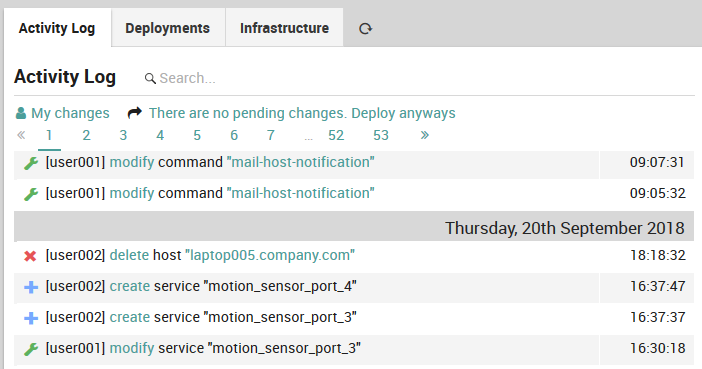
Fig. 19 The activity log panel
Each row represents a successful change to an object, coded for action type, user (“cli” indicates an automated action) and time. The action types are:
Create (a blue “+” icon)
Modify (a green “wrench” icon)
Delete (a red “x” icon)
A duplicate timestamp over consecutive rows indicates those objects were deployed at the same time. Clicking on the modify action type in particular will take you to the Diff panel (Fig. 20) that will detail exactly what changes were made.
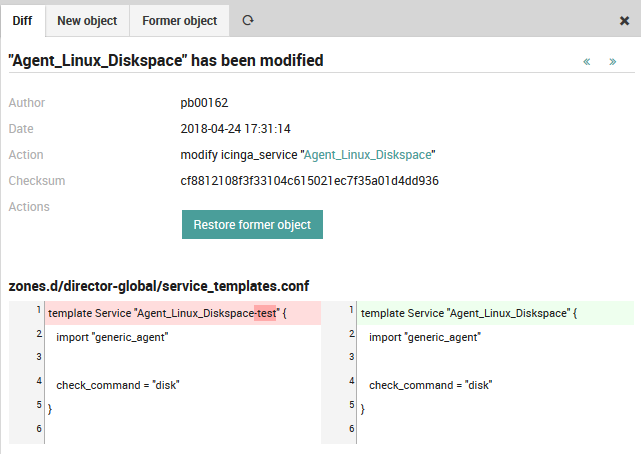
Fig. 20 Showing the differences between before and after configurations
Once you have completed a successful deployment of monitoring objects in Director, you can then go to the host monitoring panel (i.e.,g click on a host under ) to check on the success of the overall monitoring configuration.
NetEye Satellite Nodes
In this section you can find information for advanced configurations of Icinga2 within the NetEye Satellite Nodes.
The basic steps for the configuration of NetEye Satellite Nodes can be found instead here.
Configuration of a Second Satellite in Existing Icinga2 Zone
Adding a second Satellite (we’ll call the Satellite acmesatellite2), for tenant_A, in an existing Icinga2 zone, so to create an High Availability configuration with the existing Satellite acmesatellite, takes few steps.
To start, write the configuration file /etc/neteye-satellite.d/tenant_A/acmesatellite2.conf
on the Master, in tenant folder tenant_A, for Satellite acmesatellite2.
Satellite acmesatellite2 must be defined having the same icinga2_zone as for acmesatellite.
Once the acmesatellite2 configuration file has been prepared, run commands
neteye satellite config create
and
neteye satellite config send
on the Master, for both Satellites acmesatellite and acmesatellite2, to create the new configurations and to send them to the corresponding Satellites.
Once done, execute
neteye satellite setup
on both Satellites. See the Satellite Configuration for details.
Note
If icinga2_zone is not defined in Satellite
/etc/neteye-satellite.d/tenant_A/acmesatellite.conf, to add
a second Satellite in an existing zone, use the name of the first Satellite (acmesatellite)
as value for the icinga2_zone attribute within /etc/neteye-satellite.d/tenant_A/acmesatellite2.conf.
Agent Nodes
Icinga2 packages
Icinga2 packages are provided for different OS/distributions via the NetEye repositories for Icinga2 agent installation. Specifically, we support
- Debian derivatives:
Debian Buster
Debian Jessie
Debian Stretch
Ubuntu Xenial
Ubuntu Bionic
Ubuntu Eoan
Ubuntu Focal
Ubuntu Groovy
- Red Hat derivatives:
CentOS 6
CentOS 7
CentOS 8
Fedora 29
Fedora 30
Fedora 31
Fedora 32
- SUSE derivatives:
OpenSuse 5.0
OpenSuse 15.1
SLES 12.4
SLES 12.5
SLES 15.0
SLES 15.1
SLES 15.2
and Windows.
Note
In order to install Icinga2 packages you need to have the boost libraries installed
(version 1.66.0 or newer) or available via the default package manager.
Icinga2 repository versioning
You must use Icinga2 packages provided by the NetEye repositories instead of the official Icinga2 packages. From 4.16 onwards, icinga2 agents are version specific both for the NetEye version and for the monitored operating system version. You can modify package URLs accordingly. If you are downloading packages for 4.<neteye_minor>, you need to change neteye-x.x-icinga2-agents with neteye-4.<neteye_minor>-icinga2-agents in below packages urls.
Add the NetEye repository for Icinga2 packages
This section will explain how to add the dedicated NetEye repository for Icinga2 packages in different OSs and distributions (e.g. Ubuntu, CentOS, SUSE), thus supporting the installation of an Icinga2 agent via the default package manager installed in the OS.
URL repository follow this syntax:
https://repo.wuerth-phoenix.com/<distribution>-<codename_or_version>/neteye-4.<neteye_minor>-icinga2-agents/
Icinga2 RPM repository
To add the repository that provides the Icinga2 RPM packages (e.g. CentOS, SUSE, Fedora) you have to add a new repository definition to your system.
Let us suppose that you need to add the new repository definition on a CentOS 7
machine, which is monitored via NetEye 4.16. You can add the repo definition
in a file neteye-icinga2-agent.repo:
[neteye-agent]
name=NetEye Icinga2 Agent Packages
baseurl=https://repo.wuerth-phoenix.com/centos-7/neteye-4.16-icinga2-agents/
gpgcheck=0
enabled=1
priority=1
Please note that the location of this file will change according with
the distribution used. For example, on Fedora and CentOS
installations the default repo definition directory is
/etc/yum.repos.d/, while SUSE will use
/etc/zypp/repos.d/.
Once the new repository has been added, you need to load the new repository data by running dnf update.
Icinga2 DEB repository
To add the Icinga2 agent repository on Ubuntu or Debian systems you have to create the file
neteye-icinga2-agent.list in the directory /etc/apt/sources.list.d/`.
For example, to add the repository on a Ubuntu 20.04 Focal Fossa you have to create a file with the following content:
"deb [trusted=yes] https://repo.wuerth-phoenix.com/ubuntu-focal/neteye-4.16-icinga2-agents/ stable main"
Finally, run apt update to update the repo data.
Icinga2 windows packages
Get the Icinga2 Agent for Windows accessing the URL below and downloading the .msi file (replace x.x with the NetEye version number, e.g. 4.23):
https://repo.wuerth-phoenix.com/windows/neteye-x.x-icinga2-agents/
Install Icinga2
To install Icinga2, follow Icinga2 Documentation Icinga2 requires boost libraries to work properly. Ensure that the libraries are also installed on the system.
To install windows msi on agent, follow Icinga2 Windows Agent Installation official document.
Working with Icinga 2 Agents can be quite tricky, as each Agent needs its own Endpoint and Zone definition, correct parent, peering host and log settings. There may always be reasons for a completely custom-made configuration. However, I’d strongly suggest using the Director- assisted variant. It will save you a lot of headaches.
Preparation
Agent settings are not available for modification directly on a host object. This requires you to create an “Icinga Agent” template. You could name it exactly like that; it’s important to use meaningful names for your templates.
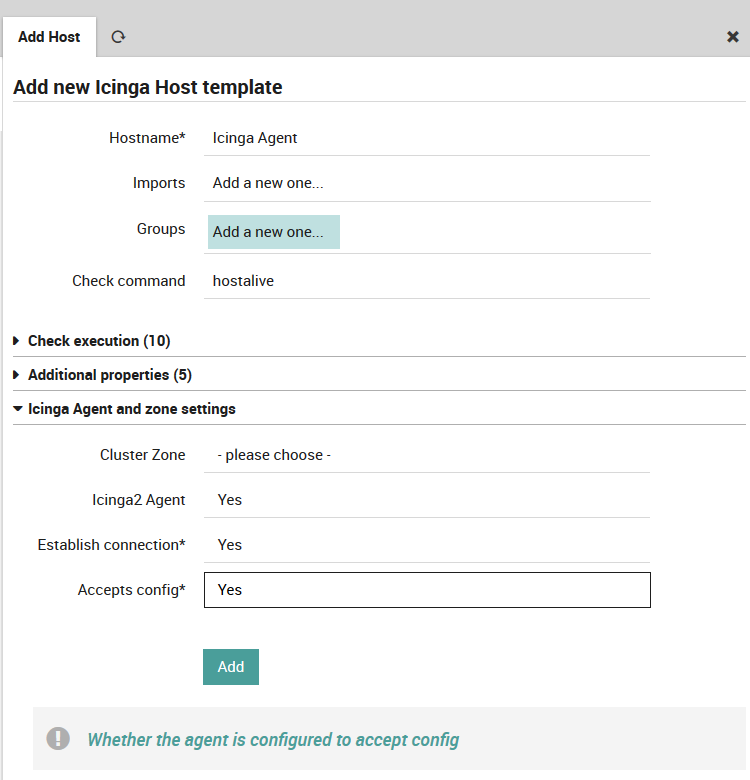
Fig. 21 Create an Agent template
As long as you’re not using Satellite nodes, a single Agent zone is all you need. Otherwise, you should create one Agent template per satellite zone. If you want to move an Agent to a specific zone, just assign it the correct template and you’re all done.
Usage
Well, create a host, choose an Agent template, that’s it:
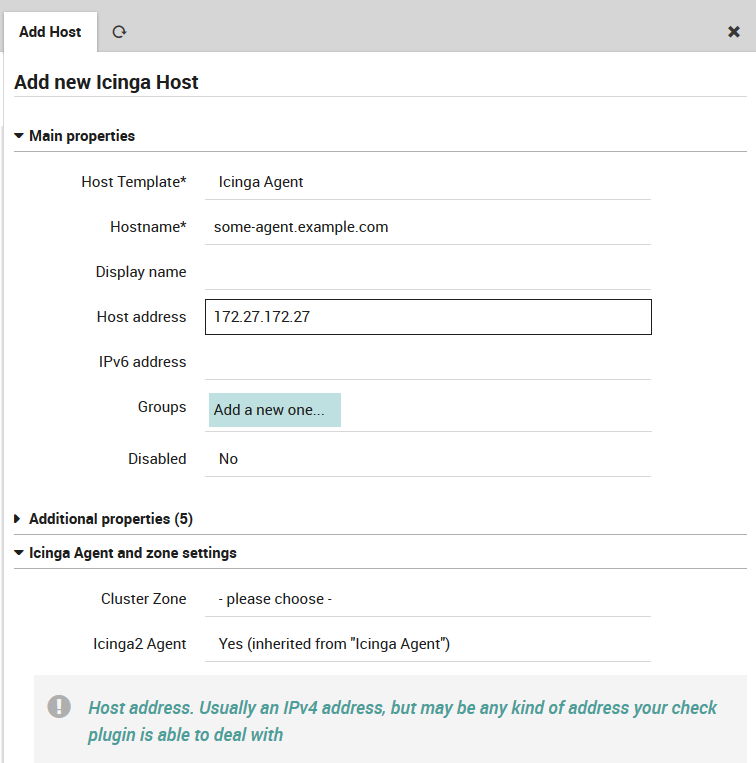
Fig. 22 Create an Agent-based host
Once you import the “Icinga Agent” template, you’ll see a new “Agent” tab. It tries to assist you with the initial Agent setup by showing a sample config:
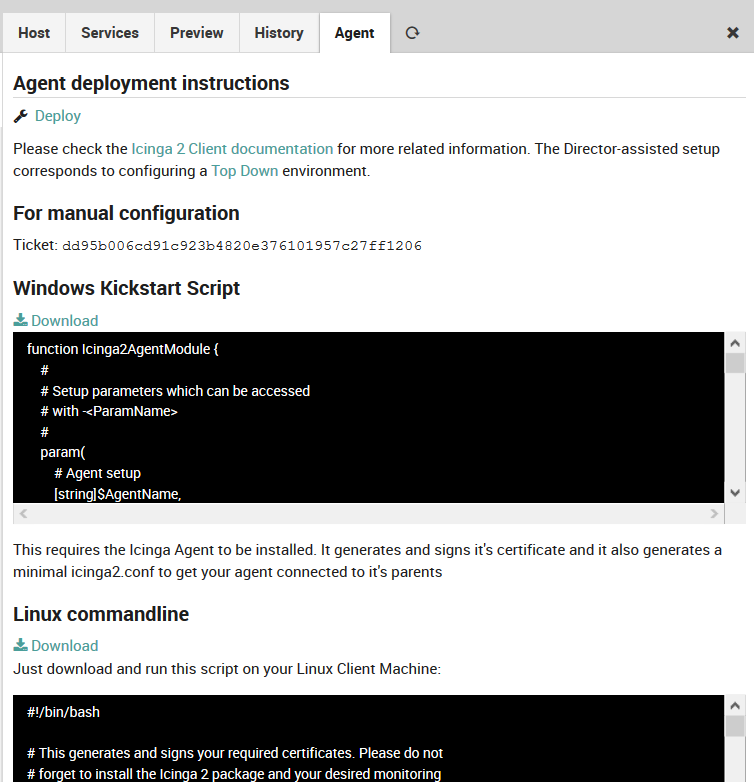
Fig. 23 Agent instructions 1
The preview shows that the Icinga Director would deploy multiple objects for your newly created host:
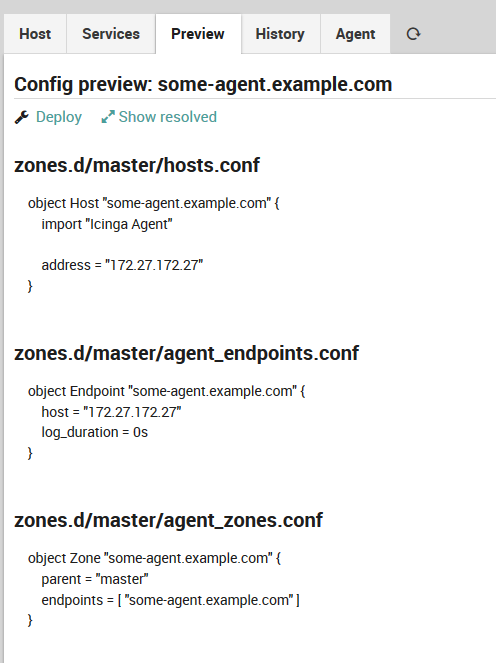
Fig. 24 Agent preview
Create Agent-based services
Similar game for services that should run on your Agents. First, create a template with a meaningful name. Then, define that Services inheriting from this template should run on your Agents.
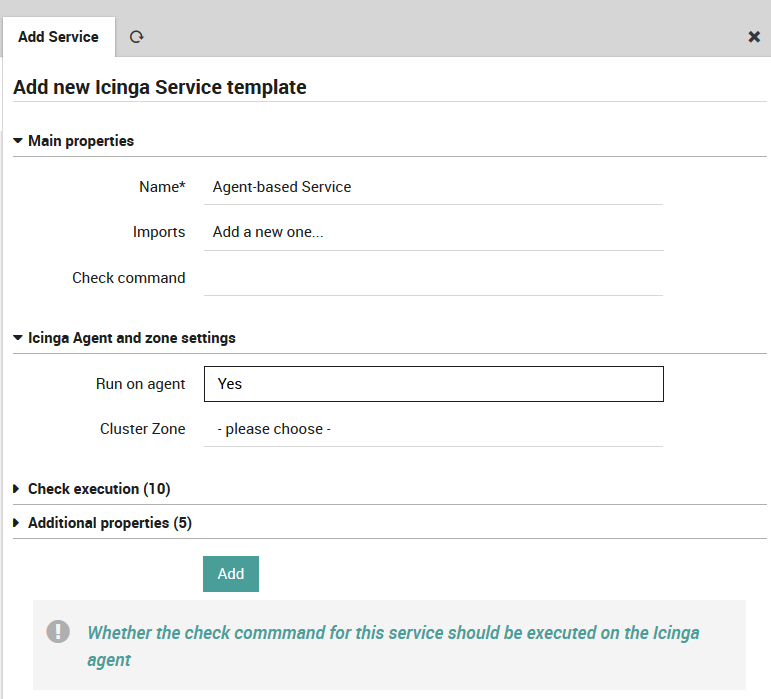
Fig. 25 Agent-based service
Please do not set a cluster zone, as this would rarely be necessary. Agent-based services will always be deployed to their Agent’s zone by default. All you need to do now for services that should be executed on your Agents is importing that template:
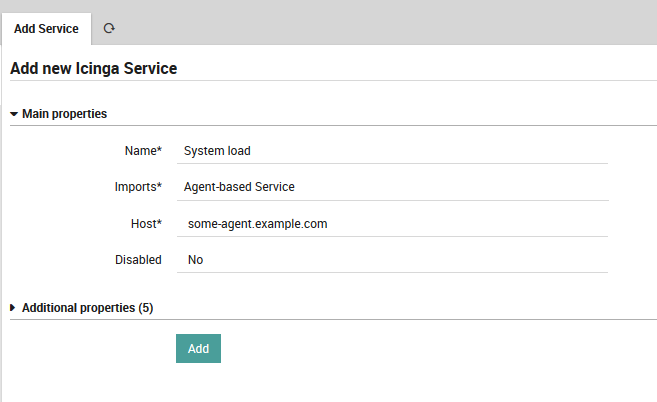
Fig. 26 Agent-based load check
Config preview shows that everything works as expected:
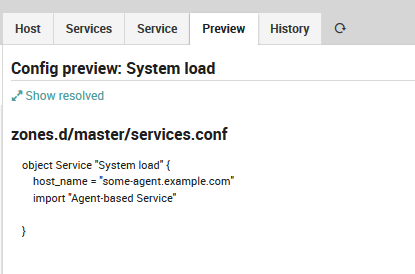
Fig. 27 Agent-based service preview

