Selector: Interface Overview
Alyvix Selector allows you to organize individual test case objects, copy test case objects from one file to another, and visualize and change basic test case parameters.
When used with Alyvix Editor rather than as a standalone application, it allows you to quickly select test case objects in order to create scripted interactions.
The Selector interface is centered around a list of all test case objects in a given test case,
with a separate tab for each .alyvix file.
The primary tab (the first one opened, with the blue background) is the only file whose objects
can be changed. Any other secondary tabs are used to view and filter their test case objects,
and if desired, to import them into the primary tab (the values of test case objects in secondary
tabs cannot be changed).
Note that you can start Alyvix Selector as a standalone module from the command prompt (you can find information about its command arguments here):
C:\Alyvix\testcases> alyvix_selector -f <file-name>
This will bring up the Selector interface:
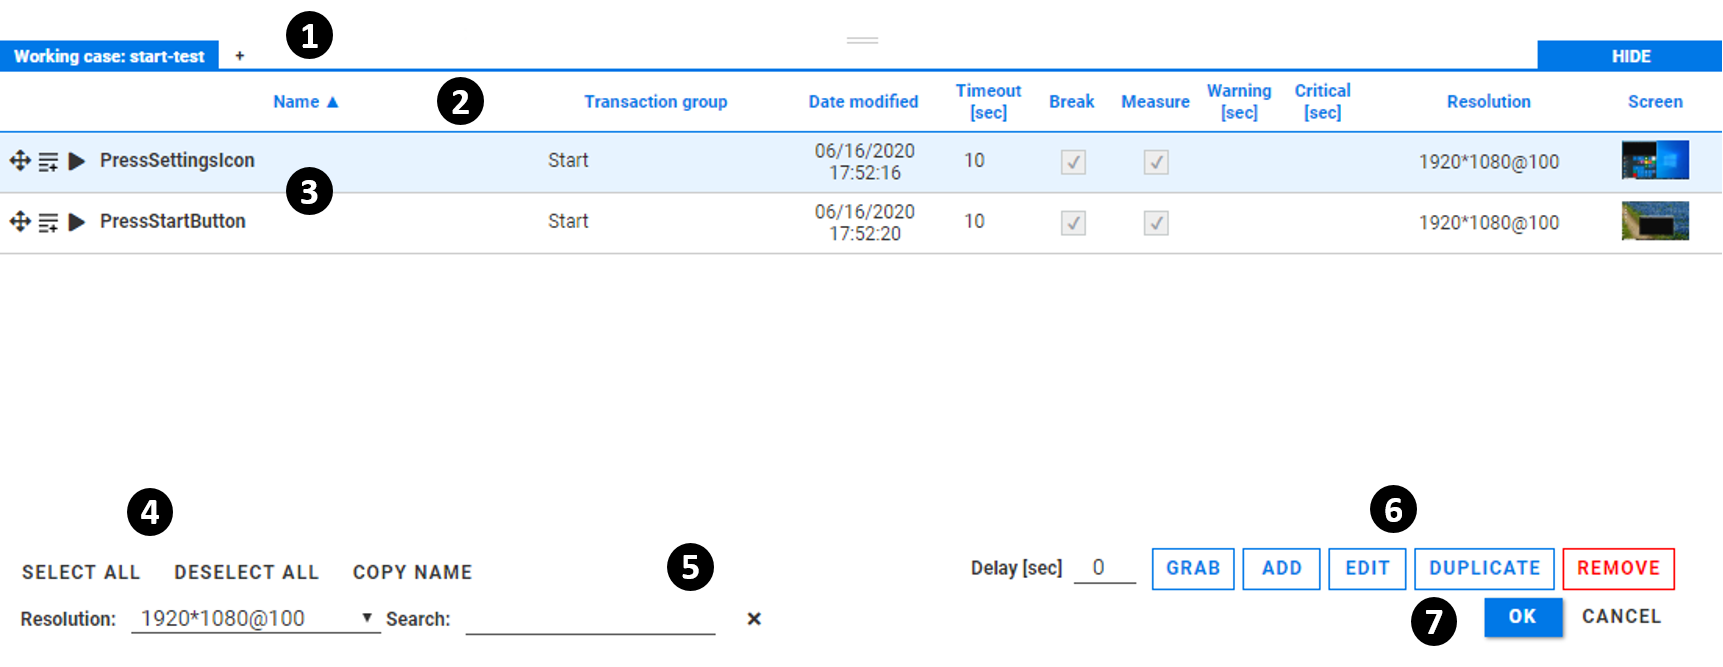
The principle interface elements are:
The file tabs show the primary tab and any opened secondary
.alvyixtest case files. Switching between tabs shows the test case objects contained in each file. A new file can be loaded by clicking on the button. Similarly, the button next to a non-primary tab will remove that tab (note that you cannot remove the primary tab).The list headers categorize the properties of each object, allowing you to sort on some fields and find the details of a particular test case object at a glance.
The test case object list shows the principal properties (excluding the component recognition and interaction settings) of each test case object, with one line for each object.
The list actions let you quickly select or deselect all test case objects in the list, and copy the name of a test case object.
The filtering and search fields let you select all test case objects with a given screen resolution and scaling factor, or that contain a given text string in either the Name or Date modified fields. The Search field uses a non-regex substring search, and the action clears this field.
The test case object buttons, , , and act on the currently selected test case objects in the list. The button will initiate a new screen capture (after a specified in seconds) to define a new test case object.
The and buttons will exit Alyvix Selector, either saving or discarding any changes, respectively.
Selector List Headers
The test case object list headers describe the contents of their respective columns. The list can be sorted on the first three columns by clicking on the header name, with the and icons indicating whether the sort order is ascending or descending.
The list headers have the following characteristics:
Name: The object name assigned to the test case object.
Transaction group: This is a user-definable field that can be used to group together test case objects that have something in common (for instance a “login” group, “response check” group, “purchase” group, etc.) and then used for sorting and searching.
Date modified: The date and time automatically recorded when the test case object was last modified in Designer, Selector or Editor.
Timeout: The timeout value is the number of seconds that Alyvix attempts to detect objects onscreen. If this value is exceeded, then the break flag will determine what happens next (note that the timeout and break parameters can also be set in Designer).
Break: If this flag is set, then when the timeout is exceeded Alyvix will stop the currently running script and switch instead to running the fail script. If unset, Alyvix will instead continue on to the next object if the timeout is exceeded (the relationship between timeout, break and measure is described in further detail below.
Measure: Tells Robot whether or not to output the measurement data of a given step in the console output. When a test case has completed execution, only test case objects whose measure flag is set will have their timing data included.
Warning, Critical: The threshold values set for integration with a monitoring system
Resolution: The horizontal and vertical pixel resolution, and the scaling factor (Windows zoom) of the test case object’s screen capture.
The Screen element is a thumbnail of the frame on which that test case object is defined, which can be especially helpful distinguishing between them when you have a large number of objects in a single file.
Test Case Object List
This list shows all test case objects contained in the .alyvix file corresponding to the
currently selected tab.
The values for many fields in the primary tab can be changed directly without opening Designer. This can be accomplished by simply clicking on the existing value (or blank space where it should go), entering the new value, and then either pressing Enter or clicking elsewhere in the list.
Note
Remember that in standalone mode, any changes will not be saved until you have exited Selector by clicking on the button. When used with Editor, changes from Selector will be saved when the entire test case is saved in Editor.
All editable fields are validated in real time to ensure that only new values of the correct type can be entered. When a value is not valid you will see an error message like this:

Note
The values of test case objects in secondary tabs cannot be changed.
When Selector is being used as part of Alyvix Editor, the and ![]() action
icons at the start of each row allow you to
add the corresponding test case object to the scripting panel
by using drag-and-drop or appending it to the
scripting panel. The action will
execute that test case object
as if it were the only scripted element in its test case.
action
icons at the start of each row allow you to
add the corresponding test case object to the scripting panel
by using drag-and-drop or appending it to the
scripting panel. The action will
execute that test case object
as if it were the only scripted element in its test case.
The Shift and Control keys work together with the mouse to select multiple rows in the standard way when using Windows applications. Selected rows are shown with a light blue background, and can then be used with the actions described in the next section below.
Test Case Object Actions
The control together with the button allows you to
add a completely new test case object by launching Designer directly from the Selector interface
with the specified countdown delay in seconds, just as if you had used Designer’s --delay
option from the command prompt. This action is
available regardless of whether any test case objects are selected.
The button allows you to (1) replace the existing screen capture of the current test case object with a new one from the current interface, or (2) add a new screen capture at a different resolution. See the section below for a more complete description.
The button appears when only a single test case object is selected. Clicking on it launches Alyvix Designer with the currently selected test case file and object, allowing you to modify that object.
Two other actions affect all test case objects currently selected:
will create a new test case object(s) from each selected row. The new name(s) will be the same name(s) as the currently selected object(s), but with the string
_copyappended at the end.will delete all currently selected test case objects. A confirmation request dialog will appear to make sure test cases aren’t accidentally deleted.
When an additional file tab is open, only the action will appear. Any objects selected will be copied just as for , except that the new object(s) are copied to the primary tab rather than to the currently opened tab.
Note
Remember that in standalone mode, any changes will not be saved until you have exited Selector by clicking on the button. When used with Editor, changes from Selector will be saved when the entire test case is saved in Editor. (No changes will be made to any objects in any secondary tabs).
Regrabbing and Adding Screen Resolutions
The button described above has two principal uses, to replace the existing screen capture with a new one, and to add an additional screen capture at a different resolution than the existing one.
When the resolution of the Windows desktop matches one of the resolutions recorded in the test case object, Selector will overwrite that screen capture in the object with the new version.
This replacement allows you to keep a test case up-to-date, which can be useful for times when a web site or web app has been fixed or updated. In addition to simple replacement, you can also use regrabbing to build new test cases faster by using the button to copy the test case object, and then just changing the screen.
When the resolution of the Windows desktop does not match any of the screen grabs stored in the test case object, then a grab of the current screen will be added to its existing screen grabs, annotated with the current screen resolution and zoom factor.
Note
When you regrab a test case object that includes a text component in detect mode with a regular expression, the scraped expression will automatically be reprocessed under the existing regular expression and the new value stored.
Interactions - Timeout, Measure, Break
The user interface elements for timeout, break and measure are described in the List Headers section above. Briefly, timeout and break affect Alyvix’s behavior, while measure serves to indicate that Alyvix should measure and report the time until detection at the end of the test case run. These three parameters can help you judge availability and responsiveness.
Each application you use with Alyvix will likely have a number of different types of behavioral and measurement requirements. Past experience has shown that the following three scenarios are the most frequent. Each is suited to a particular combination of these three parameters:
Heavy resource usage:
TIMEOUT: high,BREAK: set,MEASURE: setExamples: Loading an application, loading a full new web page, or initiating an action that results in a search or database request
This first situation happens whenever you expect it will take some time for an action to run to completion. If that doesn’t occur within a certain time limit, then it doesn’t make sense to continue running the test case. Steps with potentially large wait times are one of the main reasons you are monitoring an application in the first place, so it makes sense to report the measurements for steps like these.
Light resource usage:
TIMEOUT: low,BREAK: set,MEASURE: unsetExamples: Navigating through an application via menus or buttons, entering values in fields, or an intermediate check where the timing results are unimportant
In the second case you may need to perform a series of steps to put the application in a state where you can measure what you need. This may include navigating to a particular interface, or adding or changing values in an interface that is already displayed, especially when there’s no need to worry about network latency or remote resources. A series of these steps is typically followed by a heavy resource usage step. Here the timeout can be low since we don’t expect each individual step to take too long, and we don’t usually need to see the resulting measurements (e.g., how long it takes to enter text into a field), but we should still fail if the change couldn’t be made, since it would not be possible to perform a subsequent measurement step. Although you can measure these steps, note that measuring too many will clutter the results, especially if you import them into graphical analysis software.
Optional actions:
TIMEOUT: low,BREAK: unset,MEASURE: unsetExamples: Remove a cookie/popup notice, or put an interface into a standard format
Finally, you sometimes need to interact with an interface only if a certain condition is met, like when there are cookie notices or popups overlaid intermittently on a web page that may cover a button you need to press, or an application retains persistent state (especially in a multi-user scenario) so that window size or position may differ over time. Using a test case object that looks for them, in conjunction with an IF FALSE scripting element and an action that standardizes the interface, such as removing a cookie notice or maximizing a window.