Designer: Interface Options
The parameters and settings for Alyvix Designer are divided into:
Test Case Object Options, those which affect the entire test case object, like its name and how long to wait before timing out
Component Options, which are associated with a particular visual component, describing how it should be recognized on the screen and interacted with
The String Field, a sophisticated component option that allows you to compose both simple strings and complex templated strings, and either insert them into a GUI component like a text field, simulate a menu action or pressing a special key
Test Case Object Options
At the top of the Designer panel (the version in Alyvix Editor) are the options relating to the test case object as a whole:

The Object name is the reference name of a particular test case object within a given test case. A test case typically contains multiple test case objects which are used when building scripts, and thus it needs a unique, descriptive name to easily distinguish it from other test case objects.
There are also three test case parameters that affect how the selections and subselections in the component tree are detected, regardless of their type, and what happens if they fail to be detected:
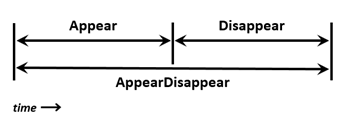
Detection condition: One of the following conditions will be checked at a default interval of every
0.5seconds:Appear: Alyvix will continuously try to detect if the test case object as a whole (i.e., all of its groups and components) appear simultaneously on screen when that was previously not the case
AppearDisappear: Similarly, Alyvix will check whether all the groups and components in the test case object appear, and then also disappear within the timeout limit
Disappear: If the groups and components of a test case object were initially present, Alyvix will detect when they are no longer visible
Timeout: This value represents the number of seconds that Alyvix attempts to detect objects onscreen. If this value is exceeded then the break flag will determine what happens next.
Break: If this option is checked, then once the timeout is exceeded Alyvix will stop the currently running script and switch instead to running the fail script. Otherwise it will continue on to the next node in the script.
The timeout and break parameters are discussed in further detail in the Selector section together with the measure parameter.
Component Options
Below the component tree in the Designer interface you can find the options that affect a specific instance of a component type used in an Alyvix test case object. Whenever you select a row in the component tree, these options will be updated to reflect the options currently assigned to that row’s component.
Root Component Options
The root element options take effect when the test case object is first executed. These options allow you to set up the proper environment for the application you want to automate, which is especially helpful when a test case object will be the very first scripted node.
For instance, you might want to start a particular application like a web browser before Alyvix begins looking for any particular components on the current screen, and then close the browser with the final test case object.
The root component options can be found at the bottom of the Designer interface when the root node S is selected:
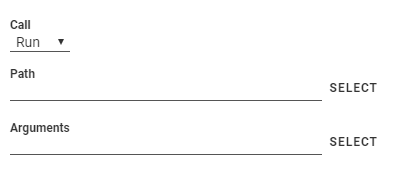
The Call dropdown tells Alyvix what action to perform when the test case object is executed:
Run: Start a Windows application
Kill: Terminate a running application
None: Don’t do anything
To start an application, you will need to tell Alyvix where to find it, and what arguments to pass. For instance, you could start a web session with a particular browser and with a specific URL as an argument. To do this, select Run and set its two parameters:
Path: Use the button to bring up a file selection dialog to find the application in the file system, or else type the full path for an executable file in your system
Arguments: Here you can enter the arguments the application expects when it starts up – the button will let you insert a file with its full path, but replaces the existing content, so use it first before adding any other arguments
If you paste a path into the Path field instead of using the button, you should not include any quotation marks even if there are spaces in the path.
The Kill option instead allows you to select a currently running process to terminate, or type one in if it’s not currently running:
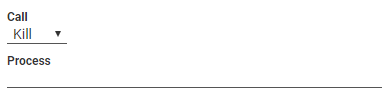
It provides a filtered dropdown named Process, populated with all currently running Windows processes, allowing you to make a quick selection with just a few keystrokes.
Note
If you launch an application with the Run or Kill option, you can still recognize child components in the application’s interface within the same test case object.
Image Type Options
The image component corresponds to the pixel-by-pixel representation of the selection or subselection on the captured screen, such as an icon. As shown here, it has the following options to choose which visual aspect of the image to match against (an Operations tutorial video is available that explains the image options):

Match: Only recognize an area on the screen that is exactly the same as the one selected during screen capture
Color: Match a selection or subselection that has the same color, but tolerate different pixels
Shape: Match the same shape as the contours of the object in the screen capture region, regardless of its color
Rectangle Type Options
The rect component corresponds to a rectangular region on the captured screen, such as buttons, text boxes, panels or windows. As shown here, it has the following options (an Operations tutorial video is available that explains the rect options):

Button: Match a region such as a button containing text, within a larger space
Box: Match a horizontal region such as a text field, where the space is filled up from the left edge to the right edge
Window: Match a panel or a window, both horizontally and vertically, where the region of interest and the selection are the same
Text Type Options
The text component corresponds to an area on the captured screen containing characters, such as a label, title or text in an input field. As shown below, it has the following options, which vary depending on the type selected.
For both the Detect and Map types, the Scrape field displays the text that was automatically recognized in the component’s subselection on the screen capture. There are some limitations to note:
The main component of a group cannot be of type Text
The region-of-interest must contain at least 2 characters (in general, text recognition improves as the amount of text in the RoI increases, and with larger fonts and increased screen resolution)
Common Options
For all group and component object types, once a match on the screen has been found, you can optionally set up an immediate mouse and/or keyboard action which is unique to each component. The actions on all components in a group will be performed in the top-to-bottom order found in the component tree.

An Action creates a mouse event corresponding to one of the six types listed below (an Operations tutorial video is available which explains the individual Action options). By default, the mouse position will be set to the center of the component’s selection or subselection.
None (default): Don’t perform any mouse action when a component is matched. No mouse icon will be displayed to the right of the component.
Move: Hover the mouse over the component, without clicking. The SET POINT button lets you select a point relative to the center of the component with the crosshairs.
Click: Move the mouse over the component (use SET POINT as with Move), and then click one or more times at that point. You can choose the left or right mouse button and the number of times to click (Units). If you select more than one click, you can then set the delay in milliseconds between each click.
Scroll: Move the mouse to the position indicated by the SET POINT button, then pick a direction (up, down, left or right), and indicate how far and how fast the object containing that point should be scrolled. A unit represents an application-dependent measure of how far the screen will scroll, typically the distance moved when the mouse scroll wheel makes one partial turn. If it is set to more than one scroll unit, you can then set the delay in milliseconds between each scroll.
Hold: Move the mouse to the position indicated by the SET POINT button, then create a mouse event where a click is initiated but the mouse button is still held down.
Release: If the Direction is set to
None, then move the mouse to the position indicated by the SET POINT button. Otherwise choose a direction (up, down, left or right) and the distance in pixels to move before releasing the mouse button.
The String option enters the text in its field into the text field in the interface that currently has focus (it will occur after the effect of any Action above), for instance in a login/password field. It can also emit special characters such as the Windows key. For more detailed information, see the following page that details how to use the String field.
Mouse and Keyboard Action Icons
When one of these options is selected, an icon will appear to the right of the component as a quick indication of that option and its parameters. The following table illustrates the icons used and their meanings.
Mouse and Keyboard Action Icons
Icon |
Description |
Move the mouse to a new position |
|
Click the left mouse button |
|
Click the right mouse button |
|
Scroll downwards |
|
Scroll upwards |
|
Hold the object under the mouse |
|
Release the held object where it is |
|
Release the held object upwards |
|
Release the held object downwards |
|
Release the held object leftwards |
|
Release the held object rightwards |
|
Enter text into the field in focus |
|
Enter parameterized text into the field in focus |
Tip
When using SET POINT, the direction of the arrow to the right of the icon is
indicative of the direction of the point that was set compared to the center of the selection
or subselection. For instance, an arrow like ![]() means the click
point will be below and slightly to the left of the selection.
means the click
point will be below and slightly to the left of the selection.
The String Field
When a component in a test case object matches an area currently onscreen, its Action will be executed, and then the contents of its String field will be typed out as a sequence of keystrokes, one at a time, to the window in focus when the test case object matched.
The text that is inserted may come from more than one source, not just what is typed in by hand in the String field, in which case that field specifies how they should be combined (examples can be found in the next section below):
Manually specified on the test case object itself:
Regular characters: Normal letters and numbers, along with most punctuation
Special characters: Non-printable characters (see table below), such as Enter and Control, along with punctuation that has special meaning such as for regular expressions
System keys: Special key combinations (see table below) for the operating system, such as Win + E to open a new Explorer window.
Text read dynamically from the screen (scraped), computed by one test case object and then inserted as specified by another test case object that comes later in the execution of the test case script:
Full text: The source is the entire text found in a region of interest specified by the earlier test case object
Mapping extracted text: Given a extract text from a region of interest, pass it to the map, and insert the map’s output value as specified by a later test case object
External sources:
Map values: The source of the text is fields in the Map itself
CLI arguments: Text derived from command line parameters passed to Alyvix Robot
The extraction and mapping functions have a common purpose: to substitute text from a source string into a template string, and then send the resulting string to the application.
If the text is extracted directly from the screen, you will typically need to have two separate test case objects: one which acquires the text from the screen, and another containing the template which inserts the text into the GUI object (the second object must occur chronologically after the first, ore else the text string will not yet have been scraped). If the text comes from one of the two external sources (map or arguments), only a single test caseobject is necessary.
Escaped String Examples
To indicate that content in the String field template is not regular text, it must be escaped
with a pair of curly braces { ... }. If you want to insert more than one template, each one
must go in its own separate set of curly braces.
Note
For the purposes of scraping and mapping text, matching is applied in a case insensitive fashion. However, the result is stored (and later retrieved) with the case of the original characters.
The following examples provide an illustration of how these string functions can be applied.
Mixing Regular and Special Characters
Regular letters and numbers, along with most punctuation and special characters can be inserted in the String field normally. However, some special characters, editing keys, and key combinations must be escaped. The table below lists the full set of special keys that can be used.
In the following example, a test case object with an Excel™ spreadsheet as a target would put the words “First”, “Second” and “Third” in three adjacent columns.
First{tab}Second{tab}Third
Full Text
When a text component matches an area onscreen, all of the text in its region of interest is
scraped and stored. This text can then be used by the test case objects in later scripting nodes
to insert strings into GUI fields. The entire text can be inserted using the syntax
{<test-case-object-name>.text}. So if a test case object named temperature_read reads
the string 37 degrees in the application, it can be copied to another GUI field by putting
the following expression in the String field of a later scripting node:
{temperature_read.text}
Mapping Extracted Text
Given a map with pairs of inputs to match and their corresponding output values, you can match text
scraped from a previous test case and insert the map’s output value for that text. On the first
test case object’s component (which must be of type text), the type must be set to MAP
and the map’s name must be chosen in the Map
dropdown. In the String field on the later test case object, the map’s output
value can be retrieved with the template {<test-case-object-name>.extract}.
For instance, if the string Paris from the test case object city is read from the screen,
and the selected map contains the pair Paris, France then the following template will generate
the text Country: France.
Country: {city.extract}
Map values
This option allows you to create a map with a table of values (where each row in the table corresponds to one iteration of the loop). For instance, you could insert three values per row into a table on a web page or in a spreadsheet with this String field entry:
{1}{tab}{2}{tab}{3}
CLI Arguments via the Alyvix Robot --args parameter
Text can also be inserted from a command line parameter passed to Alyvix Robot. To use this
capability, pass Alyvix Robot the argument as a simple keyword
after the -a parameter, and type the {<number>} notation into the String field
of the test case object that should insert the text. For instance in the string below, passing the
parameter -a Red will result in the text Color: Red appearing in the target text field of
the application.
Color: {1}
{<n>} Key Precedence and Defaults
You may have noticed that both map loops and CLI arguments share the
{<n>} notation. In fact, this notation is just a shortcut, which can be very useful since
it’s rare to have to use both at the same time. Still, should you need to insert an indexed key
when both a loop is running and you passed arguments via the command line, then the {<n>}
notation will return the map value before it would
return the value from the CLI argument list. To ensure you are inserting the string from the
source you intended, you can use the following expanded notation:
Source |
Format |
First Argument: {1} |
Second Argument: {2} |
CLI |
{cli.arg<n>} |
{cli.arg1} |
{cli.arg2} |
Map |
{<map-name>.<key-name>} |
{map1.key1} |
{map1.key2} |
Both the map loops and CLI arguments also use the same default notation:
{<key>,<default-value>}
So, for instance, you can use the following to insert the first CLI argument if it exists (and you are not in a map loop), but insert the string “abc” if no arguments were passed to Alyvix Robot:
{1,abc}
Special Characters
The following table details which keys and characters require escaping when used. Although our standard is to always use lower case, the key sequences are case insensitive.
Note that this list does not include mouse events like scroll actions for browsers.
Key Sequence |
Result |
|
Enter key |
|
Space key (this is only needed at the beginning or the end of a string) |
|
Tab key |
|
Press and immediately release the Shift key, without applying it to the letters that come next. |
|
|
|
Press and immediately release the Control key, without applying it to the characters that come next. |
|
|
|
Press and immediately release the Alt key, without applying it to the characters that come next. |
|
|
|
|
|
Backspace key |
|
Delete key |
|
Escape key |
|
Function keys |
|
Number pad keys |
|
Up arrow (cursor) key |
|
Down arrow key |
|
Left arrow key |
|
Right arrow key |
|
Home key |
|
End key |
|
Page Up key |
|
Page Down key |
|
A unicode link,
where |
|
{ |
|
} |
All other printable keys not found in the above list can be used normally.