Setup
Cluster
Service Resource Management
To manage service resources you can use a set of scripts provided with NetEye. These scripts are wrappers of the PCS and DRBD APIs.
Adding a Service Resource to a Cluster
Service resources can be added by modifying an existing template,
located under the /usr/share/neteye/cluster/templates/
directory, then copying it to a suitable location, and finally using
it in a script.
For example, consider the Services-core-nats-server.conf.tpl
template.
{
    "volume_group": "vg00",
    "ip_pre" : "192.168.47",
    "Services": [
        {
            "name": "nats-server",
            "ip_post": "48",
            "drbd_minor": 23,
            "drbd_port": 7810,
            "folder": "/neteye/shared/nats-server/",
            "collocation_resource": "cluster_ip",
            "size": "1024"
        }
    ]
}
Copy it, then edit it:
# cd /usr/share/neteye/cluster/templates/
# cp Services-core-nats-server.conf.tpl  /tmp/Services-core-nats-server.conf
# vi /tmp/Services-core-nats-server.conf
Hint
You can copy the edited file to any other location, to be used for reference or in case you need to change settings at any point in the future.
In the file, make sure to change the following values to match your infrastructure network:
ip_pre: the corporate network address of the node (i.e., the first three octets).
ip_post: the IP address of the node (only the last octet)
Once done, make sure that the JSON file you saved is valid syntactically, for example by using the jq utility:
# jq . /tmp/Services-core-nats-server.conf
A valid file will be displayed on, but if there is some syntactic mistake in the file, an explanatory message will provide a hint to fix the problem. Some possible message is shown next.
parse error: Expected separator between values at line 7, column 21

parse error: Objects must consist of key:value pairs at line 12, column 10
Note
Only one error message is shown at a time, so always run
jq until you see the content of the file.
Finally, let the cluster pick up the changes and configuration.
# cd /usr/share/neteye/scripts/cluster
# ./cluster_service_setup.pl -c /tmp/Services-core-nats-server.conf
Security
Trusted Certificate Generation with Windows
The instructions below will help you create a trusted certificate chain in Windows and configure HTTPS in NetEye 4 with the trusted certificate. There are also instructions for how to do this from within the NetEye server.
Requirements
The following requirements should be met before proceeding with configuration of the certificate:
A Windows Certification Authority should already be up and running, with a suitable Certificate Template.
The Certificate Template should meet recent encryption standards, for example:
RSA, SHA256, 4096bit
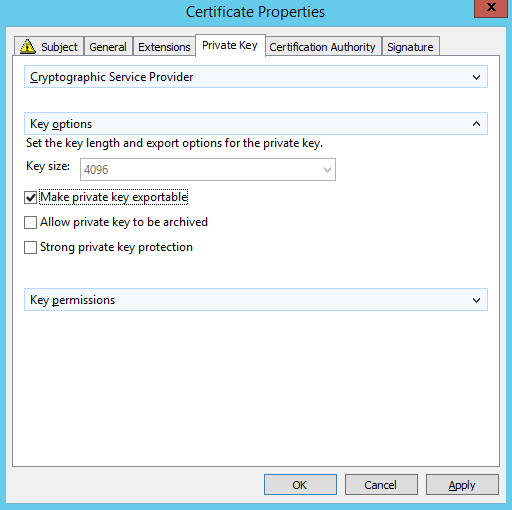
The private key should be marked as exportable
You have a Windows domain-joined Server/PC which is allowed to request certificates.
You have a Linux machine running NetEye where you can install the CA Chain Certificate. This is necessary for the server certificate to be trusted by the Apache web server.
Procedure
Step 1: Request a new certificate from a Windows domain-joined Server/PC:
Open the Microsoft Management Console ()
Within MMC, go to
In the popup dialog, navigate to , and then OK to close the dialog.
Expand , then right click on Certificates
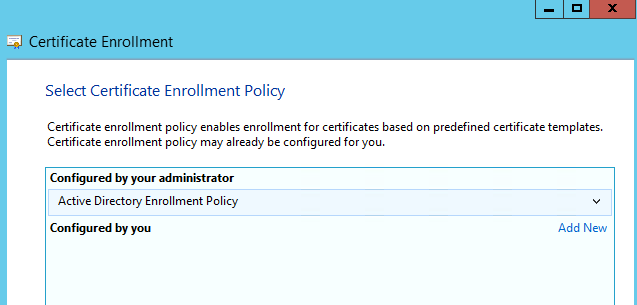
Select All Tasks, then Request new certificate (you may need to skip a “Before You Begin” screen first) and Next when “Active Directory Enrollment Policy” is selected as shown here:
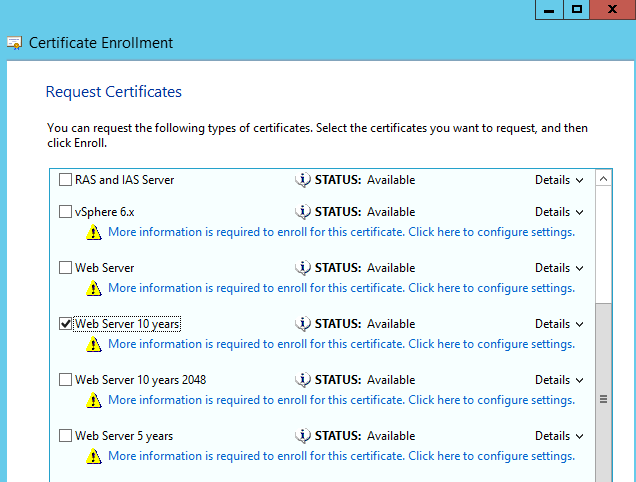
Select a Certificate Template and click on the link “More information is required to enroll for this certificate…”
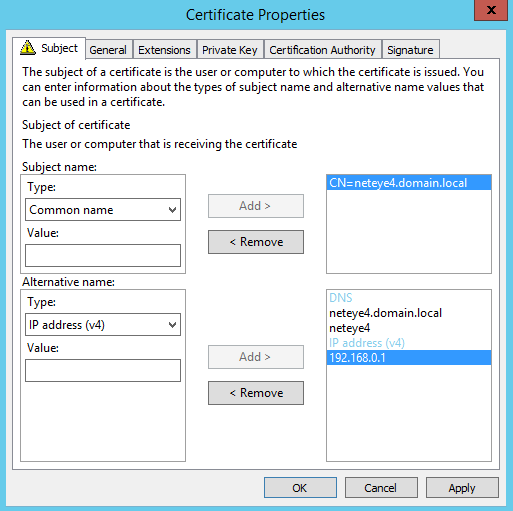
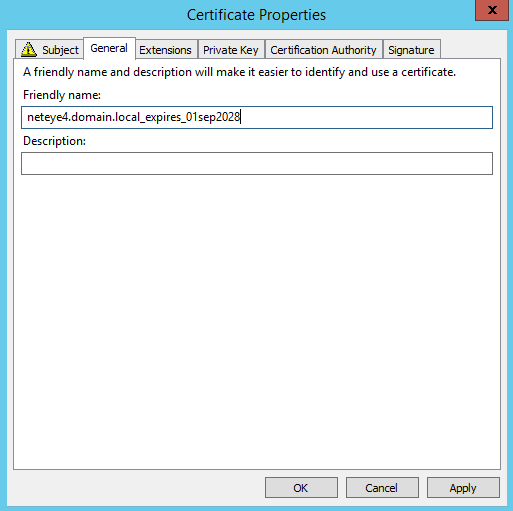
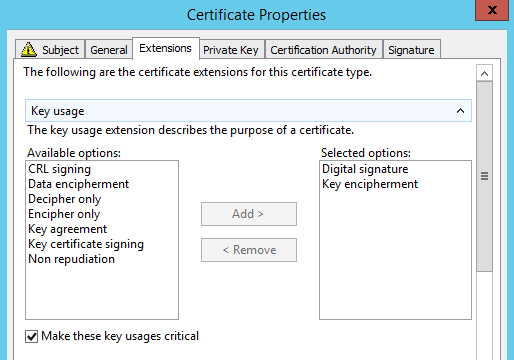
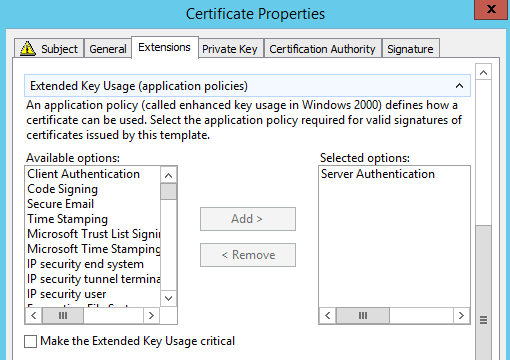
Fill-in the information for each tab in the Certificate Properties dialog as shown (the fields shown are mandatory; you can optionally add values like Country, Department, Organization, etc.):
Click OK and then Enroll and Finish.
Step 2: Export the certificate with its private key in PFX format:
Right click on the certificate you just created in the center panel, then click on .
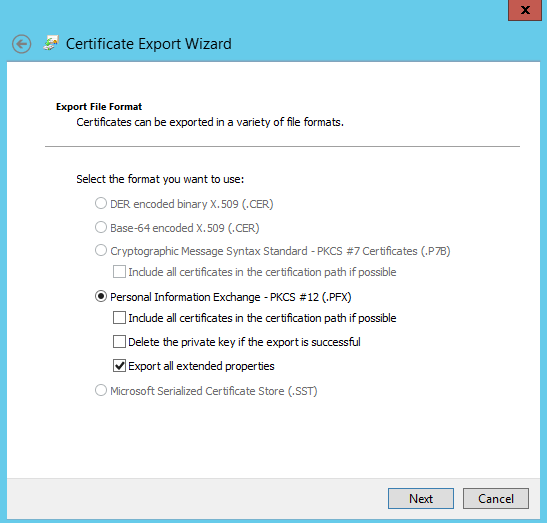
Select Yes, export the private key, click Next, and select PKCS #12:
Provide a password to protect the private key that goes with the certificate (a strong password is advised):
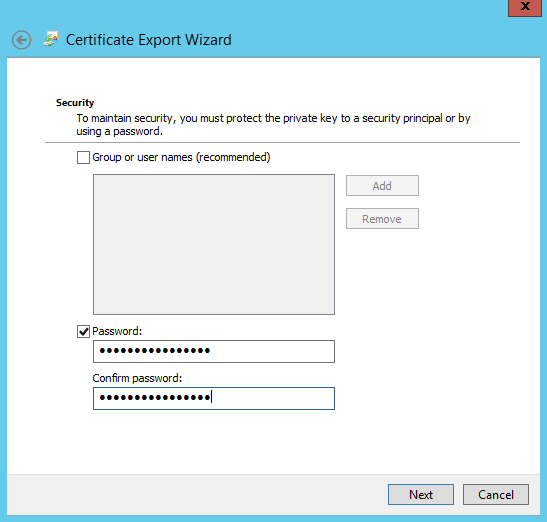
Then designate the path where the certificate should be stored:
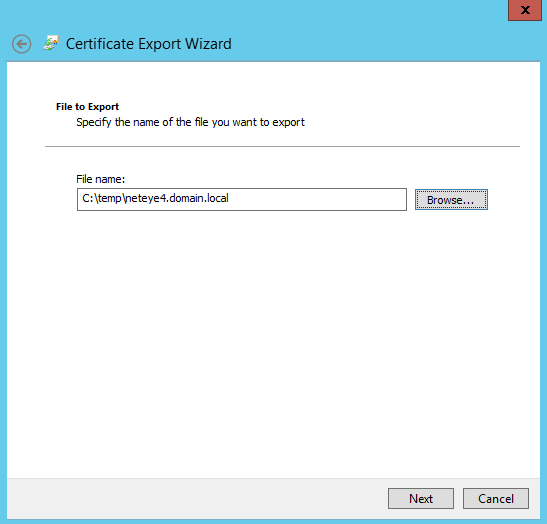
Now click Next, and then Finish. You should see the message “The export was successful.”
Step 3: Export your CA Certificate(s) in Base64 format.
Note
If the Certification Authority Infrastructure consists of multiple CAs (for example, Root CA > Subordinate Intermediate CA), you must export all of them and then combine them into a single Certificate.
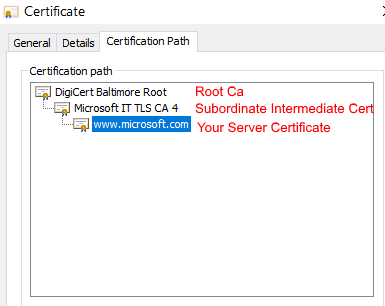
Double click on your new certificate in the center panel. In the popup dialog, click on the Certification Path tab, which should display a Certificate Chain such as the one shown here:
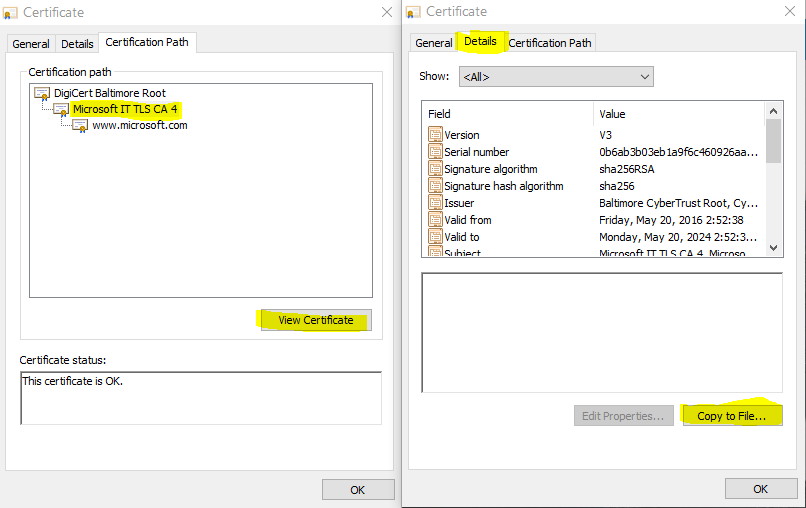
Select for instance the Intermediate Certificate, and then click on the View Certificate button. Then click on the Details > Copy to File:
Instead of the “DER encoded binary” option, select “Base-64 encoded”:

In the next dialog, choose a path and filename to save the .CER file, then click Finish.
Repeat the procedure above for the Root CA instead of the intermediate certificate.
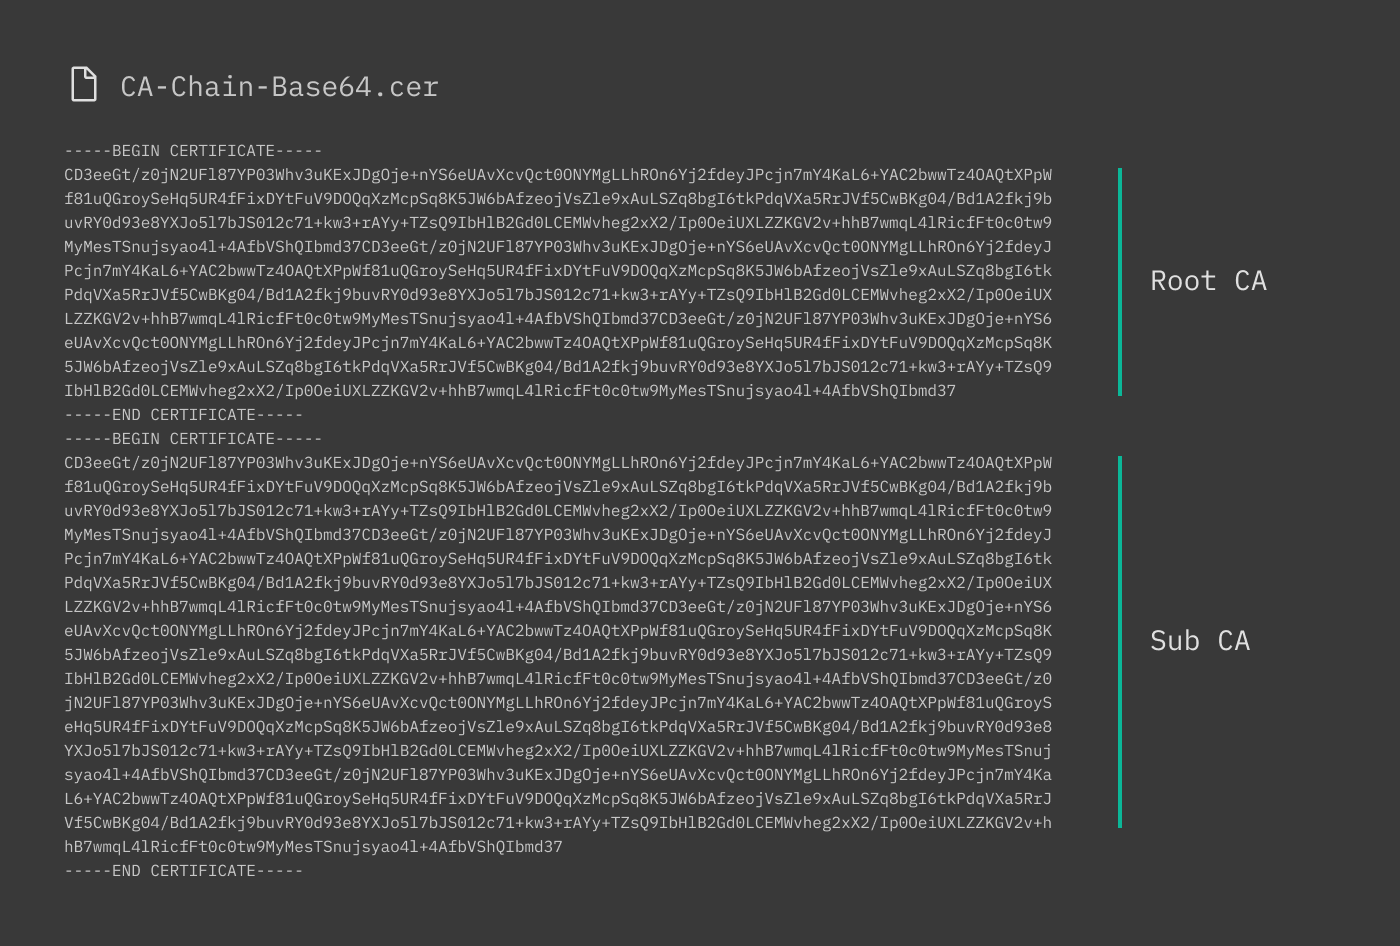
To create the certificate chain, open all of your saved CA certificates in a Text Editor and combine them into a single file, both respecting the proper order (Root/Parent before Subordinate/Child) and paying attention to not leave any blank lines between certificates as shown here:
Step 4: Copy the CA Chain certificate to the Linux server (NetEye 4) and adjust the Apache configuration:
Make a copy of the CA Chain certificate, rename and move both of them to the proper folder according to the settings in
/etc/httpd/conf.d/neteye-ssl.conffile:SSLCertificateChainFile /neteye/shared/httpd/conf/tls/certs/neteye_chain.crt SSLCACertificateFile /neteye/shared/httpd/conf/tls/certs/neteye_ca_bundle.crt
Step 5: Copy your PFX Server Certificate to the Linux server (NetEye 4), convert it, and adjust the Apache configuration:
Put the PFX certificate in a temporary directory, for example /tmp.
Extract the public part of the certificate. You will be asked for the Key Password, which is the one you entered when you exported your PFX from the Windows Machine:
# openssl pkcs12 -in {yourfile.pfx} -nokeys -out {certificate.crt}Extract the encrypted private key part of the certificate. You will be asked for the Key Password, which is the one you entered when you exported your PFX file from the Windows Machine. You will also be asked to enter a new Password for the newly generated private key (you can use the same password):
# openssl pkcs12 -in {yourfile.pfx} -nocerts -out {keyfile-encrypted.key}Now decrypt your private key:
# openssl rsa -in {keyfile-encrypted.key} -out {keyfile-decrypted.key}Rename your certificate and key and move them in the proper folder according to the settings in
/etc/httpd/conf.d/neteye-ssl.conffile:SSLCertificateFile /neteye/shared/httpd/conf/tls/certs/neteye_cert.crt SSLCertificateKeyFile /neteye/shared/httpd/conf/tls/private/neteye.key
Note
Both the certificate and key must be owned by root and only root must have full read and write access to the files. Also, certificate and key are located in shared directory. Therefore, in a cluster environment, they should be changed only on the node running the httpd resource.
Finally, restart Apache.
HTTPS Configuration
Beginning with version 4.2, NetEye has been configured to use HTTPS throughout, using a self-signed certificate based on Apache’s mod_ssl. This certificate is generated automatically during the NetEye install process.
However, it is recommended to create and install as soon as possible a new trusted certificate consisting of the self-signed certificate chained with a valid, external CA certificate.
The importance of using trusted certificates, is clear also from this example use case: if you use the Director’s Self-Service API to first connect to an external Icinga2 agent, the Kickstart initialization script may fail if it determines it cannot trust the self-signed certificate alone. While this restriction can be bypassed as an emergency measure, this is a highly insecure practice and is strongly discouraged.
The following steps will help you configure your NetEye installation to create and deploy a more secure certificate that can be trusted externally and/or in your domain. If you would prefer to create a certificate chain from within Windows, step by step instructions are available in the dedicated section.
Step 1: Obtain Your Signed Certificate from a Certificate Authority
The instructions below assume you already have a valid certificate from an external Certificate Authority (CA). Then for each server/machine you will need to:
Create a private key
Generate a certificate signing request (CSR)
Send or upload the private key and CSR to the CA
Retrieve the certificate signed by the CA
When NetEye is first installed, it configures the initial self-signed certificates in the following directories:
File |
Directory |
|---|---|
neteye_cert.crt |
/neteye/shared/httpd/conf/tls/certs/ |
neteye.key |
/neteye/shared/httpd/conf/tls/private/ |
neteye_chain.crt |
/neteye/shared/httpd/conf/tls/certs/ |
neteye_ca_bundle.crt |
/neteye/shared/httpd/conf/tls/certs/ |
neteye-ssl.conf |
/etc/httpd/conf.d/ |
Note
Certificate and key are located in shared directory. Therefore, in a cluster environment, they should be changed only on the node running the httpd resource.
Because the private key is so fundamentally important to your network’s security, you should strongly consider creating a new one. You can create the private key and the CSR file in the appropriate directory with a single command, after moving to the correct directory:
# cd /neteye/shared/httpd/conf/tls/private/
# openssl req -newkey rsa:4096 -nodes -keyout hostname.fqdn.key -out hostname.fqdn.csr
Generating a 4096 bit RSA private key
..................................................................................................++
..................................................++
writing new private key to 'hostname.fqdn.key'
-----
You are about to be asked to enter information that will be incorporated
into your certificate request.
What you are about to enter is what is called a Distinguished Name or a DN.
There are quite a few fields but you can leave some blank
For some fields there will be a default value,
If you enter '.', the field will be left blank.
-----
Country Name (2 letter code) [XX]:IT
State or Province Name (full name) []:BZ
Locality Name (eg, city) [Default City]:Bolzano
Organization Name (eg, company) [Default Company Ltd]:Company
Organizational Unit Name (eg, section) []:Monitoring
Common Name (eg, your name or your server's hostname) []:hostname.fqdn
Email Address []:mail@company.com
Please enter the following 'extra' attributes
to be sent with your certificate request
A challenge password []:
An optional company name []:
The hostname.fqdn.key file is your private key which should be kept secure and not given to anyone. The hostname.fqdn.csr file is what you should send to the Certificate Authority when requesting your SSL certificate (you may need to paste its contents into the web form of the CA).
Note
If you have a large number of systems to monitor, it makes sense to automate this process. For instance, you can keep multiple keys and CSRs manageable by using the host’s FQDN as part of the filename for both the private key and the CSR. And rather than manually answer the CSR questions one by one, you can create an external configuration file (usually called openssl.cnf) that is invoked with the -extfile parameter.
Relevant links:
Step 2: How to Create the Trusted Certificate
The certificate that the CA returns to you (let’s call it countersigned.crt) will be the (self-signed) certificate you sent them, countersigned with the CA’s key. You can then use this new trusted certificate in applications (e.g., browsers or the Icinga2 agent) that in turn trust the CA you used.
To be used with the Icinga2 agent, this certificate should be in PEM format. To check, you can look at the certificate file:
# cat countersigned.crt
-----BEGIN CERTIFICATE-----
MIID3jCCAsagAwIBAgICPnowDQYJKoZIhvcNAQELBQAwgaMxCzAJBgNVBAYTAi0t
...
-----END CERTIFICATE-----
If you do not see BEGIN CERTIFICATE, you will need to export the certificate to PEM format (you can use other tools besides openssl as long as they generate a certificate in PEM format):
# openssl x509 -in countersigned.crt -outform PEM -out countersigned.pem
Step 3: Install the Certificates on the Web Server
You must then rename your certificates and key and move them in the proper folder according to the settings in file /etc/httpd/conf.d/neteye-ssl.conf:
<VirtualHost _default_:443>
SSLEngine on
SSLCertificateFile /neteye/shared/httpd/conf/tls/certs/neteye_cert.crt
SSLCertificateKeyFile /neteye/shared/httpd/conf/tls/private/neteye.key
SSLCertificateChainFile /neteye/shared/httpd/conf/tls/certs/neteye_chain.crt
SSLCACertificateFile /neteye/shared/httpd/conf/tls/certs/neteye_ca_bundle.crt
</VirtualHost>
SSLCertificateFile: Your trusted certificate countersigned by the CA, from countersigned.crt (or countersigned.pem if you exported it in .pem format) to neteye_cert.crt
SSLCertificateKeyFile: Your private key, renamed from hostname.fqdn.key to neteye.key
SSLCertificateChainFile: Certificate chain of the server certificate. If you don’t have a chain you can copy the file neteye_cert.crt naming it neteye_chain.crt
SSLCACertificateFile: The CA’s public certificate named neteye_ca_bundle.crt
Note
Do not change setting in file /etc/httpd/conf.d/neteye-ssl.conf because they will be overwritten during update procedure possibly causing NetEye outages.
Step 4: Restart Apache
Finally, restart the HTTPD service so it reloads the configuration files above with the new trusted certificates. If you are on a single-node instance use:
# systemctl restart httpd.service
If you are on a cluster use:
# pcs resource restart httpd
Authentication
User Authentication and Permissions
Configuring authentication for users and groups of users in NetEye requires the following steps:
Creating a Resource Backend describing how to connect to an authentication backend
Creating an Authentication Backend that describes how to retrieve user credentials
Creating one or more Roles, which are sets of permissions that can be applied to either users or user groups
Adding, editing or removing Users who must be authenticated
Adding, editing or removing User Groups, whose users have commonly defined permissions and restrictions, and receive joint notifications
Users and User Groups can also be imported from authentication backends (e.g., LDAP) but their properties cannot then be modified within NetEye. Roles can only be created locally.
Defining users and groups at Configuration > Authentication will only allow you to set permissions and restrictions for what users can do within NetEye. For other uses of users and groups, such as creating contacts for monitoring notifications, please consult the user guide for those individual modules.
Resource Backends
Resource backends (Configuration > Application > Resources) describe the interface details (e.g., host, port, login) required for connecting to an authentication server or resource. These can be an LDAP or SSH server, an internal or external SQL database, or even a local file. Fig. 4 shows the resource description for an LDAP server.
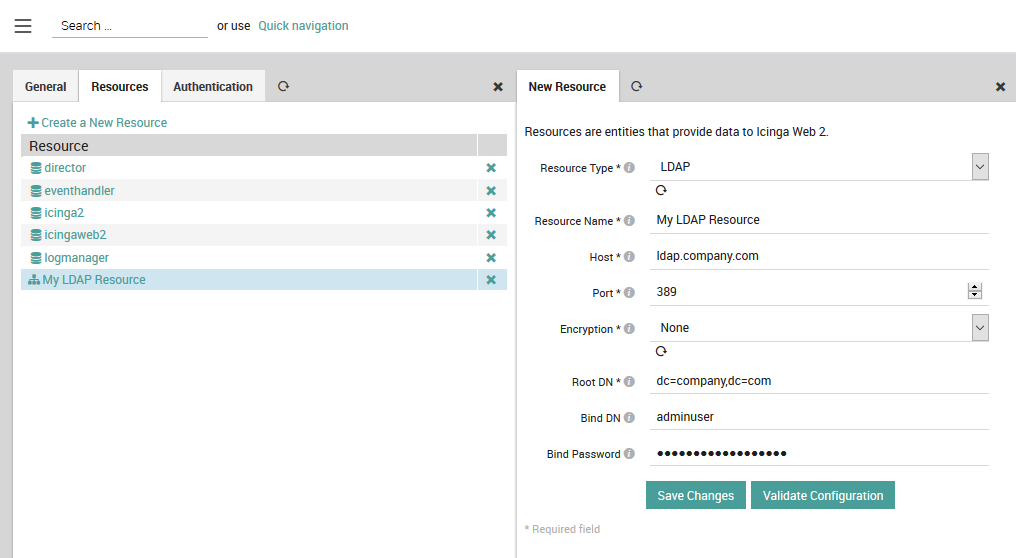
Fig. 4 Creating an LDAP resource backend
Authentication Backends
Authentication Backends (Configuration > Application > Authentication) tell NetEye how to access user credentials or user group membership from a given resource backend. Authentication backends can be sources such as LDAP, Active Directory, an SQL-compatible database, or a regular expression in the case of an external file resource. You can define multiple authentication backends, which NetEye will then consult in the order listed in the tables shown in Fig. 5. For user authentication, you can change the relative priority of the backends using the arrows.
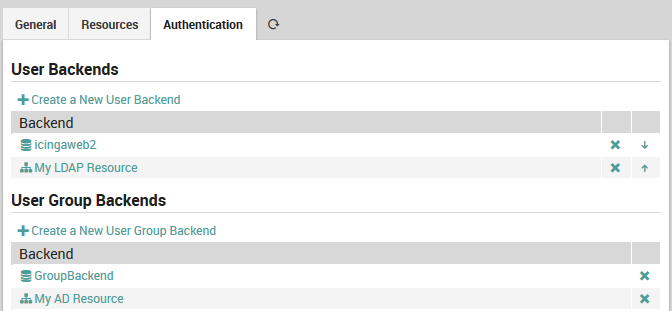
Fig. 5 The User and User Group authentication backend list.
User and user group authorization backends can share the same resource backend if they are both stored in the same object with identical external connection details.
To create a new user authentication backend, click on the action
Create a New User Backend and select the desired backend type as shown
in Fig. 6. If you do not see the
expected items in that dropdown menu, double check the configuration
of your resource backends.
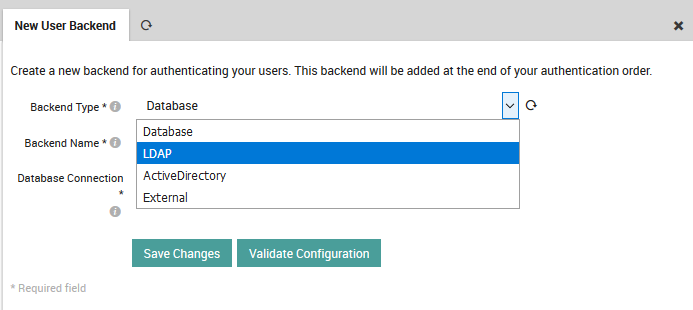
Fig. 6 Selecting the backend type for a new user backend.
Once selected, the form will expand to show the options available for the type chosen. You can now fill in the remaining values (shown in Fig. 4) that tell NetEye how to retrieve user credentials from that source. The official IcingaWeb2 documentation describes these fields in more detail.
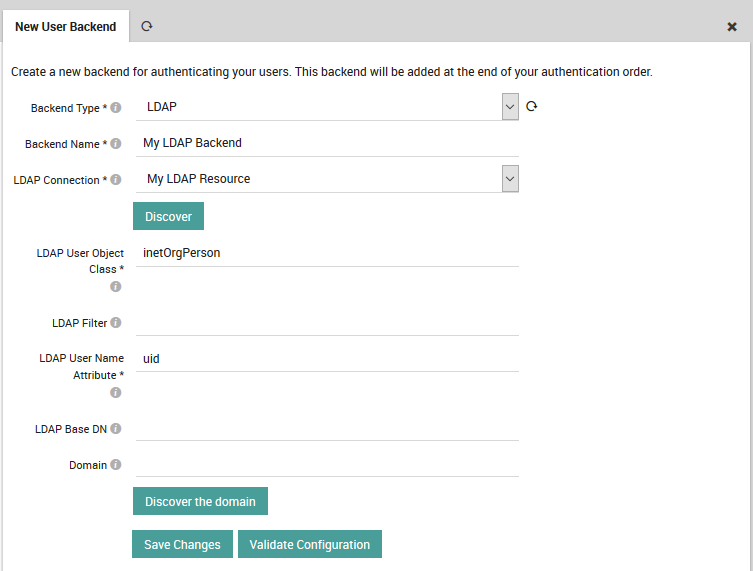
Fig. 7 Inserting user backend details.
The procedure for creating an authentication resource for user groups is very similar to that for users. Please consult the official IcingaWeb2 documentation on User Groups Authentication for further details.
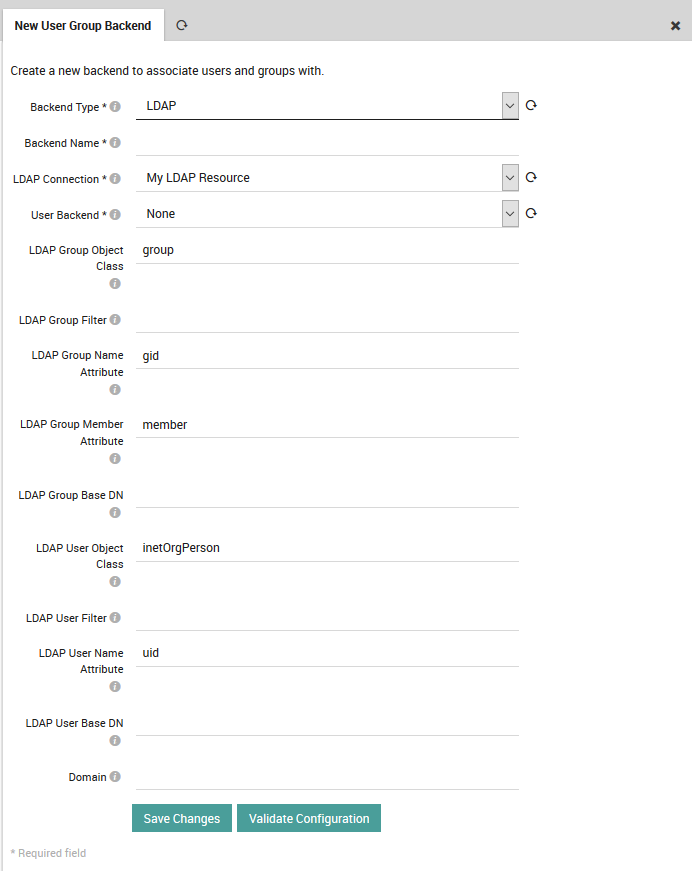
Fig. 8 Inserting user group backend details.
Roles
Roles (Configuration > Authentication > Roles) are named sets of permissions and restrictions that make it easier to allow many similar users to carry out common tasks, or to assign permissions in sets if multiple users have overlapping needs for different modules. If you have multiple users or groups of users needing similar sets of permissions, assigning a single role is much faster than assigning a large number of permissions one at a time to multiple users.
As the Icinga 2 documentation explains, by default all actions are prohibited. Permissions granted by multiple roles are summed together, while multiple restrictions have a bit more complex behavior.
In general, permissions allow users to perform a certain set of actions. They are separated into hierarchical namespaces corresponding to the names of modules, where the * (wildcard) character can be used to designate all permissions within a given namespace. Restrictions instead are used limit information that can be viewed in forms, dashboards, reports, etc. and support the same filtering expressions used in monitoring.
Some examples of roles include:
A root role can give all permissions at once by enabling the Administrative Access setting.
Assigning users permissions per module such as:
Access to the Analytics module
Configuring elements in Director
Showing all business processes (see the example in Fig. 10)
Allowing operators to do only specific tasks like:
Allow configuration of notifications (director/notifications)
Allow processing commands for toggling active checks on host and service objects (monitoring/command/feature/object/active-checks)
Allow adding comments but not necessarily deleting them (monitoring/command/comment/add)
To create a new role, click on the action Create a New Role as shown
in Fig. 9. You can also edit an existing role by
clicking on the role’s Name in the table, and remove a role by
clicking on the at the right side of that role’s row.
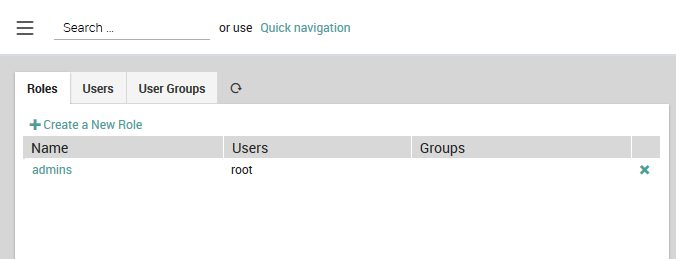
Fig. 9 The list of existing roles.
Permissions can be granted on a per-module basis using the form at the bottom of the New Role panel as shown in:numref:figure-create-role. An incomplete list of permissions can be found in Icinga’s official documentation. For restrictions, you must enter the appropriate filtering expression. These expressions can reference defined variables such as user and group names and use regular expressions.
Note
Whenever you change permissions or restrictions for any module, you will need to log out of NetEye and then log back in before the new settings will take effect.
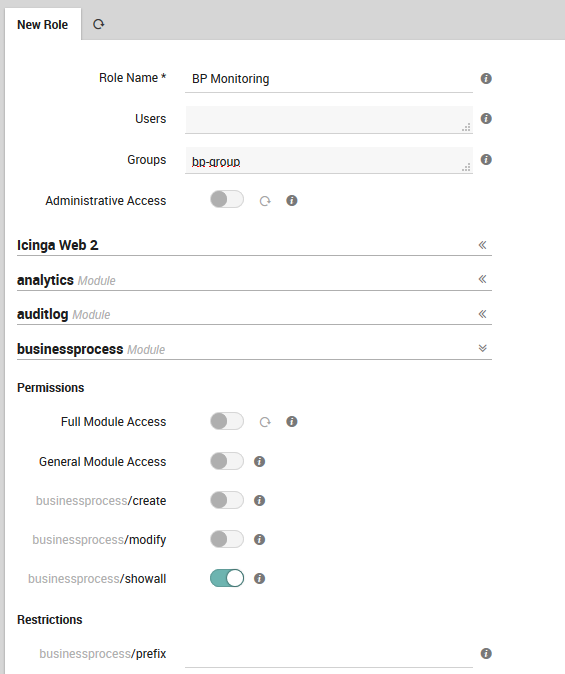
Fig. 10 Adding a new role with permissions and restrictions.
Users
A User (Configuration > Authentication > Users) in NetEye follows standard usage where a person is connected to the system via a user name, password, and set of permissions. If you choose a database as the authentication backend, then user properties can be directly edited in NetEye. If users are instead derived from another source, such as LDAP, then the user properties must be changed in those data sources, and you will only be able to change their roles and user groups.
To create a new user manually, click on the Add a New User action
(Fig. 11). By convention, user names start
with a lower case letter, while user groups begin with an upper case
letter. If the user is defined in a database, you can change that
user’s details by clicking on the user name and then on the Edit User
action in the panel that appears to the right. You can also remove
that user with the icon at the right in the Remove column.
If you have more than one user backend, you can choose one in the dropdown box at the top left. Because there are potentially a large number of users, the standard filtering and paging controls are available. If instead you want to view users imported from an external backend but you only see “icingaweb2” listed in the dropdown box, then you should check that you have properly created your user backend.
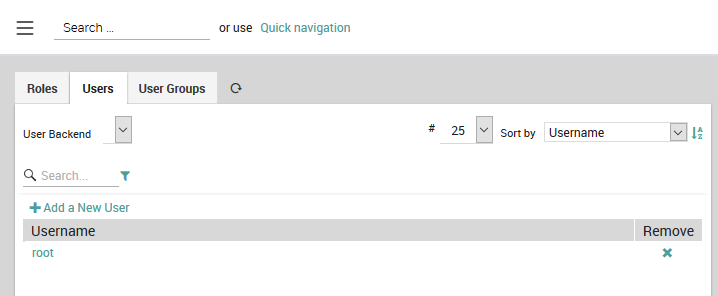
Fig. 11 Figure 8: The list of users from the current user backend.
User Groups
User Groups, like Roles, allow you to save time by dynamically creating groups that together should receive the same permissions, restrictions, and monitoring notifications (Configuration > Authentication > User Groups).
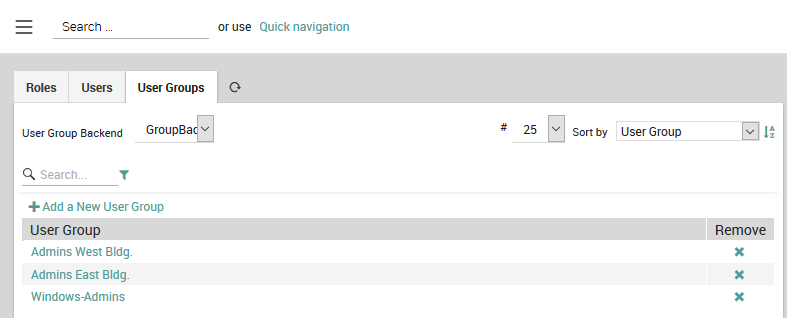
Fig. 12 Adding and removing groups of users.
If instead of seeing a list of user groups as in Fig. 12, you see the message “No backend found which is able to list user groups”, please make sure you have properly created your user group backend.
As with Users, you cannot modify groups that have been imported from a
non-database backend. Otherwise you can add a new user group or remove
an existing one (Fig. 12), add and remove the users in a given group
(Fig. 13), and edit the group name using
the icon.
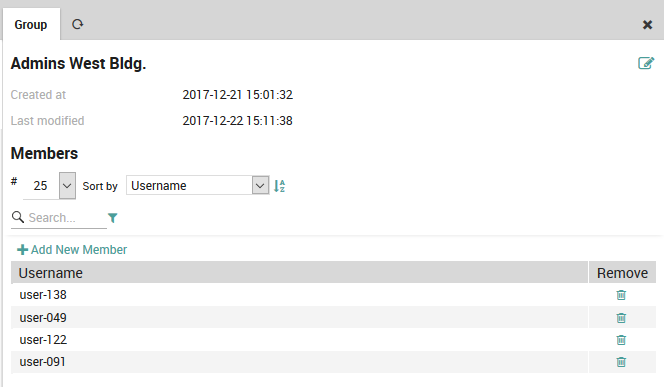
Fig. 13 Adding users to and removing users from a group.
JWT Authentication Backend
In this section, we describe a custom authentication backend which enables authenticating users via JSON Web Tokens (JWT). JWT is an open industry standard defined in RFC 7519 that defines a compact and self-contained way for securely transmitting information between parties as a JSON object.
This backend can be used to authenticate users via an external entity (SSO) e.g. a centralized company login portal, outside of NetEye.
When the JWT authentication backend is enabled and the
Authorization Header with the JWT token is included in the request,
NetEye will validate the JWT token using the previously configured
Public Key. If this is successful, the user defined in the token will be
logged in with the provided username.
To configure the JWT Authentication backend, you need to add the JWT
authentication backend in the
/neteye/shared/icingaweb2/conf/authentication.ini. For example:
[jwt_example]
backend = "jwt"
hash_algorithm = "RS256"
pub_key = "jwt-example-pubkey.pem"
username_format = "${sub}"
expiration_field = "exp"
backend: is alwaysjwtfor this backendhash_algorithm: an algorithm for the verification of the token to be chosen betweenRS256,RS384, andRS512pub_key: the public key used to verify the JWT tokenthe public key must be located in
/neteye/shared/icingaweb2/conf/modules/neteye/jwt-keys/if you have a pem certificate, you may need to extract the public key with the following command:
openssl x509 -pubkey -noout -in jwt-example-cert.pem > jwt-example-pubkey.pem
username_format: this variable can be used to configure the key(s) of the JWT payload to be used as the username of the user to be authenticated.this support variable extraction from the JWT payload by using the following pattern:
$key.
expiration_field: if you want to use a custom expiration field of the JWT payload. The default value is$exp.
Let’s suppose the following JWT token payload:
{
  "sub": "user1",
  "domain": "example.com"
  "exp": "0123456789"
}
I want to authenticate the user with the following username:
“user1.example.com”, using the verification algorithm RSA Signature with
SHA-256, and the public key
/neteye/shared/icingaweb2/conf/modules/neteye/jwt-keys/my-jwt-pubkey.pem
and the field expiration taken from exp the config looks like:
[jwt_example]
backend = "jwt"
hash_algorithm = "RS256"
pub_key = "my-jwt-pubkey.pem"
username_format = "${sub}.${domain}"
expiration_field = "exp"
The user authorization (e.g., mapping a user with one or more module’s permissions or restrictions) is managed as already described in the user authorization section.
Request Header Authentication Backend
In this section, we describe a custom authentication backend which enables authenticating users via a Request Header which contains the username of the user to log in. The prerequisite is that also a valid certificate is sent with the request for the header to be considered.
This backend can be used to authenticate users via an external (SSO) entity, like e.g., an F5 proxy.
When the Request Header authentication backend is enabled, NetEye searches for
the X-REMOTE-USER HTTP header, only for the requests that are using
a client certificate signed by one of the CAs trusted by httpd.
If it finds it, then it checks if the certificate has an allowed Common Name.
If everything looks fine, the user defined in the header will be logged in with
the provided username.
The client certificate that must be used for the requests has to be provided by the manager of the CA used by httpd for the validation.
To configure the Request Header Authentication backend, you need to configure it
in the file /neteye/shared/icingaweb2/conf/authentication.ini. For example:
[request_header_example]
backend = "request-header"
authorized_common_names = [ "..." ]
backend: is alwaysrequest-headerfor this backendauthorized_common_names: a list of authorized common names for this backend
Let’s suppose to send the X-REMOTE-USER: user1.example.com header in the request, using a certificate with the neteye-sso.example.com Common Name, the config should look like:
[request_header_example]
backend = "request-header"
authorized_common_names = [ "neteye-sso.example.com", "other-allowed-cn" ]
The user authorization (e.g., mapping a user with one or more module’s permissions or restrictions) is managed as already described in the user authorization section.
Resources Tuning
This section will contain a collection of suggested settings for various services running on NetEye.
MariaDB
MariaDB is started with default upstream settings. If the size of
an installation requires it, resource usage of MariaDB can be adjusted
to meet the higher requirements for performance. The following
settings can be added to a file
/neteye/shared/mysql/conf/my.cnf.d/custom.conf:
[mysqld]
innodb_buffer_pool_size=16G
tmp_table_size = 512M
max_heap_table_size = 512M
innodb_sort_buffer_size=16000000
sort_buffer_size=32M
Icingaweb2 GUI
Performance of the Icingaweb2 Graphical User Interface, can significantly be improved in high load environments by adding INDEX and updating the COLUMN definition of hostgroups and history related tables. To do this, execute the below queries manually:
ALTER TABLE icinga_hostgroups MODIFY hostgroup_object_id bigint(20) unsigned NOT NULL;
ALTER TABLE icinga_hostgroups ADD UNIQUE INDEX idx_hostgroups_hostgroup_object_id (hostgroup_object_id);
ALTER TABLE icinga_commenthistory ADD INDEX idx_icinga_commenthistory_entry_time (entry_time);
ALTER TABLE icinga_downtimehistory ADD INDEX idx_icinga_downtimehistory_entry_time (entry_time);
ALTER TABLE icinga_notifications ADD INDEX idx_icinga_notifications_start_time (start_time);
ALTER TABLE icinga_statehistory ADD INDEX idx_icinga_statehistory_state_time (state_time);
InfluxDB
InfluxDB is a time series database designed to handle high volumes of write and query loads in NetEye. If you want to learn more about InfluxDB you can refer to the official InfluxDB documentation
Migration of inmem (in-memory) indices to TSI (time-series)
From NetEye 4.14, InfluxDB will use the Time Series Index (TSI).
However, the existing setup will still use the TSM index for writing and fetching data until you perform the migration procedure, which consists of the following steps.
Build TSI by running the
influx_inspect buildtsicommand:In a cluster environment, the below command must be executed on the node on which the InfluxDB resource is running:
sudo -u influxdb influx_inspect buildtsi -datadir /neteye/shared/influxdb/data/data -waldir /neteye/shared/influxdb/data/wal -v
Upon execution, the above command will build TSI for all the databases that exist in *
Note
If you want to build TSI only for a specific database then add the
-database <database_name>parameter to the above command.Restart the
influxdbservice:
Single node:
systemctl restart influxdb
Cluster environment:
pcs resource restart influxdb
The official documentation of InfluxDB Upgrade contains more information about the inmem (in-memory) to TSI (time-series) migration process.
Log Analytics (Elastic Stack) Performance Tuning
This guide summarises the relevant configuration optimisations that allows to optimize Elastic Stack and boost the performance to optimise the use on Netye 4. Applying these suggestions proves very useful and is suggested, especially on larger Elastic deployments.
Elasticsearch Database Tuning
Swapping
Swapping is very bad for performance, for node stability, and should be avoided at any costs, because it can cause garbage collections to last for minutes instead of milliseconds, it can cause nodes to respond slowly, or even to disconnect from the cluster. In a resilient distributed system, it proves more effective to let the operating system kill the node than allowing swapping.
Moreover, Elasticsearch performs poorly when the system is swapping the memory to disk. Therefore, it is vitally important to the health of your node that none of the JVM is ever swapped out to disk. The following steps allow to achieve this goal.
Configure swappiness. Ensure that the sysctl value
vm.swappinessis set to 1. This reduces the kernel’s tendency to swap and should not lead to swapping under normal circumstances, while still allowing the whole system to swap in emergency conditions. Execute the following commands on each Elastic Node and made changes persistent:sysctl vm.swappiness=1 echo "vm.swappiness=1" > /etc/sysctl.d/zzz-swappiness.conf sysctl -p
Memory locking. Another best practice on Elastic nodes is use
mlockalloption, to try to lock the process address space into RAM, preventing any Elasticsearch memory from being swapped out. Set thebootstrap.memory_locksetting to true, so Elasticsearch will lock the process address space into RAM, preventing any portion of memory used by Elasticsearch from being swapped out.Uncomment or add this line to the
/neteye/local/elasticsearch/conf/elasticsearch.ymlfile:bootstrap.memory_lock: true
Edit limit of system resources on Service section creating the new file
/etc/systemd/system/elasticsearch.service.d/neteye-limits.confwith the following content:[Service] LimitMEMLOCK=infinity
Restart resources:
systemctl daemon-reload systemctl restart elasticsearch
After starting Elasticsearch, you can see whether this setting was applied successfully by checking the value of
mlockallin the output from this request:sh /usr/share/neteye/elasticsearch/scripts/es_curl.sh -XGET 'https://elasticsearch.neteyelocal:9200/_nodes?filter_path=**.mlockall&pretty'``
Increase file descriptor
Check if the amount of file descriptor suffices by using the command
lsof -p <elastic-pid> | wc -l on each nodes. By default the setting
on Neteye is 65,535.
To increase the default value this create a file in
/etc/systemd/system/elasticsearch.service.d/neteye-open-file-limit.conf
with content such as:
[Service]
LimitNOFILE=100000
For more information, see the official documentation
DNS cache settings
By default, Elasticsearch runs with a security manager in place, which implies that the JVM defaults to caching positive hostname resolutions indefinitely and defaults to caching negative hostname resolutions for ten seconds. Elasticsearch overrides this behavior with default values to cache positive lookups for 60 seconds, and to cache negative lookups for 10 seconds.
These values should be suitable for most environments, including
environments where DNS resolutions vary with time. If not, you can edit
the values es.networkaddress.cache.ttl and
es.networkaddress.cache.negative.ttl in the JVM options
/neteye/local/elasticsearch/conf/jvm.options.
SIEM Additional Tuning (X-Pack)
Encrypt sensitive data check
If you use Watcher and have chosen to encrypt sensitive data (by setting
xpack.watcher.encrypt_sensitive_data to true), you must also
place a key in the secure settings store.
To pass this bootstrap check, you must set the
xpack.watcher.encryption_key on each node in the cluster. For
more information, see the official
documentation.
Kibana Configuration tuning
There are same interesting tuning that could be done also on Kibana settings to improve performance on production.
For more information, see the official documentation.
Require Content Security Policy (CSP)
Kibana uses a Content Security Policy to help prevent the browser from allowing unsafe scripting, but older browsers will silently ignore this policy. If your organization does not need to support Internet Explorer 11 or much older versions of our other supported browsers, we recommend that you enable Kibana’s strict mode for content security policy, which will block access to Kibana for any browser that does not enforce even a rudimentary set of CSP protections.
To do this, set csp.strict to true in file
/neteye/shared/kibana/conf/kibana.yml.
Memory
Kibana has a default maximum memory limit of 1.4 GB, and in most cases, we recommend leaving this setting to its default value. However, in some scenarios, such as large reporting jobs, it may make sense to tweak limits to meet more specific requirements.
You can modify this limit by setting --max-old-space-size in the
NODE_OPTIONS environment variable. In Neteye this can be configured
creating a file
/etc/systemd/system/kibana-logmanager.service.d/memory.conf
containing a limit in MB such as:
[Service]
NODE_OPTIONS="--max-old-space-size=2048"
For more information, see the official documentation.
How to Enable Load Balancing For Logstash
Warning
This functionality is in beta stage and may be subject to changes. Beta features may break during minor upgrades and their quality is not ensured by regression testing.
The load balancing feature for logstash exploits NGINX ability to act as a reverse proxy and distribute incoming (logstash) connections among all nodes in the cluster. In this way, logstash will no longer be a cluster resource anymore, but a standalone service running on each node of the cluster.
Note however, that if you enable this feature, you will lose the ability to sign the log files. This happens because with this setup, logmanager has access only to the log files that are present on file systems mounted on the node where it is running.
Indeed, rsyslog can not take advantage of the load balancing feature, therefore only the logs on the node on which logmanager is running will be signed.
In the case of Beat, log files will be sent through the load balancer and therefore they will not be signed.
This how-to will guide you in setting up load balancing for logstash. In a nutshell, you need first to disable the logstash cluster resource, then to modify or to add logstash and NGINX configurations, and finally to keep the logstash configuration in sync on all nodes.
More in details, this are the steps:
Permanently disable the cluster resource for logstash: run
pcs resource disable logstashCreate a local service of logstash on each node in the cluster, by following these steps:
The configuration files will be stored in
/neteye/local/logstash/conf, so copy them over from/neteye/shared/logstash/confFix all the paths into the conf files:
find /neteye/local/logstash/conf -type f -exec sed -i 's/shared/local/g' "{}" \;
Edit both the
/neteye/shared/logstash/conf/sysconfig/logstashand/neteye/local/logstash/conf/sysconfig/logstashfiles and add to them the following lines:LS_SETTINGS_DIR="/neteye/local/logstash/conf/" OPTIONS="--config.reload.automatic"
Add the host directive in
/neteye/local/logstash/conf/conf.d/0_i03_agent_beats.input(use the cluster internal network IP): host => “192.168.xxx.xxx”Create a new logstash service (call it e.g., logstash-local.service) with the following content:
[Unit]
Description=logstash local

[Service]
Type=simple
User=logstash
Group=logstash
EnvironmentFile=-/etc/default/logstash
EnvironmentFile=-/neteye/local/logstash/conf/sysconfig/logstash
ExecStartPre=/usr/share/logstash/bin/generate-config.sh
ExecStart=/usr/share/logstash/bin/logstash "--path.settings" "/neteye/local/logstash/conf/" $OPTIONS Restart=always
WorkingDirectory=/
Nice=19
LimitNOFILE=16384

[Install]
WantedBy=multi-user.target
Add the service into the neteye cluster local systemd targets. You can refer to the Cluster Technology and Architecture chapter of the user guide for more information.
Edit file /etc/hosts to point the host logstash.neteyelocal to the cluster IP.
Add the NGINX load-balancing configuration in a file called logstash-loadbalanced.j2 The name is very imporant because it will be used by
neteye_secure_installto setup the correct mapping between the logstash service and NGINX. The file needs to have the following content. Please, pay special attention in copying the whole snippet AS-IS, especially the three-line of theforcycle, because it is essential in configuring NGINX on all the cluster nodes:upstream logstash\_ingest { {% for node in nodes %} server {{ hostvars[node].internal\_node\_addr }}:5044; {% endfor %} } server { listen logstash.neteyelocal:5044; proxy_pass logstash_ingest; }
Remember that the logstash standalone configuration must be kept in sync on all nodes, therefore the /neteye/local/logstash/conf/ directory must have the same content on all nodes. To achieve this goal you can for example set up a cron job that uses rsync to maintain the synchronisation.
Run
neteye_secure_installon the node where the NGINX resource is runningStart the local logstash service on every node:
systemctl start logstash-local on every node

