


 Visual Monitoring with Alyvix
Install Alyvix Service
Before installing Alyvix Service, first check that your setup meets the system requirements.
Note that Alyvix Service also requires Alyvix to be installed on the same machine. Alyvix, also known as Alyvix Core to distinguish it from Alyvix Service, is a free and open source engine for designing and building GUI test cases that show what a task and its interface should look like and how they behave, and then later running them autonomously on the local Windows machine.
System Requirements
Note
Alyvix Service assumes that you have one virtual or physical machine exclusively dedicated to running Alyvix test cases.
You should check that your designated machine and the account on that machine meet the following requirements before you install Alyvix Service:
Minimum |
Recommended |
|
|
Windows 10 (64-bit) Pro or Enterprise |
Windows Server 2016, 2019 or 2022 (English language) |
(32-bit versions of Windows are not compatible with Alyvix Service) |
||
|
2 CPUs |
2 CPUs base + 2 CPUs per session |
|
4GB RAM |
4GB RAM base + 4GB RAM per session |
|
24-bit RGB or 32-bit RGBA screen color depth |
|
|
Users defined on Alyvix Service must have RDP access (through RDC mstsc.exe) to the machine itself (e.g. the user must be a Remote Desktop User, and the firewall must not be set to block local RDC) |
|
1 session only: No Windows Terminal Server available; 1 test case executed at a time |
Multiple sessions in parallel: Windows Terminal Server allows multiple test cases to run at once |
|
|
Users defined on Alyvix Service must have the proper permissions to run and interact with the application interface being monitored |
|
Versions
Alyvix Service Version |
Required Alyvix Core Version |
PostgreSQL Version |
Alyvix API Version |
Alyvix Service 2.9.x |
3,4,5,6 |
||
Alyvix Service 2.8.x |
3,4,5,6 |
||
Alyvix Service 2.7.x |
3, 4, 5 |
||
Alyvix Service 2.6.x |
3, 4 |
||
Alyvix Service 2.5.x |
0, 1, 2, 3 |
||
Alyvix Service 2.4.x |
0, 1, 2 |
||
Alyvix Service 2.3.x |
0, 1 |
||
Alyvix Service 2.2.x |
0, 1 |
||
Alyvix Service 2.1.x |
0, 1 |
||
Alyvix Service 2.0.x |
0, 1 |
Installation Steps
The following steps will install Alyvix Service on your machine:
Request an Alyvix Service subscription
Choose your preferred subscription plan and get in touch with us to request it, providing a machine IP from where you will download the software package. You’ll obtain access to our repository.
Install Alyvix Core
Follow the installation instructions for Python and Alyvix.
Install PostgreSQL
Download and run the most recent version of the PostgreSQL 12.X installer for the Windows x86-64 architecture. Be sure to run it in administrator mode.
Click “Next” to accept all the defaults until it asks you to set the password. Change the default password to ensure the security of your system, and make a note of it so that you can configure Alyvix Service to use PostGre in the next step below.
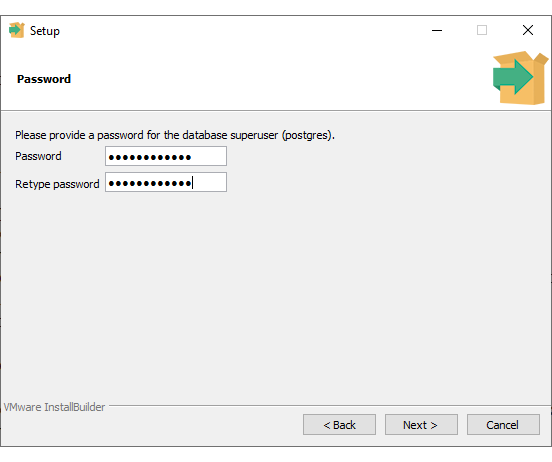
Continue clicking “Next” to accept the remaining defaults and complete the installation.
Install Alyvix Service
Download the most recent version of the installer (
alyvix_service_<version>.zip) from the repository, and run thesetup.exeinstaller which can be found inside the .zip file in administrator mode.Note
See how to Unblock Alyvix Service Files in case Windows blocks a downloaded Alyvix Service file.
Set the database password from step #3 as follows:
Open the file
C:\ProgramData\Alyvix\config.jsonin administrator modePaste the password in this line:
"database":{.. "password": "<your_password>", ..}
Mandatory security configuration
First save your HTTPS certificate files used for browser security as follows:
Create the folder
C:\ProgramData\Alyvix\certs\webserver\Save
cert.crtas an HTTPS certificate recognized by your CASave
cert.keyas the unencrypted private key corresponding tocert.crt
Note that the private key is all you need, you should not be asked for an additional password.
Next, copy the JSON Web Token (JWT), which is used for API authentication purposes, from your monitoring system to Alyvix Service.
Create the folder
C:\ProgramData\Alyvix\certs\jwt\Copy the JWT certificate file from your monitoring system into the folder above, renaming it to
public.pem.
Start Alyvix Service
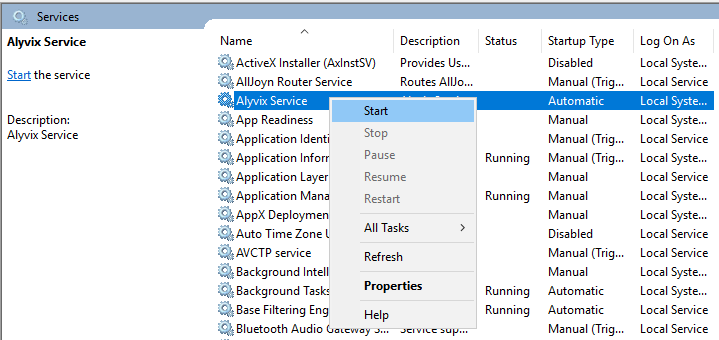
Run Alyvix Service within Windows Services Task Manager > Services Tab > Alyvix Service > Start
Monitoring system integration
At this point Alyvix Service is installed and running, and you can now proceed to integrate it installing the NetEye-Alyvix module (neteye-alyvix) and then configuring how it’s used within NetEye.
Upgrading
The following steps will upgrade Alyvix Service to the latest version on your machine:
Back up your existing configuration
If you’re upgrading from version 2.4.x or earlier, create the subdirectory
webserver\withinC:\ProgramData\Alyvix\certs\and movecert.crtandcert.keyto the new subdirectory (before version 2.5.0 these files may be inC:\Program Files\Alyvix\Alyvix Service\)Now back up the entire security certificate directory:
C:\ProgramData\Alyvix\certs\Then back up your Alyvix Service configuration file:
C:\ProgramData\Alyvix\config.jsonAnd back up your Alyvix Service tenant roles file:
C:\ProgramData\Alyvix\mapping.json
Uninstall the current version of Alyvix Service
Stop Alyvix Service: Windows Services > Alyvix Service > Stop
Close all Alyvix Client windows (where appropriate)
Uninstall Alyvix Service: Windows Control Panel > Programs and Features > Alyvix Service > Uninstall
Remove residual Alyvix Service files (when appropriate):
C:\ProgramData\Alyvix\(C:\Program Files\Alyvix\Alyvix Service\for versions before 2.6.0)Remove old Alyvix Client scheduled tasks: Windows Task Scheduler > alyvix_client<..> > delete
Upgrade Alyvix Core
Follow the instructions here
Install the new version of Alyvix Service
Run the Alyvix Service Installer (
setup.exe) found in the Alyvix Service packageRestore the two backup files and the directory you made in step #1:
C:\ProgramData\Alyvix\config.jsonC:\ProgramData\Alyvix\mapping.jsonC:\ProgramData\Alyvix\certs\
Run Alyvix Service
Start Alyvix Service: Windows Services > Alyvix Service > start
Sign out of the current session
Uninstalling Alyvix Service
The following steps will remove Alyvix Service from your machine. Basically you will need to reverse the steps performed during installation.
Disable the relevant Alyvix Nodes within your integrated monitoring system.
Stop Alyvix Service under the Services tree: Start > Computer Management > Services and Applications > Services > Alyvix Service
Uninstall Alyvix Service: Start > Settings > Apps > Alyvix Service > Uninstall
If desired, also uninstall PostgreSQL the same way.Remove these two directories:
C:\Program Files\Alyvix\C:\ProgramData\Alyvix\
If desired, remove Alyvix Core and/or Python using the Alyvix uninstall instructions.
Unblock Alyvix Service Files
When Alyvix Service installation files are downloaded from the Internet, Windows may mark them with security information known as the Mark of the Web (MOTW). In some environments, this can prevent the installer or related files from opening correctly.
If Windows blocks a downloaded Alyvix Service file, the following message may be displayed:
This file came from another computer and might be blocked to help protect this computer.
Before starting the Alyvix Service installation, verify that the downloaded files are not blocked. Windows may mark files downloaded from the Internet with security information known as the Mark of the Web (MOTW). Windows can also propagate this mark from a downloaded ZIP archive to the files extracted from it, which can leave the installer or its dependencies blocked.
Before extracting the Alyvix Service archive, unblock the downloaded alyvix_service_<version>.zip file.
To unblock the downloaded ZIP file:
Open File Explorer.
Locate the downloaded
alyvix_service_<version>.zipfile.Right-click the ZIP file and select Properties.
On the General tab, check the Security section at the bottom of the window.
If the Unblock option is available, select it.
Select Apply, then select OK.
Extract the unblocked
alyvix_service_<version>.ziparchive.Open the extracted folder and run
setup.exe.
Warning
Unblock only files downloaded from trusted sources.
If Windows continues to display security warnings for trusted Alyvix Service files:
Make sure Windows and all required applications are up to date.
Verify that the files were downloaded from an official or trusted source.
Re-download the files if they may have been corrupted.
Check whether your organization applies security policies that block downloaded files.
Temporarily disable third-party download managers or security software only for testing purposes.

