
User Guide Functional Overview Requirements Architecture System Installation NetEye Additional Components Installation Setup The neteye Command Director NetEye Self Monitoring Tornado Business Service Monitoring IT Operation Analytics - Telemetry Geo Maps NagVis Audit Log Shutdown Manager Reporting ntopng Visual Monitoring with Alyvix Elastic Stack IT Operations (Command Orchestrator) Asset Management Service Level Management Cyber Threat Intelligence - SATAYO NetEye.Cloud Solution Monitoring Business Service Monitoring Asset Management SOC System Administrator SOC Attacker Centric Cyber Threat Intelligence - SATAYO NetEye Update & Upgrade Backup and Restore How To NetEye Extension Packs Troubleshooting Security Policy Glossary
module icon Visual Monitoring with Alyvix
Overview User Roles Install Alyvix Core Install Alyvix Service Nodes RDP Client Building Tools Editor: Interface Overview Editor: Script Building Editor: Managing Scripts Designer: Interface Overview Designer: Interface Options Designer: Component Tree Selector: Interface Overview Test Case Management Dashboard Use Cases
ntopng Visual Monitoring with Alyvix Elastic Stack IT Operations (Command Orchestrator) Asset Management Service Level Management Cyber Threat Intelligence - SATAYO Introduction to NetEye Monitoring Business Service Monitoring IT Operation Analytics Visualization Network Visibility Log Management & Security Orchestrated Datacenter Shutdown Application Performance Monitoring User Experience Service Management Service Level Management & Reporting Requirements for a Node Cluster Requirements and Best Practices Kubernetes Networking NetEye Satellite Requirements TCP and UDP Ports Requirements Additional Software Installation Introduction Single Node Cluster Kubernetes NetEye Master Master-Satellite Architecture Underlying Operating System Acquiring NetEye ISO Image Installing ISO Image Single Nodes and Satellites Cluster Nodes Configuration of Tenants Satellite Nodes Only Nodes behind a Proxy Additional NetEye Components Satellites Nodes only Verify if a module is running correctly Accessing the New Module Cluster Satellite Security Backup and Restore Identity and Access Management External Identity Providers Configure federated LDAP/AD Emergency Reset of Keycloak Configuration Keycloak Hostname Configuration Advanced Configuration Roles Single Page Application in NetEye Module Permissions and Single Sign On Within NetEye Importing User Federation Groups inside another Group Importing OIDC IdP Groups inside another Group Resource Tuning Advanced Topics Basic Concepts & Usage Advanced Topics Monitoring Environment Templates Monitored Objects Import Monitored Objects Data Fields Deployment Icinga 2 Agents Configuration Baskets Dashboard Monitoring Status Integration with Elasticsearch VMD Permissions Notifications Jobs API Configuring Icinga Monitoring Retention Policy NetEye Self Monitoring Concepts Collecting Events Add a Filter Node WHERE Conditions Iterating over Event fields Retrieving Payload of an Event Extract Variables Create a Rule Tornado Actions Test your Configuration Export and Import Configuration Example Under the hood Development Retry Strategy Configuration Thread Pool Configuration API Reference Configure a new Business Process Create your first Business Process Node Importing Processes Operators The ITOA Module Configuring User Permissions Telegraf Metrics in NetEye Telegraf Configuration Telegraf on Monitored Hosts Visualizing Dashboards Customizing Grafana The NetEye Geo Map Visualizer Map Viewer Configuring Geo Maps NagVis Audit Log Overview Shutdown Manager user Shutdown Manager GUI Shutdown Commands Advanced Topics Overview User Role Management Cube Use Cases ntopng and NetEye Integration Permissions Retention Advanced Topics Overview User Roles Install Alyvix Core Install Alyvix Service Nodes RDP Client Building Tools Editor: Interface Overview Editor: Script Building Editor: Managing Scripts Designer: Interface Overview Designer: Interface Options Designer: Component Tree Selector: Interface Overview Test Case Management Dashboard Use Cases Overview Architecture Authorization Kibana Elasticsearch Cluster Elasticsearch Configuration Replicas on a Single Node Elasticsearch Performance tuning Overview Enabling El Proxy Sending custom logs to El Proxy Configuration files Commands Elasticsearch Templates and Retentions El Proxy DLQ Blockchain Verification Handling Blockchain Corruptions El Proxy Metrics El Proxy Security El Proxy REST Endpoints Agents Logstash Rsyslog Elastic APM Elastic RUM Multitenant OpenTelemetry Collector Elastic XDR Overview Authorization in the Command Orchestrator Module Configuring CLI Commands Executing Commands Overview Permissions Installation Plugins Single Tenancy Multitenancy Communication through a Satellite Asset collection methods Display asset information in monitoring host page Overview Customers Availability Event Adjustment Outages Resource Advanced Topics Introduction The Intelligence We Produce Mitre Attack Coverage Getting Started Settings SATAYO Items Intelligence Requirements Managed Service Request Form FAQ Changelog SATAYO Community NetEye.Cloud as a SaaS solution NetEye.Cloud Subscription Base Concepts Authentication Options Authentication via IdP Group Claims for Authorization Management Authentication via Microsoft Entra ID Authorization Navigating the UI Monitoring with NetEye.Cloud Monitored Objects Finding and Filtering Hosts Exporting Monitoring Data Viewing Host and Service Details Organizing with Groups Tactical Overview Problems View Dashboard Typical Daily Interactions Scheduled Downtime Notifications and Alerts VMD Business Service Monitoring Business Process Logic Business Process View Asset Management in NetEye.Cloud Automatic Inventory Collection Software & License Management Contract & Supplier Management Change & Lifecycle Management SOC System Administrator (AdS) Access to NetEye and Elastic Elastic Dashboards Elastic Discover Elastic Alerts Elastic Rules Introduction to SOC Attacker Centric Service Description NetEye SIEM About SATAYO Threat Intelligence and Security Operations How SATAYO works MITRE ATT&CK Coverage Dashboard SATAYO Findings SATAYO REST API SaaS & Managed Mode Before you start Update Procedure Single Node Upgrade from 4.49 to 4.50 Cluster Upgrade from 4.49 to 4.50 Satellite Upgrade from 4.49 to 4.50 DPO machine Upgrade from 4.49 to 4.50 Create a mirror of the RPM repository Sprint Releases Feature Troubleshooting Backup and Restore Tornado Networking Service Management - Incident Response IT Operation Analytics - Telemetry Identity Provider (IdP) Configuration NetEye Cluster on Microsoft Azure NetEye Cluster on AWS Introduction to NEP Getting Started with NEPs Online Resources Obtaining NEP Insights Available Packages Advanced Topics NEP Updates & Upgrades Setup Configure swappiness Restarting Stopped Services Enable stack traces in web UI How to access standard logs Director does not deploy when services assigned to a host have the same name How to enable/disable debug logging Activate Debug Logging for Tornado Modules/Services do not start Sync Rule fails when trying to recreate Icinga object How to disable InfluxDB query logging Managing an Elasticsearch Cluster with a Full Disk Some logs are not indexed in Elasticsearch Elasticsearch is not functioning properly Reporting: Error when opening a report Debugging Logstash file input filter Bugfix Policy Reporting Vulnerabilities Cyber Resilience Act Compliance Glossary

Install Alyvix Core

Before installing Alyvix, first check that your environment meets the system requirements. If it does, you will then need to install Python on your Windows machine before installing Alyvix itself.

System Requirements

Note

Alyvix assumes that you have one virtual or physical machine exclusively dedicated to running Alyvix test cases.

You should check that your designated machine and the account on that machine meet the following requirements before you install Alyvix:

Minimum

Operating System

Windows 10 (64-bit) Pro or Enterprise -or- Windows Server 2016, 2019 or 2022 (32-bit versions of Windows are not compatible with Alyvix)

Processor

2 CPUs

Memory

4GB RAM

Graphics

24-bit RGB or 32-bit RGBA screen color depth

Application Permissions

Users defined on Alyvix Server must have the proper permissions to run and interact with the application interface being monitored


Versions

Alyvix Version

Python Version Required

Install Command

Alyvix 3.8.0

Python 3.14.7

pip install alyvix==3.8.0 --extra-index-url https://alyvix.github.io/alyvix-python-packages/simple/

Alyvix 3.7.1

Python 3.9.7

pip install alyvix==3.7.1

Alyvix 3.7.0

Python 3.9.7

pip install alyvix==3.7.0

Alyvix 3.6.0

Python 3.9.7

pip install alyvix==3.6.0

Alyvix 3.5.0

Python 3.9.7

pip install alyvix==3.5.0

Alyvix 3.4.0

Python 3.9.7

pip install alyvix==3.4.0

Alyvix 3.3.2

Python 3.9.7

pip install alyvix==3.3.2

Alyvix 3.3.1

Python 3.9.7

pip install alyvix==3.3.1

Alyvix 3.2.3

Python 3.9.7

pip install alyvix==3.2.3

Alyvix 3.2.0

Python 3.9.7

pip install alyvix==3.2.0

Alyvix 3.1.6

Python 3.7.9

pip install alyvix==3.1.6


Installing Python

Follow this procedure to install Python on your system:

  1. Download the 64-bit Windows installer for Python version 3.14.7. Note that Alyvix is not compatible with 32-bit versions of Python.

  2. Start the installation:

    1. Right-click on the downloaded executable and select “Run as administrator”

    2. Check the box “Add Python 3.14 to PATH” at the bottom

    3. Choose the option “Customize installation”
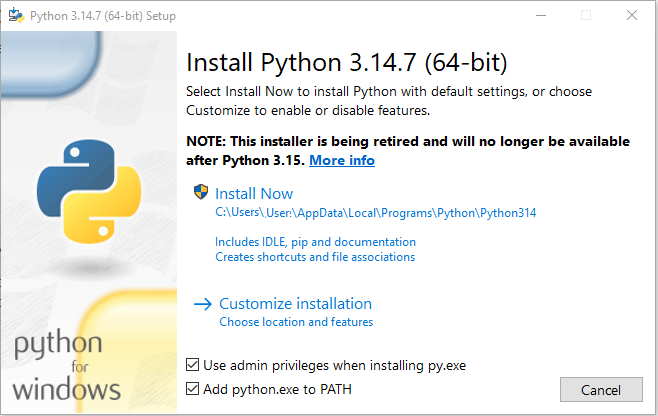
    The first panel of the python installation process.
  3. On the second panel all the option boxes should already be checked. Click “Next” to continue.
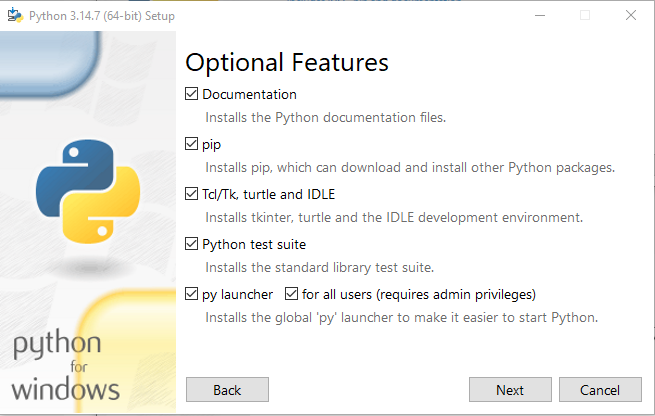
    The second panel of the python installation process.
  4. On the third panel, make sure the advanced options are set as shown below. Then under “Customize install location”, insert the recommended location C:\Python314\. Finally, click on “Install”. At this point Python will begin installing, typically requiring about 5 minutes.
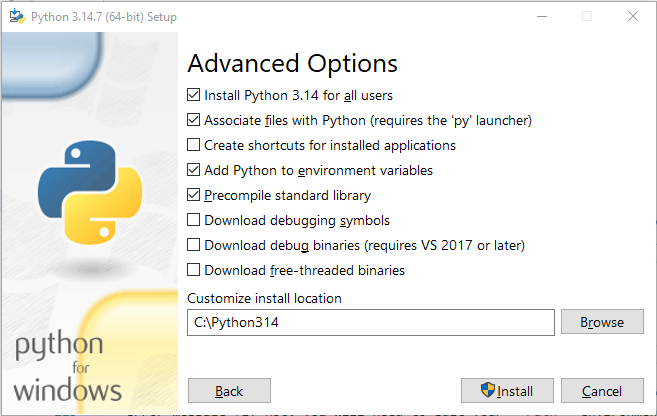
    The third panel of the python installation process.
  5. The installation is correct if the following command returns a version number rather than an error message (if not, you will need to edit your Path environment variable):

    C:\> python --version
    Python 3.14.7
    

Installing Alyvix

Alyvix itself is installed via pip, the official Python package manager. pip will automatically detect that your system is running Python 3 and will install Alyvix 3, placing all python files in the directory C:\Python314\Lib\site-packages\alyvix\.

The Alyvix installer is launched from the command prompt that, like the Python installer, must be started in Administrator mode. Only this single step is required:

  1. Run the following command to download and install the latest Alyvix master release along with all of its dependencies:

    C:\> pip install alyvix
    

    If necessary, you can install Alyvix through a proxy by adding the following parameter, however it is highly recommended to use a credential free command:

    C:\> pip install --proxy=https://[user:password@]proxyserver:port alyvix
    
  2. Check that the installation concluded successfully. Run the following command:

    C:\> alyvix_editor
    

    If the Alyvix Editor window appears as shown here, then everything is working properly.
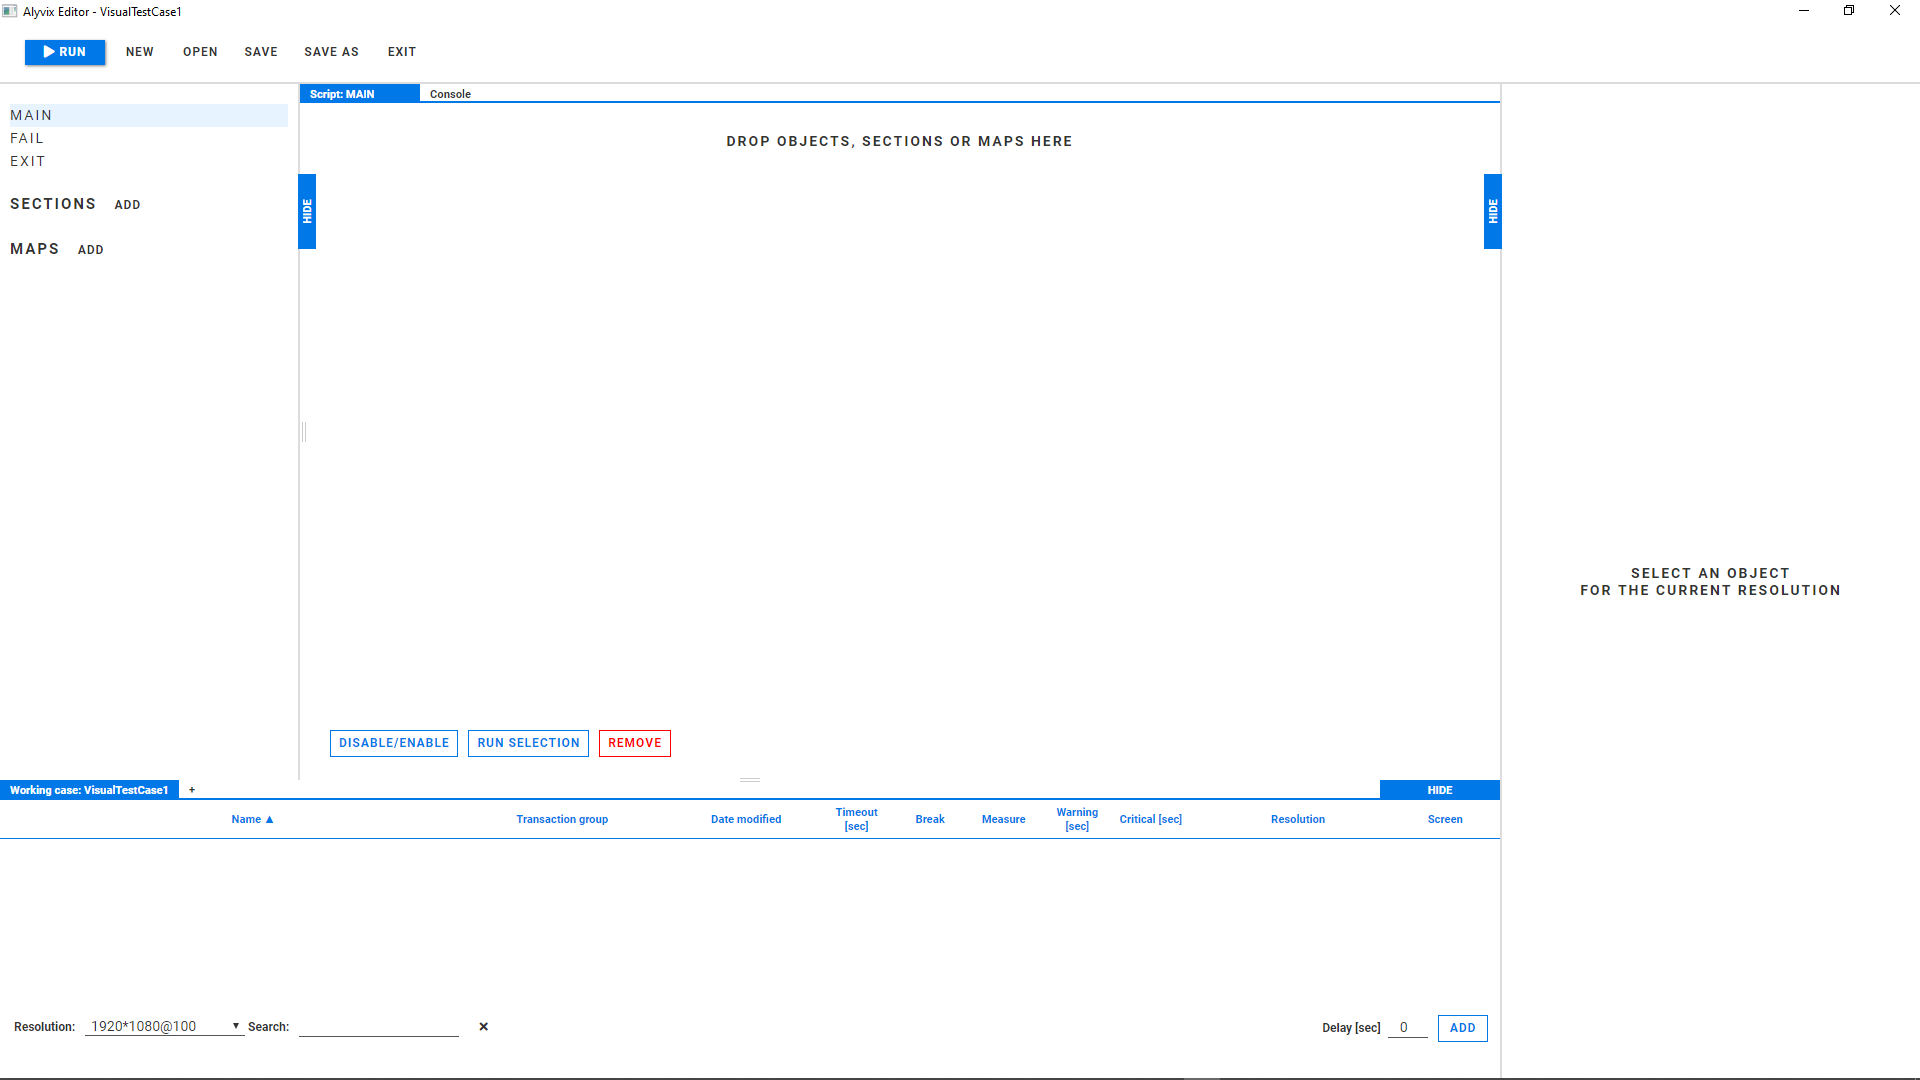
    The main Alyvix Editor screen indicating the installation was successful.

We recommend you place your Alyvix test cases in a separate data directory reserved for test cases, such as C:\Alyvix\Testcases\.

Upgrading Alyvix

Only two steps are needed to upgrade to the latest version:

  1. Close Alyvix

    • Save all of your currently open projects

    • Close all Alyvix user interfaces and applications

    • Terminate all running Alyvix processes

  2. Upgrade Alyvix with pip

    • Start a Command Prompt in administrator mode

    • Follow the case below that corresponds to your situation in order to download and upgrade to the latest Alyvix master release along with all of its dependencies:

      • If you have Python 3.7.9 installed, uninstall it, then manually remove its containing folder (e.g., C:\Python37\) and re-install Alyvix with pip as shown in the section Installing Alyvix above.

      • If you have Python 3.9.7 installed, uninstall it, then manually remove its containing folder (e.g., C:\Python39\) and re-install Alyvix with pip as shown in the section Installing Alyvix above.

      • If you have Python 3.14.7 installed, then you can use the pip –upgrade command:

        C:\> pip install --upgrade alyvix
        

Offline Installation

In order to create an offline installation, you will need two machines:

  • An internet-connected installer machine with a working Python 3 installation to serve as a source for downloading the required software packages

  • A second target machine that will serve as the offline probe

The following steps will then enable you to install Alyvix on the target machine:

  1. On the installer Windows 64-bit machine with an existing Python 3 installation:

  2. Copy the entire directory onto the target machine

  3. Use the Python installer now on the target machine to install Python following the instructions above

  4. Open a command prompt in the directory on the target machine and install Alyvix with this command:

    C:\...\MyFolder> pip install alyvix-3.2.0-cp39-cp39-win_amd64.whl --no-index --find-links .
    
  5. Check that the installation was successful by starting Alyvix Editor:

    C:\> alyvix_editor
    

    If the Editor window appears, the installation was successful.

Uninstalling Alyvix and Python

To uninstall Alyvix, regardless of whether you also want to uninstall Python, run the following command in a Command Prompt or Power Shell with Administrator privileges:

C:\> pip uninstall alyvix

Pip will list the packages to be removed, and then ask for confirmation.

If you only use Python to run Alyvix, you can now also remove Python itself. Go to Start Menu > Windows Settings > Apps, scroll down, and remove both Python 3.14.7 (64-bit) and Python Launcher. The process may take up to 5 minutes.

Once completed, you can also manually remove the C:\Python314\ directory (or whichever directory you specified during installation) and either archive or delete your test case directory.

The Python installer does not remove environment variables, so if desired you can manually remove them at System Properties > Environment Variables > System Variables > Path.

Installation Troubleshooting

Below are some potential installation problems and their solutions.

“Python” command does nothing or launches Microsoft Store on Windows 10

This error occurs when during installation steps #2 and #4 you forgot to check the boxes to add Python to the path and environment variables. Typing the python command in the command prompt under this condition will launch Microsoft Store in an attempt to install it that way.

To correct this situation you will need to either (1) uninstall and then reinstall Python, or (2) manually add the appropriate paths in the System Properties > Environment Variables panel.

“ImportError: DLL load failed” — Failure to Import Tesseract OCR

This error is caused by a missing dependency of the Tesseract OCR module, which requires that the file vcomp140.dll be present in Windows during installation by pip:

File "C:\Python39\lib\site-packages\alyvix\core\tesserocr\__init__.py", line 1, in <module> from ._tesserocr import *
ImportError: DLL load failed: The specified module could not be found.

You can fix this problem by installing the Microsoft Visual C++ Redistributable for Visual Studio, which contains the required file. It’s available at https://aka.ms/vs/16/release/vc_redist.x64.exe.

“WindowsError: [Error 206] The filename or extension is too long”

This error is caused by Python’s pip command attempting to write temporary files using a very long, automatically generated, unique path name.

WindowsError: [Error 206] The filename or extension is too long: <path/file>

You can fix this problem by editing the Windows setting that allows file paths longer than 260 characters. Open the Group Policy editor (GPEDIT.MSC) and navigate to Computer Configuration > Administrative Templates > System > Filesystem. At the right, double click on Enable Win32 long paths, then in the popup panel click on the “Enabled” setting. Click on Apply and OK, then you’ll need to restart your computer or VM.
