Advanced Topics
Elasticsearch security helper tool
The secure communication provided by the X-Pack Security requires additional parameters such as authentication certificates to interact with the Elastic Stack APIs. We have developed a few helper tools, based on curl, to simplify your interaction with the APIs.
The Elasticsearch helper script lets you omit all the authentication parameters for the admin user, which would otherwise be required.
Location: /usr/share/neteye/elasticsearch/scripts/es_curl.sh
The NetEye helper script can be used instead if you only need read permission for the fields @timestamp and host on the Logstash index entries. This script is used by NetEye for self-monitoring activities.
Location: /usr/share/neteye/elasticsearch/scripts/es_neteye_curl.sh
Elasticsearch System indices on Single Nodes
Elasticsearch System indices are a type of indices meant to be used only internally by the components of the Elastic Stack. They may be associated with some System template which specifies their settings.
Some System templates may require System indices to have at least one replica, which in simple terms means that the index must be replicated on more than one node (note that this may apply also for non-System templates and indices). While having replicas is straightforward on a NetEye Cluster, on Single Node installations this is not possible, which causes these indices to go in yellow state due to the so-called unassigned shards warning.
Since on Single Node installations this warning cannot be solved by assigning shards to other nodes, the solution to the problem is to tell Elasticsearch that non-replicated indices should be allowed.
NetEye applies this solution by default during the neteye_secure_install on the templates and indices which have this problem. However, some templates and indices are created only when some features of the Elastic Stack are triggered by the user and must be manually fixed by the Elastic Stack administrator.
To facilitate the job of admin though, NetEye provides a script that given the name of an Elasticsearch template, modifies the settings of the template itself and of all the matching indices to allow zero replicas on Single Node installations.
This goal is achieved by the script by setting the option index.auto_expand_replicas to 0-1.
Suppose you identified that the Elasticsearch template that causes the index to have the number of replicas set to one (or more) is named .siem-signals-default. You can then call the script as follows:
neteye# bash /usr/share/neteye/elasticsearch/scripts/elasticsearch_set_autoexpand_replicas_to_index_templates_and_indexes.sh ".siem-signals-default"
Note
The script works only with the composable index templates introduced in Elasticsearch 7.8 and does not support the Legacy index templates.
Moreover, the script supports the update of multiple Index Templates at once. To perform such operation simply pass the multiple Index Templates names are arguments, like this:
neteye# bash /usr/share/neteye/elasticsearch/scripts/elasticsearch_set_autoexpand_replicas_to_index_templates_and_indexes.sh <index_template_name_1> <index_template_name_2> <index_template_name_3>
Kibana Keystore Usage
The Kibana Keystore feature comes with a keybana-keystore tool, which permits to manage the settings in the keystore.
If your installation is a NetEye Cluster, you are advised to use kibana-keystore tool only from the cluster nodes where the Kibana resource is active.
Using the keybana-keystore tool from nodes where Kibana is not
running will have no effect on the Kibana Keystore configuration.
El Proxy Security
The El Proxy module is automatically configured upon installation to use certificates for improved security and to comply with standard NetEye policies. This section describes some details of the configuration and can be used to modify the setup if required.
TLS configuration
The El Proxy server can start in HTTP or HTTPS mode; this is
configured in the config web_server.tls section.
The available modes are:
None: The El Proxy server starts with TLS disabled. Example:
[web_server.tls]
type = "None"
PemCertificatePath: The El Proxy server starts with TLS enabled using the PEM certificates read from the local file system. When this method is used, the following information must be provided:
certificate_path: path to the server public certificate
private_key_path: path to the server private key
Example:
[web_server.tls]
type = "PemCertificatePath"
certificate_path = "/path/to/certs/ebp_server.crt.pem"
private_key_path = "/path/to/certs/private/ebp_server.key.pem"
Authentication to Elasticsearch
When the Elasticsearch client is created, the authentication method to be used to connect to Elasticsearch needs to be specified. The authentication method defined in the configuration file is only used for the serve command.
The available authentication methods are:
None: the client connects to Elasticsearch without authentication. Example:
[elasticsearch.auth]
type = "None"
BasicAuth: the client authenticates to Elasticsearch with username and password. When this method is used, the following information must be provided:
username: name of the Elasticsearch user
password: the password for the Elasticsearch user
[elasticsearch.auth]
type = "BasicAuth",
username = "myuser",
password = "mypassword"
PemCertificatePath: the client connects to Elasticsearch using the PEM certificates read from the local file system. When this method is used, the following information must be provided:
certificate_path: path to the public certificate accepted by Elasticsearch
private_key_path: path to the corresponding private key
Example:
[elasticsearch.auth]
type = "PemCertificatePath",
certificate_path = "/path/to/certs/ebp.crt.pem",
private_key_path = "/path/to/certs/private/ebp.key.pem",
El Proxy Verification
In El Proxy, the verify command can be used to understand if the underlying blockchain has been corrupted. In the remainder, some advanced aspects of the verification are outlined.
First Iteration Retrieval
During the verification process, one of the first steps performed by El Proxy is the retrieval of the first expected iteration. This aspect is particularly important when considering the retention policies, since the first expected iteration needs to be calculated based on the logs that we still expect to find in Elasticsearch. The following diagram outlines the first steps of the verification process which involve the retrieval of the first iteration and the various errors or warnings raised.
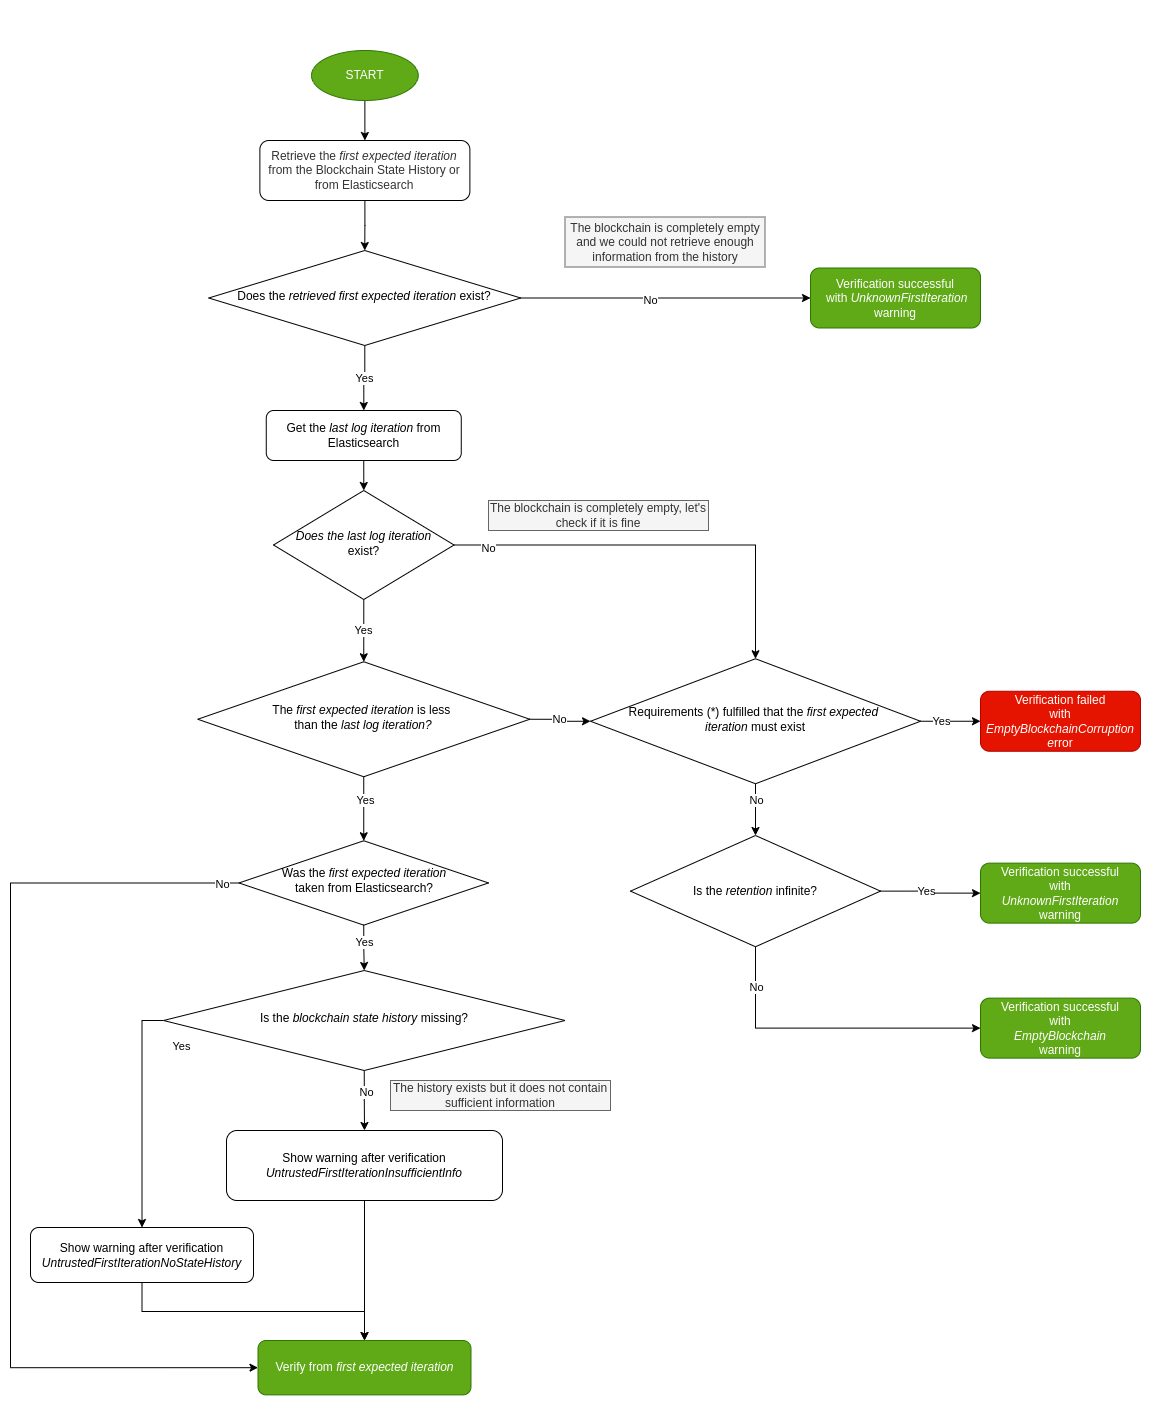
Fig. 208 El Proxy verification process - First iteration retrieval.
(*) for more information please refer to the following Must Exists vs May Exist section
Warnings and Error Codes
The verification process may complete successfully, emit an error or a warning. Errors thrown by El Proxy lead to a failed verification, while warnings may appear also on successful completion.
The following table reports the warnings that could be reported by El Proxy during the verification process, along with the possible causes and actions that can be taken to address the issue.
Warning Code |
Description |
Actions |
|---|---|---|
Untrusted First Iteration No State History |
The first iteration found on the blockchain cannot be trusted because it differs from iteration zero, and the blockchain state history file was not found. Thus, El Proxy cannot confirm that the iterations preceding the one that was found are missing. After the first successful blockchain verification, the blockchain state history file will be created, and the warning will disappear. For more info on this topic, refer to the Verification and Retention Policies section. |
Manually investigate the blockchain to confirm that all previous iterations are expected to be missing and re-run the verification. |
Untrusted First Iteration Insufficient Info |
The first iteration found on the blockchain cannot be trusted because it differs from iteration zero, and the blockchain state history file does not contain enough information to assess the expected first iteration of the blockchain. This warning is thrown when the time between two consecutive verifications exceeds the retention period of the Elasticsearch indices where the blockchain is stored, thus leading to an outdated blockchain state history file. |
Reduce the time between consecutive verifications by increasing the verification frequency. For more info on how to modify the verification frequency, refer to the NetEye Setup section. |
Unknown First Iteration |
The blockchain is empty, and the blockchain state history file does not contain any information about the expected first iteration. This warning is thrown on two occasions:
|
Ensure that the blockchain is empty because it is new, and wait for the first log to be indexed before running the verification again. |
Empty Blockchain |
The first expected iteration and all the subsequent iterations were not found in the blockchain.
This warning differs from the
|
Ensure that the absence of newly indexed logs in the blockchain is expected, and wait for some logs to be indexed before running the verification again. |
Retention Policy Not Applied |
The blockchain contains logs that are older than the maximum expected age based on the retention policy of the blockchain. This can happen if the retention policy was not correctly applied to the blockchain or if some logs have been re-indexed after their deletion by the retention policy. |
Ensure that no logs have been re-indexed after their deletion by the retention policy. |
Similarly, the following table reports the errors that could be reported by El Proxy during the verification process, along with the possible causes and actions that can be taken to address the issue.
Error Code |
Description |
Actions |
|---|---|---|
Empty Blockchain Corruption |
The blockchain is empty, and the first expected iteration was not found, leading to a failed verification. El Proxy expected the first iteration based on the blockchain state history file written during the last successful blockchain verification. This error can be thrown if the blockchain state history file is corrupted or if all the logs have been deleted from the blockchain. |
Ensure that the blockchain state history file has not been corrupted, then manually investigate the cause of the missing logs. |
Full Queue |
The queue containing the logs to be indexed on Elasticsearch is full. Indexing logs on the part of Elasticsearch may take more time than sending them with Logstash. |
Increase the maximum queue size parameter. Warning If the rate of logs sent by Logstash is higher than the rate at which Elasticsearch indexes the logs, increasing the maximum queue size is not sufficient. Furthermore, increasing the maximum queue size could have a big impact on the memory consumption of El Proxy. Be sure to calculate a reasonable value based on the average log size and the available resources. |
Log Verification Bad Iteration |
The iteration of a log is wrong. This error could be thrown in case one or several consecutive logs are missing, or if one or several logs iterations have been modified. |
Ensure to investigate the problem’s cause and acknowledge the error’s corruption id with the elastic-blockchain-proxy acknowledge command. Then run the verification again. |
Log Verification Wrong Previous Hash |
The previous hash of a log does not match the hash of the previous log. This error can be thrown if the log’s previous hash was modified. |
Same as above. |
Log Verification Wrong Hash |
The hash of a log does not match the hash corresponding to its content. This error can be thrown if the log’s content is modified. |
Same as above. |
Acknowledgement Verification Wrong Previous Hash |
The previous hash of the acknowledgement for a corruption ID does not match the hash of the log right before the corrupted log. This error can be thrown if the previous hash of the acknowledgement has been modified. |
Delete the acknowledgement and run the verification again. |
Acknowledgement Verification Wrong Hash |
The hash of the acknowledgement for a corruption ID does not match the expected hash. This error can be thrown if the acknowledgement content has been modified. |
Same as above. |
This website uses cookies that store your theme preferences. These cookies do not store any personally identifiable data.