Updating CentOS and NetEye
Update the CentOS Operating System
Operating system updates often address security vulnerabilities that have been recently discovered or not previously disclosed. If operating system updates are not installed in a timely manner, you run the risk of unauthorized access as well as the theft or destruction of personal and/or confidential data.
NetEye base OS packages published in the official public repository are updated on a regular weekly basis. Indeed, the latest updates available of the current minor CentOS release are fetched and tested within Würth Phoenix testing area; after a week of successful testing, they are released to the public. Also, the published NetEye ISO is updated during this regular weekly process.
CentOS minor upgrades are delivered after an extended testing phase during the release cycle currently in progress. If the testing phase is successful, the CentOS minor upgrade is published on the repo for the current minor release. Also, the NetEye ISO is updated accordingly.
Additional information about CentOS versioning is available in the official documentation.
You can safely update the operating system itself via the “yum update” command:
# yum clean all
# nohup yum update -y &
Migrate RPM Configuration
Each upgraded package can potentially create .rpmsave and/or .rpmnew files. You will need to verify and migrate all such files.
You can find more detailed information about what those files are and why they are generated in the official RPM documentation.
Briefly, if a configuration file has changed since the last version, and the configuration file was edited since the last version, then the package manager will do one of these two things:
If the new system configuration file should replace the edited version, it will save the old edited version as an .rpmsave file and install the new system configuration file.
If the new system configuration file should not replace the edited version, it will leave the edited version alone and save the new system configuration file as an .rpmnew file.
Note
You can use the following commands to locate .rpmsave and .rpmnew files:
# updatedb
# locate *.rpmsave*
# locate *.rpmnew*
The instructions below will show you how to keep your customized operating system configurations.
How to Migrate an .rpmnew Configuration File
The update process creates an .rpmnew file if a configuration file has changed since the last version so that customized settings are not replaced automatically. Those customizations need to be migrated into the new .rpmnew configuration file in order to activate the new configuration settings from the new package, while maintaining the previous customized settings. The following procedure uses Elasticsearch as an example.
First, run a diff between the original file and the .rpmnew file:
# diff -uN /etc/sysconfig/elasticsearch /etc/sysconfig/elasticsearch.rpmnew
OR
# vimdiff /etc/sysconfig/elasticsearch /etc/sysconfig/elasticsearch.rpmnew
Copy all custom settings from the original into the .rpmnew file. Then create a backup of the original file:
# cp /etc/sysconfig/elasticsearch /etc/sysconfig/elasticsearch.01012018.bak
And then substitute the original file with the .rpmnew:
# mv /etc/sysconfig/elasticsearch.rpmnew /etc/sysconfig/elasticsearch
How to Migrate an .rpmsave Configuration File
The update process creates an .rpmsave file if a configuration file has been changed in the past and the updater has automatically replaced customized settings to activate new configurations immediately. In order to preserve your customizations from the previous version, you will need to migrate those from the original .rpmsave into the new configuration file.
Run a diff between the new file and the .rpmsave file:
# diff -uN /etc/sysconfig/elasticsearch.rpmsave /etc/sysconfig/elasticsearch
OR
# vimdiff /etc/sysconfig/elasticsearch.rpmsave /etc/sysconfig/elasticsearch
Copy all custom settings from the .rpmsave into the new configuration file, and preserve the original .rpmsave file under a different name:
# mv /etc/sysconfig/elasticsearch.rpmsave /etc/sysconfig/elasticsearch.01012018.bak
Update a NetEye Single Instance
To perform an update (e.g., bug fixes, security patches or performance improvements), first update all packages:
# yum clean all --enablerepo=neteye
# nohup yum update -y --enablerepo=neteye &
Again, please check for any .rpmnew and .rpmsave files (see the section above).
Next, re-initialize all modules.
The secure install procedure, implemented within the neteye_secure_install script, is used after every installation, upgrade or update to:
Reconfigure NetEye services and/or migrate configurations and databases after important changes
Restart services that were stopped or modified
Create certificates for secure communication
Before making any changes, the secure install script will also run a subset of light and deep health checks to ensure that NetEye will not be adversely affected due to a transient problem like low disk space or custom configurations. Note that this should not replace running a separate, manual deep health check both before and after you upgrade or update.
The script should be run immediately after the installation or update of any new RPM packages from NetEye repositories. To run it, just type in the name of the script in a shell as root:
# neteye_secure_install
Finally, ensure that any potentially stopped and/or newly installed NetEye services are running:
# neteye start
Update a NetEye Cluster
This update procedure can be used either as a standalone update, for instance when applying a security fix, or as the first step when upgrading a full cluster.
When updating nodes in a cluster, each node except the last must be updated independently while in standby. Once the last node has been updated, the other cluster nodes can be removed from standby mode.
This diagram shows the cluster update procedure. Blue boxes represent the initial and final cluster composition. The step numbers in yellow correspond to the steps listed in the instructions below.
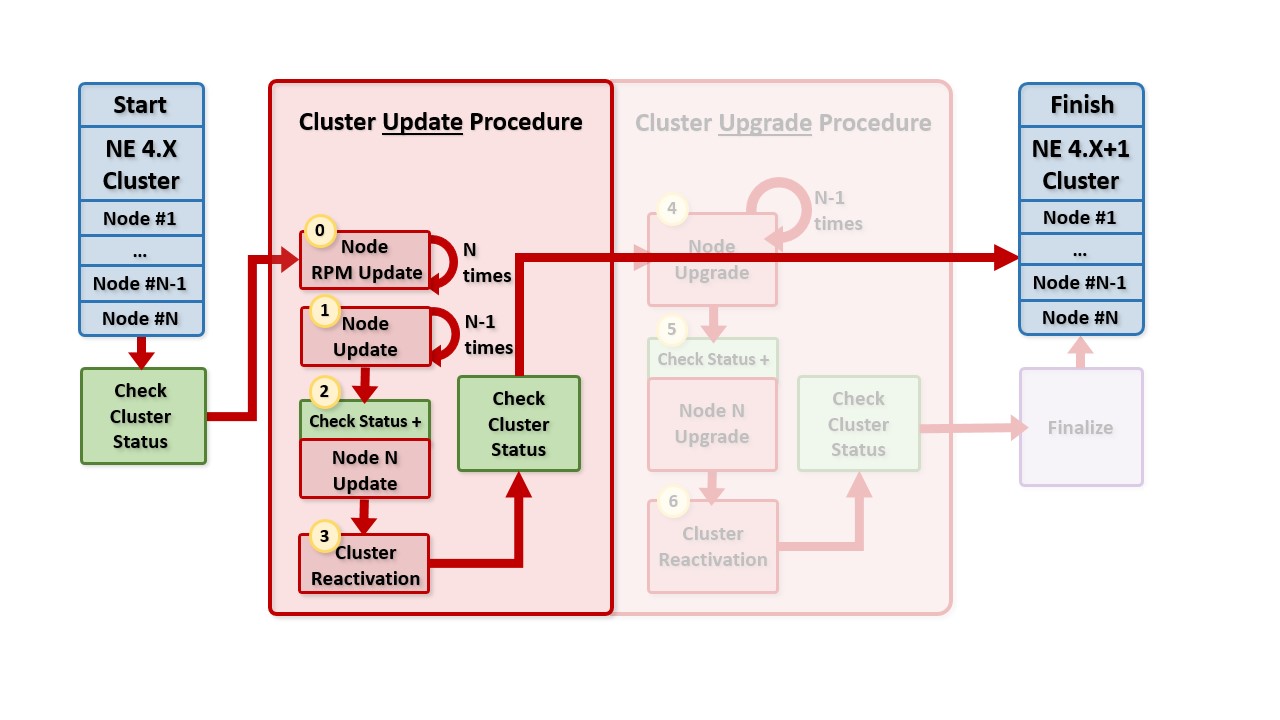
Fig. 150 Cluster update procedure
Prerequisites
Updating a cluster will take a nontrivial amount of time, however no downtime needs to be planned. During the cluster update, individual nodes will be put into standby mode and so overall cluster performance will be degraded until the update procedure is completed and all nodes are removed from standby mode.
An estimate for the time needed to update a healthy cluster without problems is approximately 10 minutes plus 5 minutes per node. So for instance on an 3-node cluster it may take approximately 25 minutes (10 + 5*3). This estimate is a lower bound that does not include additional time should there be a kernel update or if you have additional modules installed.
The order in which nodes are updated is not important. However, you should note that the last node to be updated will require a slightly different process than the other nodes.
It is critical that the versions of the Linux kernel and drbd match. If an update would cause the versions to be out of alignment, you should not update or upgrade your cluster. You can find the currently installed and the available package versions by running the following two commands, then checking that the version numbers reported in the line “Installed Packages” match those reported on the last line of the “Available Packages” column.
# yum list kernel --show-duplicates
... 3.10.0-957.12.1.el7.x86_64 ...
# yum list kmod-drbd --show-duplicates
... 9.0.19_3.10.0_957.12.1-1.x86_64 ...
If yum reports that either the kernel or drbd has a newer version available, you need to check that after an update their versions will again be the same. For instance, in the example above, the lines for “Available Packages” for both packages contain the version string “3.10.0_957.12”, and so you could proceed with the update.
Checking that the Cluster Status is Normal
At several points in the update process you will need to check that the cluster status is normal (the green box in the diagram above). When asked to check that the cluster status is normal, you should first start an SSH session on the first cluster node (Node #1)
Check cluster status
Run the following cluster command:
# pcs status
and please ensure that:
Only the last node (N) MUST be active
All cluster resources are marked “Started” on the last node (N)
All cluster services under “Daemon Status” are marked active/enabled on the last node (N)
Check DRBD status
Check if the DRBD status is ok by using the drbdmon command, which updates the DRBD status in real time.
See also
Section 4.2 of the official documentation <https://linbit.com/drbd-user-guide/drbd-guide-9_0-en/#s-check-status> contains information and details about the possible statuses.
If any of the above checks fail, please call our service and support team before proceeding.
Step #0: Update RPMs on all Cluster Nodes
First you will need to check that the cluster status is normal as described in the section Checking that the Cluster Status is Normal above.
Disable fencing when on the first node so that cluster nodes are not stopped or powered down while the update is underway:
Start an SSH session on the node.
Type the following command to disable fencing:
# pcs property set stonith-enabled=false
Then, repeat the following update steps for all nodes:
Start an SSH session on the node (we’ll call this the “current” node).
You can install the updates:
# nohup yum update -y --enablerepo=neteye &Check for any .rpmnew and .rpmsave files created during the update process (see the section above for more details).
Once you have done the aforementioned instructions on all nodes, please proceed with Step #1.
Step #1: Update All Cluster Nodes Except the Last
Next, repeat these update steps for all nodes except for the last one:
Start an SSH session on the node (we’ll call this the “current” node).
Run the following command so that the current node is no longer able to host cluster resources:
# pcs node standby --wait=300
# echo $?
0If the exit code is different from 0, the current node is not yet in standby, so please be sure that the current node is in standby before proceeding.
Run the secure install script on the current node:
# nohup neteye_secure_installIf a new kernel was installed on the current node during this step, reboot it now.
Once you have done the aforementioned instructions on all nodes except the last one, please proceed with Step #2.
Step #2: Update the Last Cluster Node
You can now update the last cluster node (Node #N) by launching an SSH shell to that node and executing the following tasks.
Check cluster status
Run the following cluster command:
# pcs status
and please ensure that:
Only the last node (N) MUST be active
All cluster resources are marked “Started” on the last node (N)
All cluster services under “Daemon Status” are marked active/enabled on the last node (N)
Check DRBD status
Check if the DRBD status is ok by using the drbdmon command, which updates the DRBD status in real time.
See also
Section 4.2 of the official documentation <https://linbit.com/drbd-user-guide/drbd-guide-9_0-en/#s-check-status> contains information and details about the possible statuses.
Run NetEye Secure Install
# nohup neteye_secure_install
Now, if a new kernel was installed on the last node, we are supposed to reboot, but this is the active node and cannot be rebooted now. So, run the following command to remove all nodes from standby mode:
# pcs node unstandby --all --wait=300
# echo $?
0
If the exit code is different from 0, some not have been not reactivated, so please be sure that all nodes are active before proceeding.
Finally, run the following command so that the current node is no longer able to host cluster resources:
# pcs node standby --wait=300
# echo $?
0
If the exit code is different from 0, the current node is not yet in standby, so please be sure that the current node is in standby before proceeding.
Final tasks
Please ensure that only the last node is in standby and all the other are Online.
Now, you can reboot the current node.
Proceed to Step #3 below.
Step #3: Cluster Reactivation
You can now restore the cluster to high availability operation.
Run the following command to remove all nodes from standby mode (it doesn’t matter which node this command is run on):
# pcs node unstandby --allPlease ensure your cluster is healthy by checking the standard procedure described in the section Checking that the Cluster Status is Normal.
If you previously disabled stonith above to disable fencing, re-enable it:
# pcs property set stonith-enabled=true
This website uses cookies that store your theme preferences. These cookies do not store any personally identifiable data.