


 Architecture
Kubernetes
NetEye integrates a Kubernetes distribution to manage the deployment of some of its components. This integration represents a step towards the transformation of NetEye into a cloud-native application, which is the long-term goal.
The chosen Kubernetes distribution is RKE2, which is a CNCF-certified Kubernetes distribution. RKE2 is designed to be secure by default, with a focus on simplicity and ease of use.
NetEye completely manages the RKE2 installation and configuration, so that the user does not have to worry about the underlying Kubernetes infrastructure.
Kubernetes migration will allow NetEye to leverage the benefits of Kubernetes, such as:
Improved scalability and resource management
Enhanced security and isolation of workloads
Simplified deployment and management of applications
Seamless and faster updates and rollbacks of components
Kubernetes roles
NetEye offers two types of Kubernetes roles to be able to more efficiently manage the compute resources of the NetEye installation:
Kubernetes Master (
kubernetes-master): This role is responsible for managing the Kubernetes cluster and its components. It runs the Kubernetes API server, controller manager, scheduler, and etcd database. The master node is also responsible for managing the deployment of NetEye components on the worker nodes.Kubernetes Worker (
kubernetes-worker): This role is responsible for running the NetEye components and workloads. Worker nodes receive instructions from the master node and execute the tasks accordingly.
A node can have any possible combination of the two roles, with the only constraint of having at least three master nodes and two worker nodes in cluster installations.
To configure node roles in a cluster installation, use the kubernetes-master and
kubernetes-worker values as described in Cluster Nodes Roles.
Kubernetes is also supported and configured on Single Node installations, where the single node has implicitly both the master and worker roles.
Kubernetes installed tools
The following tools are installed and configured to simplify the management of the Kubernetes cluster and its components:
kubectl (doc): The command-line tool for interacting with the Kubernetes cluster.
k9s (doc): A terminal-based UI for managing Kubernetes clusters.
helm (doc): A package manager for Kubernetes that simplifies the deployment and management of applications on the cluster.
crictl (doc): A command-line interface for interacting with container runtimes, such as containerd, which is used by RKE2.
The most common tools for managing the Kubernetes cluster are kubectl and k9s, which are installed on all nodes of the NetEye installation and automatically configured to connect to the local Kubernetes cluster.
For example, to check the status of the Kubernetes cluster, you can run the following command on any node:
kubectl get nodes
or, alternatively, you can use k9s to get a more user-friendly view of the cluster status:
k9s
and then in the k9s interface, you can navigate to the “Nodes” view to see the status of all nodes in the cluster by writing :nodes in the command bar and pressing Enter.
For more information on their usage and options, please refer to the official documentation.
Kubernetes Networking
Since NetEye leverages Kubernetes for its container orchestration, it is mandatory to ensure that the networking requirements are met. Down below you can find an image depicting how the networking is structured in a NetEye cluster:
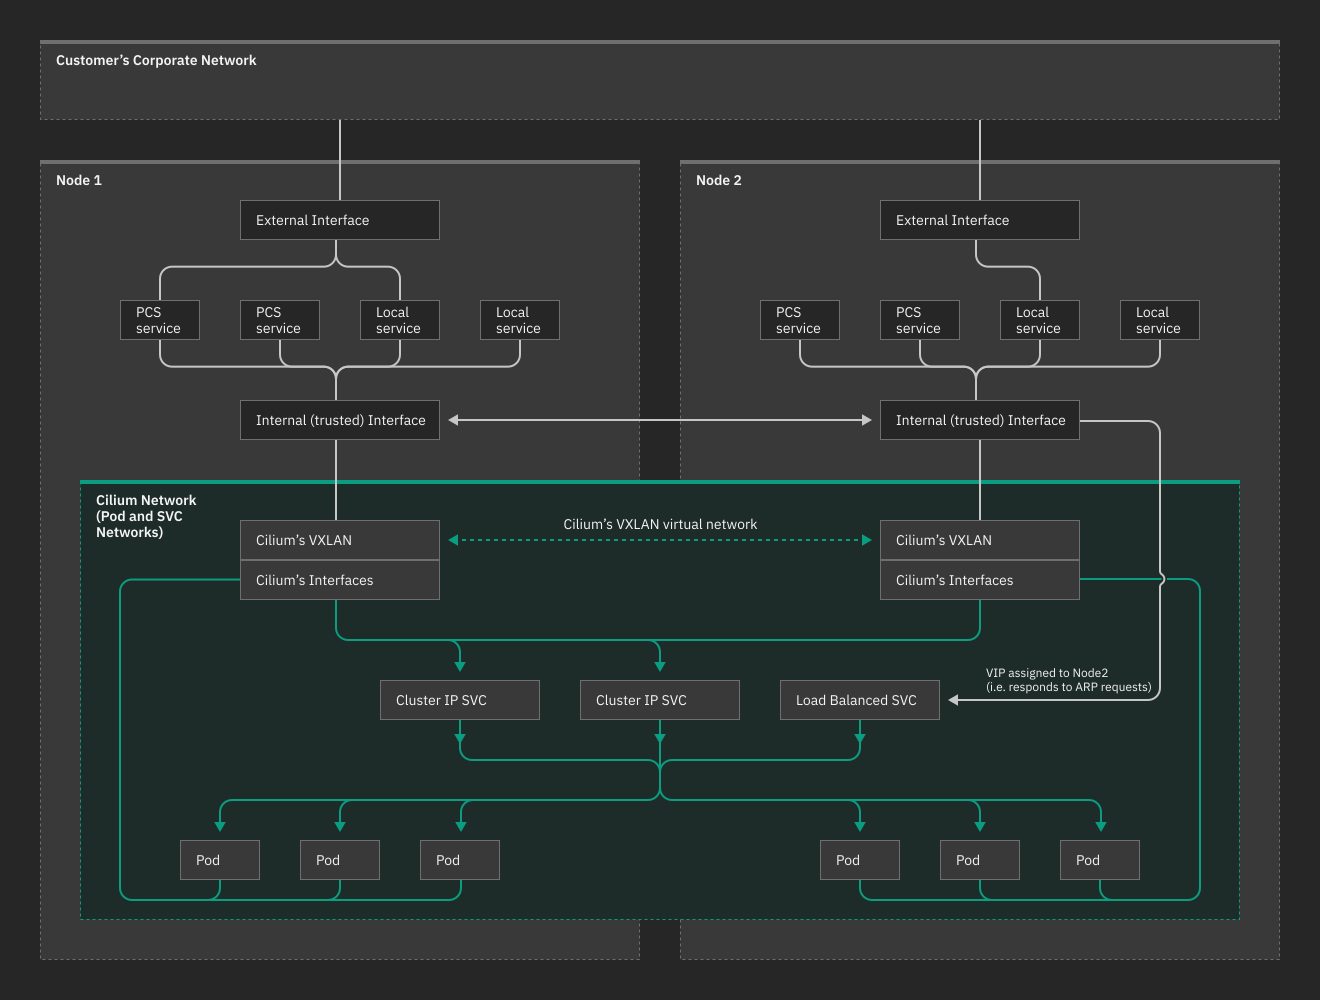
Fig. 3 Networking in a NetEye Kubernetes cluster
Three networking components are involved in the NetEye Kubernetes networking:
Kubernetes Pod Network: It is responsible for providing communication between Pods across different nodes. Each Pod gets its own IP address, and the Pod Network ensures that these IP addresses are unique and routable within the Kubernetes cluster.
Kubernetes Service Network: It is responsible for providing communication between Services and Pods. Services are an abstraction that allows Pods to be accessed by a stable IP address and DNS name, even if the underlying Pods are created and destroyed dynamically.
Service Load Balancer Network: It is responsible for providing external access to the workloads running inside the Kubernetes cluster. It serves as a bridge between the internal Kubernetes networking and the external world. This network is only required in cluster deployments, and runs inside the trusted network zone of a NetEye installation.
NetEye deployments use Cilium as the CNI plugin to manage the Pod Network and the Service Network and is automatically configured during the installation process. Cilium is a powerful and flexible networking solution that leverages eBPF technology to provide advanced networking and security features for Kubernetes clusters.
How Cilium handles traffic
NetEye uses Cilium as its CNI plugin. Cilium runs eBPF programs in the Linux kernel to apply network policy, load-balance Kubernetes Services, and forward traffic. Cluster installations use the eBPF kube-proxy replacement, eBPF masquerading, eBPF host routing, Gateway API with Envoy, Cilium Layer-2 announcements and finally VXLAN encapsulation for inter-pod traffic.
Node to Pod traffic
For a LoadBalancer Service, Cilium allocates a virtual IP from the Load Balancer range. One eligible node responds to
ARP requests for that IP on a selected trusted-network interface. If that node fails, another eligible node takes over
and sends a gratuitous ARP reply so clients update their MAC-address mapping. A CiliumLoadBalancerIPPool allocates
the addresses, while a CiliumL2AnnouncementPolicy selects the Services, nodes, and interfaces that announce them.
The packet path is therefore:
Client
  -> Load Balancer virtual IP on the trusted L2 network
  -> elected node (Cilium replies to ARP)
  -> Cilium eBPF Service handling
  -> Envoy Gateway listener
  -> Kubernetes Service
  -> selected Pod
The exact inter-node packet format depends on the configured Cilium routing mode. In encapsulation mode, the underlay network sees node-to-node tunnel packets; in native-routing mode, it must be able to route Pod CIDRs. This distinction must be checked in the deployed Cilium configuration before creating firewall rules for inter-node traffic.
Pod to Pod traffic
NetEye uses Cilium VXLAN encapsulation for inter-node Pod traffic. When a Pod communicates with a Pod on another node, Cilium encapsulates the original Pod packet in a VXLAN UDP packet. The physical network therefore sees traffic between the nodes’ routable IP addresses, not directly routed Pod IP addresses.
The network connecting the Kubernetes nodes must provide normal node-to-node IP connectivity and allow VXLAN traffic over UDP port 8472, it does not need routes for the Pod CIDR.
Pod to Outside traffic
For traffic initiated by a Pod towards an address outside the cluster’s native routing range, eBPF masquerading normally rewrites the source address to the node’s routable address. The external system sees the node address rather than the private Pod address and can return traffic through the existing network configuration.
Interfaces and host visibility
Cilium creates Linux interfaces and routes while it manages Kubernetes networking. Commands such as ip a
can show the physical node interfaces and interfaces with names such as cilium_host, cilium_net,
cilium_vxlan and lxc*. These are managed implementation details: do not delete, rename, or manually reconfigure
them.
Pod addresses normally appear in the Pod network namespace or through kubectl, rather than as ordinary addresses on a physical node interface. Service IPs are virtual eBPF load-balancer frontends, and Load Balancer IPs are virtual addresses announced by Cilium; they may therefore not appear as ordinary addresses in ip a. Use Kubernetes and Cilium status commands to inspect them instead.
For a conceptual overview of where Cilium uses eBPF, see the Cilium eBPF datapath introduction. For the behavior of eBPF-based source masquerading, see the Cilium masquerading documentation.

