Elasticsearch Templates and Retentions
Elasticsearch Templates and Retentions
Several ILM policies are provided by default and should cover most of the retention use cases. A set of Index Templates installed by El Proxy match indexes against some index patterns to map each index to one ILM policy.
For example, the data stream with name
logs-system.auth-elproxysigned-exampletenant-6_months-exampletag will match the
index pattern logs-system.auth-elproxysigned-*-6_months-* of the template
logs-system.auth-el-proxy-6_months-retention, which assigns the 6_months_retention
lifecycle policy to the index.
The retention policies available by default are the following:
3_months : delete index after 90 days from creation
6_months : delete index after 180 days from creation
1_year : delete index after 365 days from creation
2_years : delete index after 730 days from creation
default (2_years) : delete index after 730 days from creation
infinite : never delete the index
Index Templates for Elastic Agents
To effectively implement retention policies and mappings for indices generated by Elastic Agents, El Proxy creates a set
of Index Templates for each logs dataset installed via Fleet Integrations.
For instance, when you install or update the Nginx Integration, Fleet will generate the Index Templates
logs-nginx.access and logs-nginx.error.
When the Integration is added or updated in any Agent Policy, El Proxy will generate corresponding Index Templates for each El Proxy
retention policy, such as logs-nginx.access-el-proxy-6_months and logs-nginx.error-el-proxy-6_months. These templates
will match the index patterns logs-nginx.access-elproxysigned-*-6_months-* and
logs-nginx.error-elproxysigned-*-6_months-* respectively.
The Index Templates created by El Proxy incorporate all component templates originally configured by the Elastic Integration, ensuring that all settings and mappings are preserved.
It is important to note that Index Templates related to an Elastic Integration are automatically overwritten each time the Integration is updated in any Agent Policy. Therefore, if you wish to apply a custom configuration to the template, please modify only the designated @custom Component Templates.
Index Templates for Beats Agents
In order to allow El Proxy indices generated by Beats agents (at the moment Filebeat, Winlogbeat and Auditbeat) to have both the settings coming from the Beats Index Template and the settings needed by El Proxy, El Proxy by default installs a set of composable Index Templates that only import the following Component Templates:
neteye-autoexpand-replicas: sets the index.auto_expand_replicas to 0-1.el-proxy-mappings: defines static and dynamic mapping for El Proxy objectsEBP_METADATAandES_BLOCKCHAIN.<beats_agent_name>-<beats_agent_version>@settings: configures the settings for the Beats agent <beats_agent_name> with version <beats_agent_version>. This Component Template is generated by NetEye and is the transformation of the mappings of the Composable Index Template<beats_agent_name>-<beats_agent_version>into a Component Template.<beats_agent_name>-<beats_agent_version>@mappings: configures the mappings for the Beats agent <beats_agent_name> with version <beats_agent_version>. It is constructed in a similar way as the<beats_agent_name>-<beats_agent_version>@settingsComponent Template.el-proxy-<retention_name>-retention: sets the lifecycle of the index to the ILM policy <retention_name>_retention.<index_template_name>@custom: contains possible User customizations for the current Index Template, where <index_template_name> represents the name of the current Index Template.
All default Index Templates, Component Templates (with the exception of the @custom Component Templates) and ILM policies are automatically overwritten during every neteye update or neteye upgrade. For this reason you must never modify them.
Generating Templates for Additional Beats
El Proxy ships by default the composable Index Templates for the Filebeat, Auditbeat and Winlogbeat agents.
In case you install templates for any additional Beats agents (e.g. Packetbeat), you must create create El Proxy composable Index Templates for this Beats agent. If you do not perform this operation El Proxy retention policy and mappings will not be correctly applied on that Beats’ indices.
Supposing you want to create El Proxy Index Templates for the Beats packetbeat with version 8.8.2, you can execute this script as follows:
bash /usr/share/neteye/elasticsearch/scripts/elasticsearch-generate-el-proxy-beats-template.sh \
-b "packetbeat" -v "8.8.2"
Hint
If for any reason the composable Index Templates for the Beats agent has a name different than the standard
<beats_agent_name>-<beats_agent_version>, you can call the script with the argument -t <index_template_name>.
Customizing the Composable Index Templates
As described in Section Elasticsearch Templates and Retentions, the composable Index Templates installed by El Proxy specify no settings, they only import the settings from a set of Component Templates.
Since all the Index Templates installed by El Proxy are overwritten during every neteye install, you must not add your customizations by modifying the Index Templates in place.
Instead, supposing you need to customize the composable Index Template
filebeat-7.17.4-el-proxy-1_year-retention, you can simply add your
customizations in the Component Template
filebeat-7.17.4-el-proxy-1_year-retention@custom. This Component Template
is empty by default, is included by default in the relative Index Template and
will not be overwritten during the neteye install.
Configuring El Proxy Retentions
El Proxy retention policies are to be configured via the Icinga Director. Retention policies are host-based, and so a blockchain retention should be set as one of the Custom properties in the Host Configuration Panel, as described in Enabling El Proxy.
Some particular logs may require a special, custom retention configuration to be applied. Below you will find information on how to customize Logstash pipelines to apply different retention policies in El Proxy.
To specify which ILM policy to use from a variety of available ones you can set
the field EBP_METADATA.retention in a logstash filter.
For example, if you want to set a 6 months policy for authentication logs you can create a new filter
in the directory /neteye/shared/logstash/conf/conf.ebp.d called 1_f10000_auth_retention.filter
which contains the following condition:
filter {
  if "authentication" in [event][category] {
    mutate {
      replace => {"[EBP_METADATA][retention]" => "6_months" }
    }
  }
}
If the index pattern does not match any valid retention policy name, the default (2_years) ILM policy will be applied.
Changing the retention policy for an existing blockchain results in the creation of a new blockchain: a new key will be generated and must be saved in a safe place. All new logs will be saved in the new blockchain while the old blockchain will not receive any new log. For the verification process you need to use the appropriate key for each blockchain.
The retention policy change is not retroactive: the old blockchain will maintain the original retention period.
Adding Custom Retentions to El Proxy
As described in Section Elasticsearch Templates and Retentions, El Proxy ships by default
a set of retention policies and maintains a mapping between their names and corresponding duration in days
in the /neteye/shared/elastic-blockchain-proxy/conf/retention_policies.toml.
During the El Proxy Verification Setup, /etc/neteye-dpo file should specify
the retention of a blockchain to be verified.
Apart from a set of retention policies El Proxy ships by default, you can also add a custom retention of your own choice.
For instance, if you would like to use a custom retention policy for a blockchain, such as a 1 month retention, you have to:
Execute the script to add a custom retention for El Proxy by specifying a name for the retention (only alphanumeric characters and underscore are valid) and a duration (in days):
/usr/share/neteye/scripts/elastic-blockchain-proxy/add_el_proxy_retention.py --name 1_month --duration-in-days 30
Create a new retention entry in the Icinga Director:
In the Provide Data Lists of the Director find Data lists tab
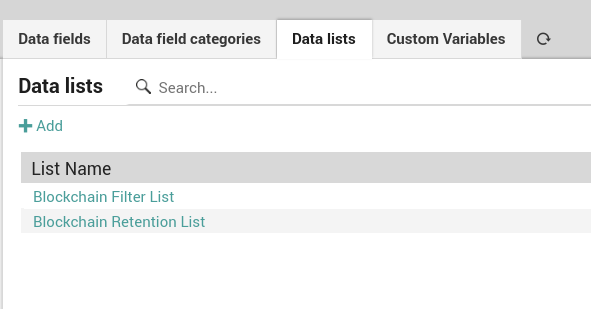
In the Blockchain Retention List add a new retention entry; specify as key the exact same name you used at the step above.
New blockchain retention will now be available in the selection of retentions in the Host Configuration Panel.
You must never change the deletion period with a shorter one otherwise you will have missing logs in the middle of the blockchain and this will cause the verification to fail.
Tuning El Proxy blockchain rollover
When dealing with El Proxy data streams that receive an unusual amount of logs (either fewer or greater than normality), you may want to tune the default rollover of the data streams underlying the blockchain in order to avoid oversharding.
This configuration tuning is meant to be done only by advanced Elastic users, so it will take for granted many underlying concepts.
Let’s say for example that the blockchain *-*-elproxysigned-master-6_months-0 is receiving so few logs that you’d like to roll over its data streams every 30 days (and not every 14 days as default).
To achieve this you should:
Create a new ILM
Create a new Index Template matching the blockchain and applying the newly created ILM
Below you will find how to perform these 2 steps in order to comply with El Proxy requirements
Create a new ILM
In Kibana Stack Management, enter the edit mode the ILM corresponding to the retention of the blockchain, in this case 6_months_retention.
Duplicate the ILM by enable the “Save as new policy” flag, and give it a good name, for example elproxysigned-master-6_months-0.
Modify the setting of the rollover as you prefer (in our case setting Maximum age to 30 days), leave the other settings as they are and save.
Create a new Index Template
In Kibana Stack Management, clone the El Proxy template corresponding to the retention of the blockchain, in this case el-proxy-6_months_retention.
At this point you should:
Choose an appropriate name, for example elproxysigned-master-6_months-0
Set the index pattern to the one of your blockchain, in our case *-*-elproxysigned-master-6_months-0
Set the priority to 1000 to ensure that your template has priority on the other templates
Unset the Add metadata flag since this template is not managed by NetEye
Under Component template remove the El Proxy component template that sets the ILM for the index, in our case el-proxy-6_months-retention
Under Index settings apply the ILM you created above, in our case:
{
  "lifecycle": {
    "name": "elproxysigned-master-6_months-0"
  }
}
Proceed to create the template