Log Manager - Deprecated
Warning
This module is deprecated, please consider switching to the new Elastic Stack, which is actively developed.
How Log Manager Works
NetEye uses rsyslog as the underlying log auditing data collector. Rsyslog is an Open Source software utility used on Unix and Unix-like computer systems for forwarding and collecting log messages. It implements the basic syslog protocol RFC 3164, extends it with content-based filtering, rich filtering capabilities and flexible configuration options, and adds important features such as using TCP for transport.
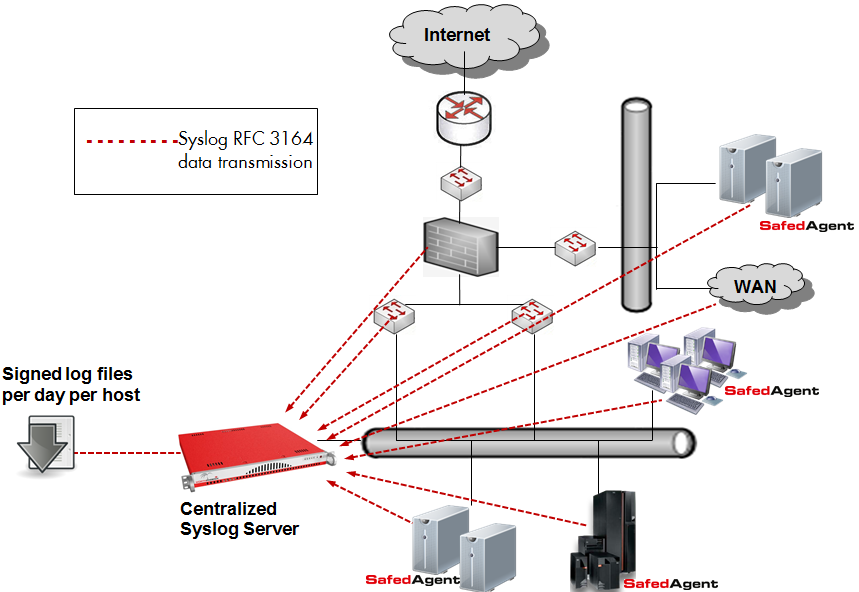
Fig. 162 The Log Manager system architecture
Rsyslog as a Data Collector
Most embedded devices (routers, switches, firewalls, etc.) support the transmission of syslog data via the RFC 3164 protocol, allowing the data to be collected by rsyslog. Systems based on Windows, Linux, AIX, HP-UX, and Solaris must instead use other agents to fulfill these needs. NetEye’s Safed Agent combines the functionality of Snare and Epilog to guarantee interoperability with rsyslogd and syslog-ng, and uses open protocols to allow integration with other centralized Syslog Servers.
- The Safed Agent extends the functionalities of other open source agents:
Better reliability for data transmission
Efficient CPU usage
Improved security through TLS, HTTPS, and access control
Optimized and centralized agent configuration
A larger number of supported platforms
Improved filtering efficiency
Auto discovery of administrators
A single agent for all systems: Windows XP, Windows Vista, Windows 7, Windows Server 2000, Windows Server 2003 (32 – 64 Bit), Windows Server 2008, Windows Server 2008 R2, IBM-AIX, HP-UX, Solaris, and Linux (Debian, RedHat, SUSE, Ubuntu, etc.)
Log Manager Concepts
Role Distinction: System Administrator vs. Logging Supervisor
One of the principle concepts of the legally clean implementation of the central NetEye logging facility is the distinction between an internal system administrator and the person in charge of system logging (the logging supervisor). The security and protection of the log server configuration can only be proven to be unaltered (a legal requirement) if the log server configuration cannot be accessed by the system administrator. This is why the NetEye Log Manager web frontend comes with a dedicated, separate role determining access to the configuration section.
Syslog Server Access Restriction
Following the above reasoning, the syslog server itself must not only be protected physically from being accessed by system administrators, but also by password. If the NetEye monitoring service is also running on the same server, then access can be granted through dedicated permissions. (This avoids the need of providing the universal and unlimited access that a root user has).
Security and Integrity Validation
Log Manager provides for the following set of legally required characteristics:
Verification that log date and date of last modification on the system are equal.
The signature of the log file exists and that the signature checksum recalculation matches the current content of the log file.
The timestamp of the signature corresponds at most to only one day after the date when the log files were collected.
Folder integrity check: A SHA512 checksum is calculated over the whole folder for a single day, and stored in the archive of the next day. This initiates a chain of trusted integrity. Together with the checksum of the previous day, the hash of the next day’s checksum is then calculated. ANY modification of the SHA512 file would lead to corruption on the hash result for the next day, and the same for ANY modification of any log file and their signatures.
Monitoring checks are performed to determine whether the Safed Agent is running and is reachable on the remote system.
For Windows-based hosts, checks can be run for automatic detection and registration of users making up the AD administrators group.
The process of daily log archiving can be described in the flowchart in Fig. 163:
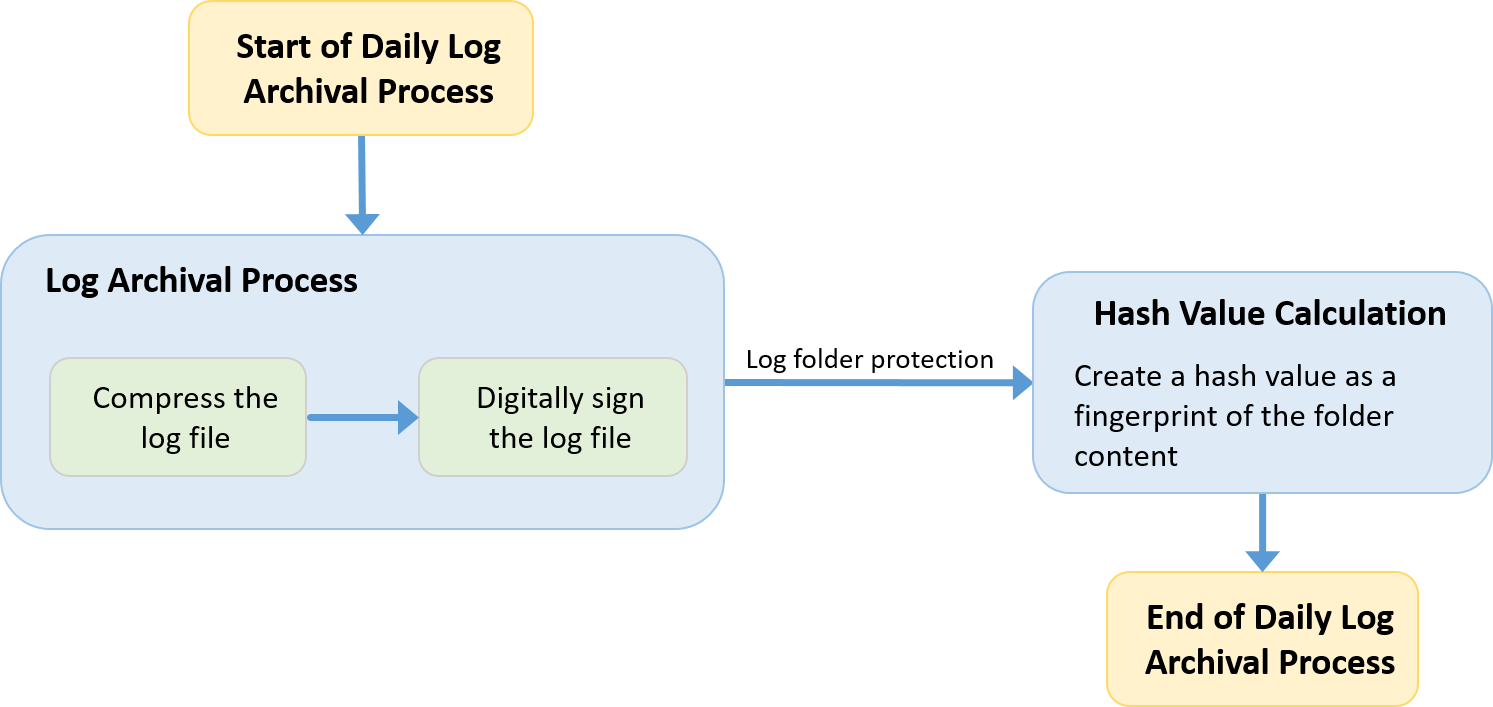
Fig. 163 Daily log archiving process
Technical Overview
The Syslog server runs as a service and collects the incoming log messages, based on custom filter and host rules, into a defined folder architecture on the local file system. The folders where the log files are stored have the following structure:
Year
Month
Day
hostname-hostip.log
Each individual log file is filled during the day with incoming log messages. Then at the end of the day, this log file is compacted to optimize the space used on disk and signed with an installation-specific private key in order to freeze the log file content and the current timestamp in a signature file. This ensures that any modification to the file can be detected because the signature will be invalidated, and that any signature re-created after the day the log file was made can be discovered.
By default, in the Monitoring module there are two services that check respectively the retention policy and the blockchain integrity of the Log Manager files. Each service check reads the verification output from a cache that is periodically updated (Log Integrity Checks); in case of errors, the plugin output reports the timestamp of the last verification execution.
A user can run the dedicated icingacli verify command and force
it to read from cache (both for retention policy and for integrity
verification) just adding the --cache option to it. For further
details use:
icingacli logmanager consistency verifyBlockChain --help
icingacli logmanager retentionpolicy verify --help
To carry out recurrent tasks, two systemd timers are made available within the Log Manager module and are activated during the installation:
icingaweb2-module-logmanager-retention.timer. This timer launches the command
icingacli logmanager retentionpolicy applyexactly at midnight; its purpose is to verify if the retention time for log files has been exceeded and applies the defined policy.icingaweb2-module-logmanager-extend-blockchain.timer. The purpose of this timer is to build a blockchain for the log files saved on NetEye.
The NetEye Log Manager module also allows you to define server-based filter and exclusion rules to optimize and restrict the content of logged strings. Normally it would be better to already filter unnecessary log content on the remote systems where the log stream is generated in order to reduce network traffic and server processing time. However, this is not always possible due to system and application restrictions.
While it can be done for application-specific log content, this might get more tricky if, e.g., the EventLog of a Microsoft system is read out. Then there could be events with the same Event ID where some of those events are of interest and others are not. In those cases where you can’t precisely filter all the required log strings on the remote system, the NetEye Log Manager lets you define custom filters based on white and/or black lists.
Agents Setup for NetEye Syslog Auditing
The Safed Agent must be installed on each remote machine that will need to send logs to NetEye. The Safed Agent can be installed on Windows and Linux (v1_10_1), as well as AIX and HP-UX (v1_8_3).
This PDF document describes the Safed Agent installation procedure for each operating system (for Windows, see below).
The full Safed Agent project on GitHub can be found in the project home page.
A Windows pre-compiled binary can be found on the NetEye download page by following the path NetEye > SAFED > Windows msi. The most up-to-date installation instructions for Windows can be found in pdf version <https://github.com/WuerthPhoenix/safed/blob/master/doc/safedInstallationWin.pdf> (remember to install with Administrator rights).
Safed Configuration: Overview
This section introduces the Safed Syslog Agent, and shows you how to use Log Manager to automatically configure and update a remotely installed Safed Agent in your infrastructure.
As indicated in the schema in Fig. 164, the EventID and LogFile configuration is abstracted by a templates configuration that allows you to more easily reuse multiple log objects and filters across multiple types of hosts.
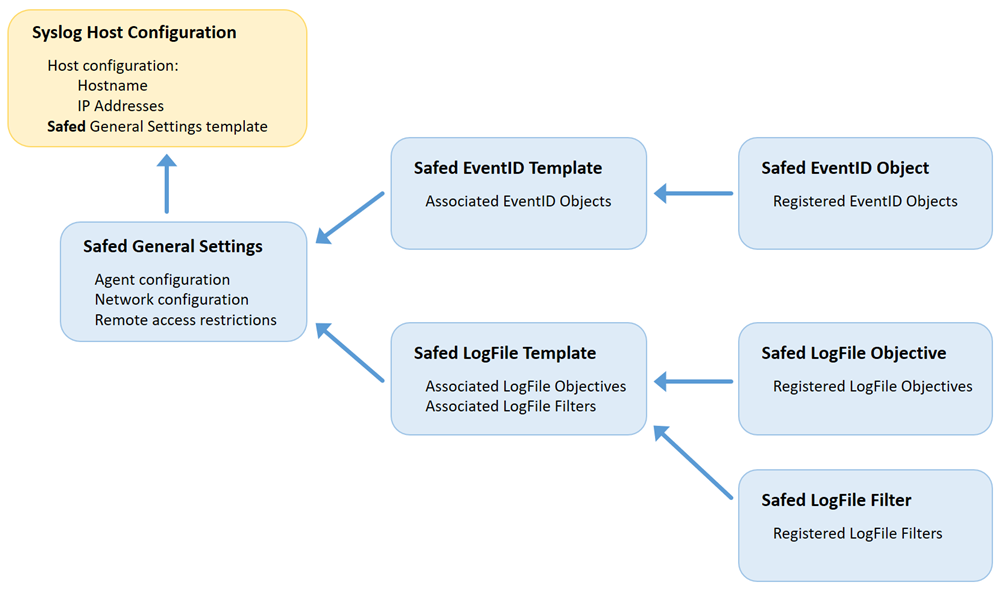
Fig. 164 The Syslog Host Configuration Schema
The centralized Safed configuration extends the NetEye server-based Syslog server configuration and filter setup. This allows you to develop filter and log templates that can be sent as configuration instructions to Safed Agents. The first step is to register the host(s) you want to log within Log Manager.
Configuring the Safed Agent consists of three tasks:
Agent configuration both in general, and specifically for Safed
General Settings: Configuring the Safed Agent and associating LogFile and EventLog templates with a particular host.
LogFiles: The configuration of log files (text files written by applications, DBMS, etc.) to be monitored and logged on the Syslog server
EventLogs: The configuration of EventID Objects from Microsoft systems that should be logged
Safed Configuration: General Settings
The Safed General Settings allow you to associate one or more LogFile Templates (and when working with Safed Agents on Windows, one or more EventLog Templates as well) with a given host. You can then deploy that configuration under Log Manager > Host > Deploy to N Host(s) (see the dedicated section).
To define a new General Setting for a host, click on Log Manager > Safed Agent. Then click the “Add” action to display the General Configuration Template (Fig. 165). Fill in the first three fields:
General Configuration Name: Enter a name that will be displayed in the list of templates.
Additional Description: Optionally add more information about the template.
Operating System Family: Select the operating system from the drop down list.
Note that there are important differences between configuring Safed Agents on Windows hosts versus for Safed Agents running on the Unix family of operating systems (Linux, Unix, AIX and Solaris). If you fill in other fields below, and then change the OS type, you may lose some of the values in those fields unless you first save those settings.
The following fields are common to configurations for all operating systems:
Override DNS Name: Rename the host when Safed writes out logs, as well as the log’s file name.
NetEye Server address: The IP address of the host where this configuration will be deployed.
Destination Port: The port of the Syslog stream (defaults to 514).
Protocol Type: Whether to use TCP or UDP. With UDP, log transmission is not guaranteed and the Safed transmission check and log buffer will not be activated. When using TCP, the Safed Agent detects when the TCP buffer fills up and will cache the log files locally until communication can be re-established, whereupon it will send all delayed log data to the NetEye log server.
Max Message size: Maximum size of a transmitted log message in bytes.
Restrict Web access: Limit the configuration deployment to specified IP addresses.
Web server port: A port for authentication via web server.
Require password: Force account-based access, with the login specified if this is enabled.
Set new password: To change password, enter the new password here.
Repeat new password: Repeat the same password if you filled in the field above.
Add New LogFile: Assign the LogFile templates using the multi-select tool.
If you select an option from the Unix OS family, the following fields will become available:
Days of Log Archives: The number of days that Log Manager will keep its own activity logs.
Wait time: The time in nanoseconds between reading log files (default is 10M = 10ms).
SYSLOG Facility: The Syslog facility that audit messages will be directed to.
SYSLOG Priority: The Syslog priority that will be marked on the audit messages.
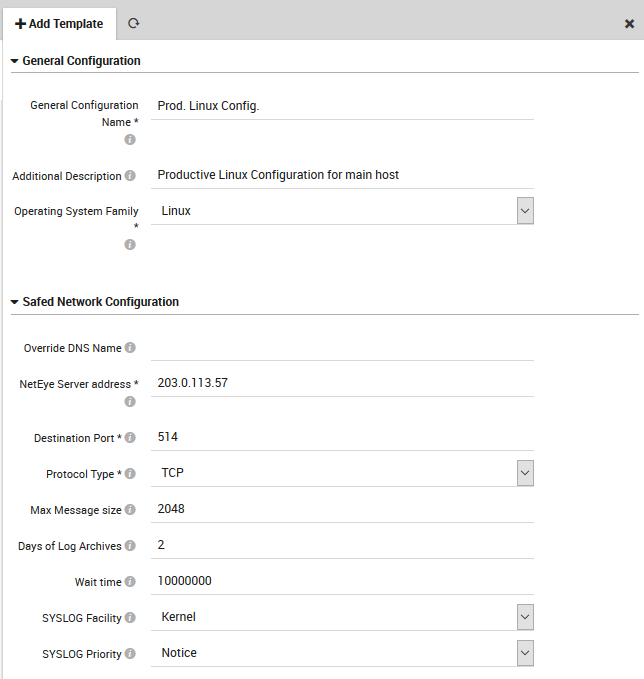
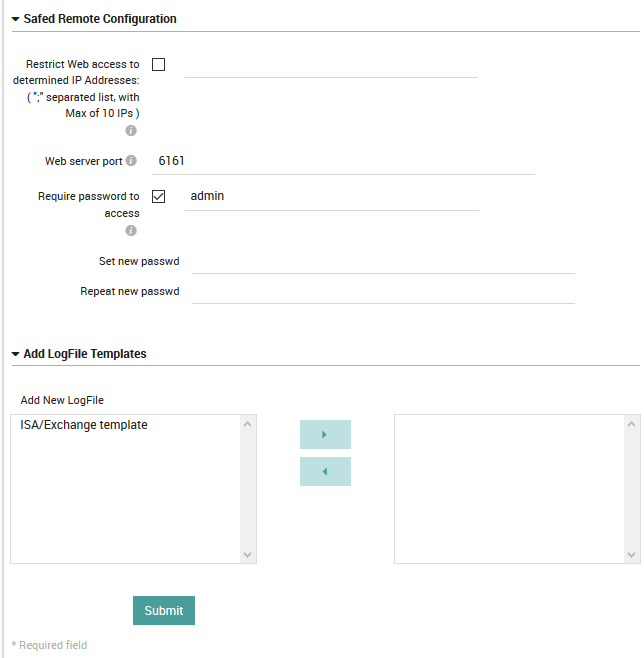
Fig. 165 The General Settings configuration panel for Unix-like operating systems.
If you choose the Windows OS family, the following fields will become available (Fig. 166):
Enable Eventlog audit: Allow NetEye’s Safed to automatically set the audit configuration.
Enable File audit: Allow NetEye’s Safed to automatically set the audit configuration for files.
Enable USB audit: Allow NetEye’s Safed to automatically set the audit configuration for USB connections.
Local Log Cache files: The number of rotating logs to keep (in the system32 folder), in days.
Enable admin account discovery: Allow NetEye’s Safed to automatically discover administrators and set filters accordingly.
Daily discovery frequency: Define how many times per day to launch administrator discovery.
Administrators discovery engine: Select the method for executing discovery.
Use SysAdmin Last Rule Filter: When parsing a Log event, automatically add a final default rule.
Add New EventLog: Assign the EventLog templates using the multi-select tool.
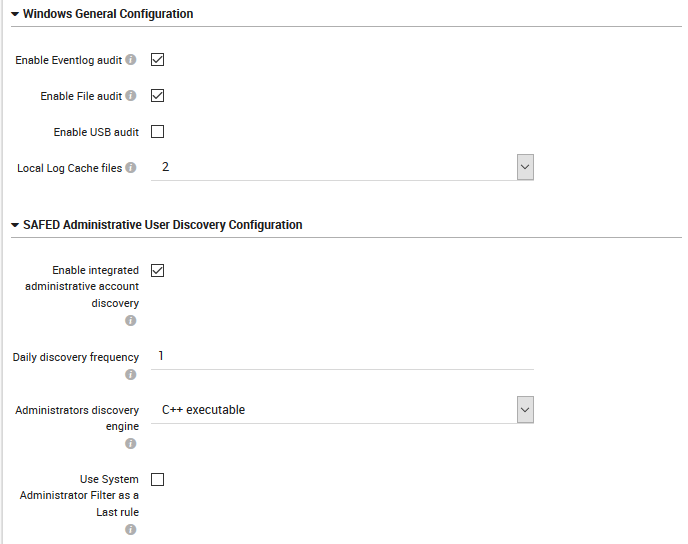
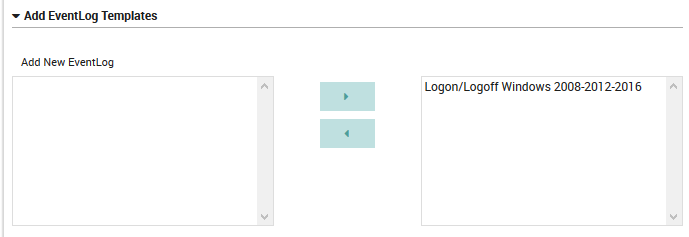
Fig. 166 The General Settings configuration panel for Windows operating systems.
To edit an existing General Configuration template, follow the same sequence as above. You will see all existing general configuration templates along with a quick summary as shown in Figure 3. Instead of clicking on the “Add” action, click on the name of an existing objective. You can then edit the template using the same panel above (Fig. 165) used to create it.
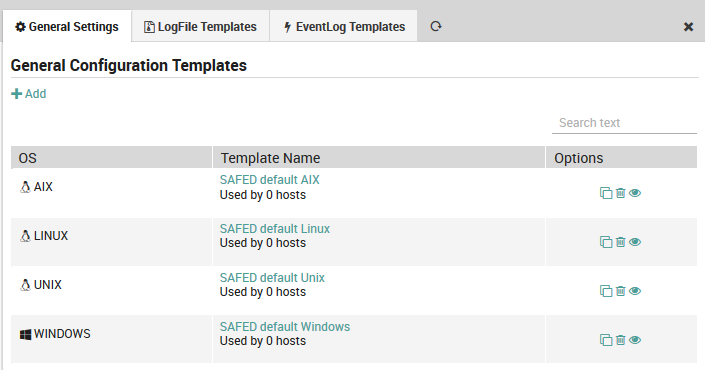
Fig. 167 Editing a general configuration template definition.
Under the template name you can find the number of hosts that have been associated with this template.
In the Options column you can initiate several types of actions for a given template:
Clone: The clone action ( ) can save you time when you need a template that is similar to one you have. It will open a new Add Template panel containing the same field values as the one you copied from.
Delete: The delete action ( ) allows you to delete that template as long as there are no hosts associated with it (i.e., “Used by 0 hosts”).
View: The view action ( ) will show you a preview of the configuration file that will be sent to all hosts associated with that template, for instance:
[Output]
     network=1.1.1.1:514:tcp
     syslog=0
     days=2
     maxmsgsize=
     waittime=10000000
[Log]
     logFileToKeep=5
     logLevel=1
[Remote]
     allow=1
     listen_port=6161
[End]
Safed Configuration: LogFile Templates, Objectives and Filters
A LogFile Template allows you to associate one or more LogFile Objectives with one or more LogFile Filters. To define a new LogFile Template, click on Log Manager > Safed Agent > LogFile Templates. Then click the “Add” action, and specify:
Name: A name for the Objective/Filter combination.
Description: A more extended description of the template.
The two sets of subpanels below allow you to associate LogFile Objectives and LogFile Filters with the current LogFile Template. The left side of each subpanel contains defined objectives and filters that are available. On the right are those that have been associated with the current template. To move elements from one side to the other, you can use the multi-select tool.
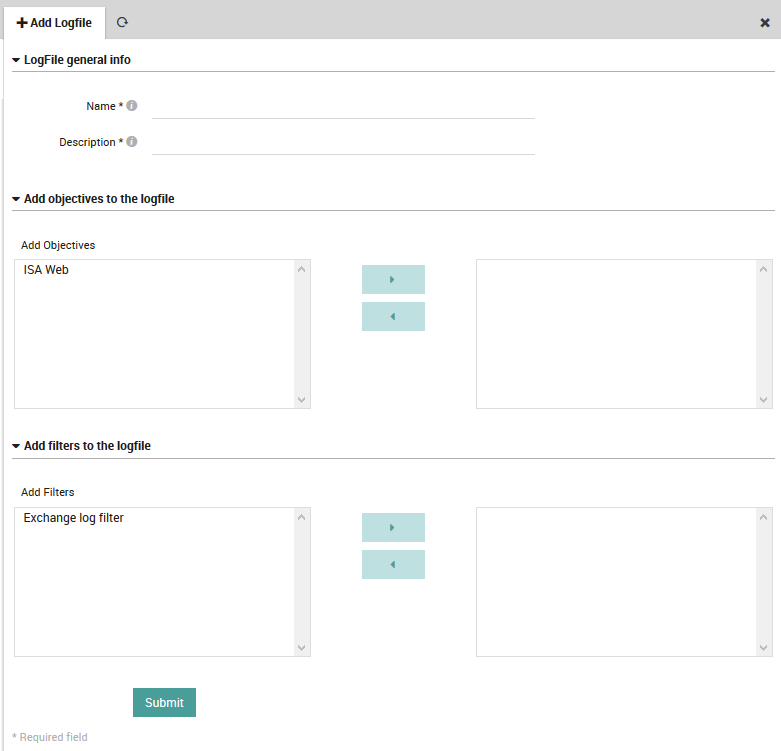
Fig. 168 Adding a new LogFile Template definition.
To edit an existing LogFile template, follow the same sequence as above. You will see a list of all existing LogFile templates as shown in Fig. 169. By clicking on the name of a particular template, you will be able to edit it using the same panel above used to create it.
The listing also shows the number of General Settings items that have been associated with this template. If there are no associations, you can delete a filter by clicking on the trash can ( ) icon to the right. If instead the template is associated with an objective or filter, the trash can icon will change to black to indicate the template cannot be deleted.
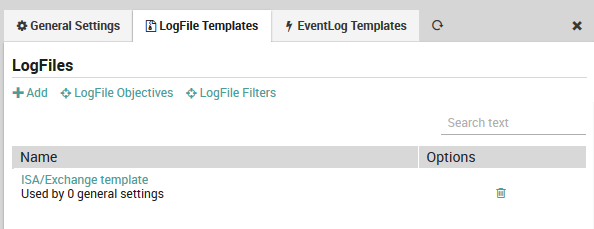
Fig. 169 List of existing LogFile Template definitions
Creating, Editing and Deleting a LogFile Objective Definition
To define a new LogFile Objective, click on . Then click the “Add” action, specifying:
Name: A descriptive name for the LogFile Objective configuration.
Log File or Directory: Either the path to the log file, or the directory where dynamically named logs are kept.
Dynamic Log name format: If the field above is a directory, this field should capture the filename’s structure. A percent sign (‘%’) represents a date in the form YYMMDD, and regular expressions can be used. If this field is empty, then the first file in the directory will be selected.
Include comment lines: Determines whether comment lines (those beginning with a ‘#’) will be included.
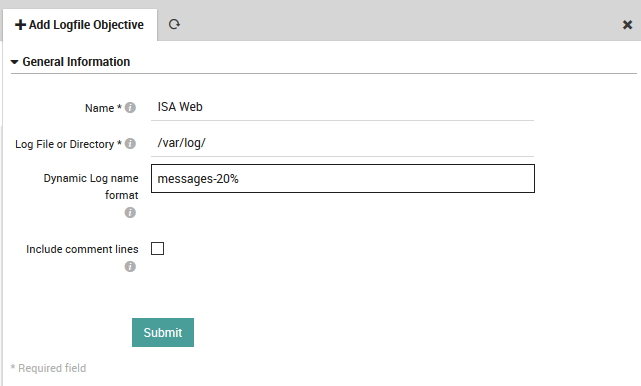
Fig. 170 Adding a new LogFile Objective definition.
To edit an existing LogFile objective, follow the same sequence as above. You will see all existing LogFile objectives along with a quick summary as shown in Fig. 171. Instead of clicking on the “Add” action, click on the name of an existing objective. You can then edit the objective using the same panel above used to create it (Fig. 170).
The summary also shows the number of LogFile templates that have been associated with this objective. If there are no such associations, you can delete an objective by clicking on the trash can ( ) icon.
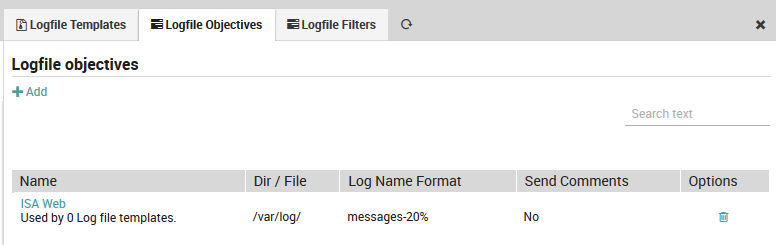
Fig. 171 Index of existing LogFile Objective definitions.
Creating, Editing and Deleting a LogFile Filter Definition
To define a new LogFile Filter, click on Log Manager > Safed Agent > LogFile Templates > LogFile Filters. Then click the “Add” action, specifying:
Filter name: A descriptive name for the filter.
Include/Exclude: Whether this filter definition should act in inclusive or exclusive mode.
Filter Regex: A regex-compatible filter expression, containing for instance:
A Boolean OR: ‘root|administrator’
Grouping parentheses: ‘gr(a|e)y’
Quantification: ? = zero or one; * = zero or more

Fig. 172 Adding a new LogFile Filter definition.
To edit an existing LogFile filter, follow the same sequence as above. You will see all existing LogFile filters along with a quick summary as shown in Fig. 173. By clicking on the name of a particular filter, you will be able to edit the filter using the same panel above used to create it.
The summary also shows the number of LogFile templates that have been associated with this filter. If there are no such associations, you can delete a filter by clicking on the trash can ( ) icon.

Fig. 173 Index of existing LogFile Filter definitions.
Safed Configuration: EventLog Templates and Objectives
A new EventLog is created by setting up a new EventLog Template and then associating it with one or more EventLog Objectives. To define a new EventLog Template, click on Log Manager > Safed Agent > EventLog Templates. Then click the “Add” action, and specify:
Name: A name for the Objective/Filter combination.
Description: A more extended description of the template.
The two sets of subpanels below allow you to add the desired EventLog Objectives. The left side of the subpanel contains the available objectives you have defined. On the right are those that have been associated with the current template. To move elements from one side to the other, you can use the multi-select tool, including changing the relative priority among the various EventLog objectives.
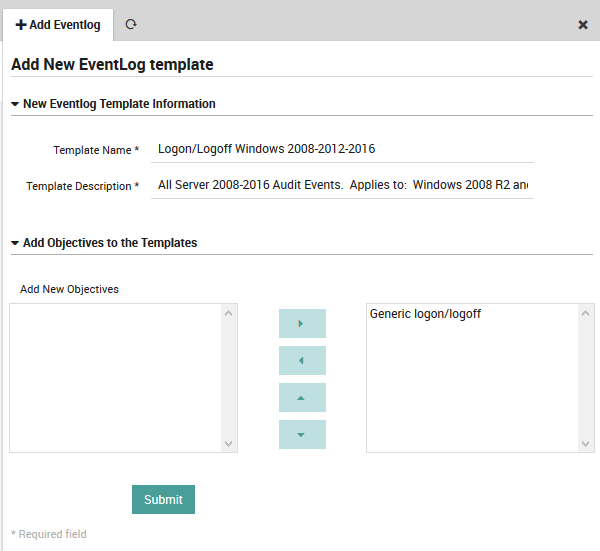
Fig. 174 Adding a new EventLog Template definition.
To edit an existing EventLog template, follow the same sequence as above. You will see a list of all existing EventLog templates as shown in Fig. 175. By clicking on the name of a particular template, you will be able to edit it using the same panel above used to create it.
The listing also shows the number of General Settings items that have been associated with this template. If there are no associations, you can delete a filter by clicking on the trash can ( ) icon to the right.
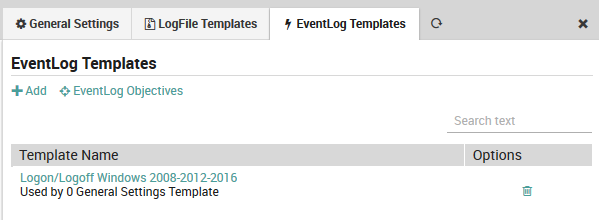
Fig. 175 List of existing EventLog Template definitions.
Creating, Editing and Deleting an EventLog Objective Definition
To define a new EventLog Objective, click . Then click the “Add” action, specifying:
Name: A descriptive name for the EventLog objective configuration.
High Level Event Type: This selects pre-defined categories of events that can depend on the installed operating system, such as authentication, file access, user rights changes, etc.
General Filter Expression: A regex-compatible filter expression applied to EventLog items. The Include/Exclude option will affect this globally. Otherwise, an expression can contain for instance:
A Boolean OR: ‘root|administrator’
Grouping parentheses: ‘gr(a|e)y’
Quantification: ? = zero or one; * = zero or more
Event ID: If the High Level Event Type is not set, you can insert a specific set of Event IDs to use instead of the pre-defined events. If it is set, then the high level events will take priority. You can also specify whether to include just those events, or exclude them from the set of all events.
User Filter Expression: A regex-compatible filter applied to the user(s) associated with an Event. Again, this can be globally included or excluded.
Event Types to include: In addition to high level types, this multi-select tool allows you to include only specific event types such as those based on security or severity.
Event Log to include: This option allows you to select the types of logs to include rather than the type of events. If you select Custom, a text field will appear allowing you to enter a specific log.
Alert level: Here you can specify a maximum alert level to include. The Log Manager will then include all alerts of that severity or lower.
Additional comment: In this text box you can write comments such as explaining what this EventLog objective is intended for, or which Event IDs are covered.
Register Templates: Any EventLog templates you have defined can be included here.
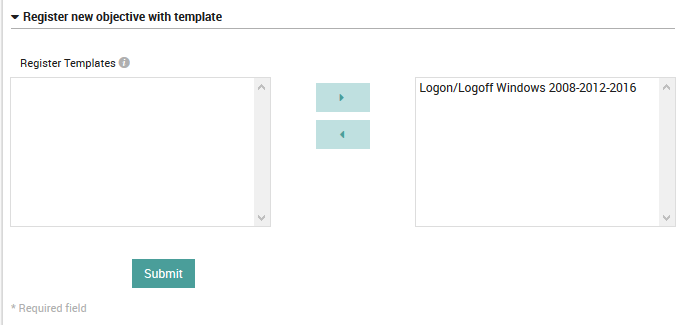
Fig. 176 Adding a new EventLog objective definition.
To edit an existing EventLog objective, follow the same sequence as above. You will see all existing EventLog objectives along with a quick summary as shown in Figure 4. Instead of clicking on the “Add” action, click on the name of an existing objective. You can then edit the objective using the same panel above (Figure 3) used to create it.
The summary also shows the number of EventLog templates that have been associated with this objective. If there are no such associations, you can delete an objective by clicking on the trash can ( ) icon. In addition, there is a clone ( ) button that can save you time whenever you need to define multiple similar EventLog objectives.
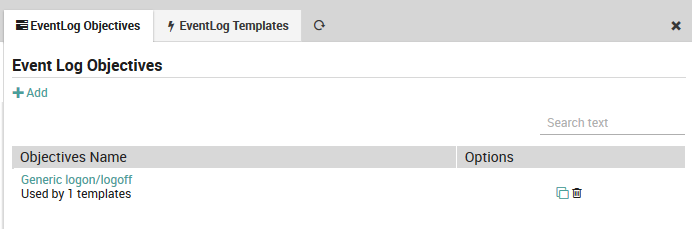
Fig. 177 Index of existing LogFile Objective definitions.
Log Manager Host Configuration
Once you have filled out the General Settings and defined the required Safed templates, you can begin configuring hosts to use Safed.
Go to Director > Host objects > Hosts and select a host with a Safed Agent installed. Under the “Custom properties” section, you will see a field marked “Safed Profile” (Fig. 178). Select one of the general configuration templates you defined. Then click on the “Store” button at the bottom of the panel.
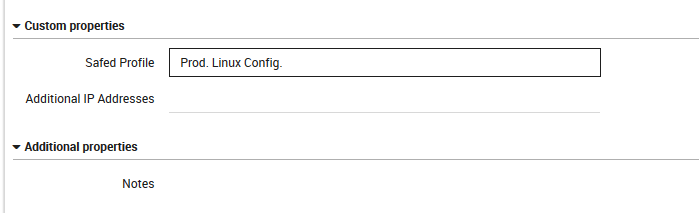
Fig. 178 Configuring a host for use with Safed.
If you have a large number of hosts that you would like to configure for use with Safed, you can save time by pre-defining the “Safed Profile” field on the appropriate host template in Director. Also in “Custom properties” is the “Additional IP addresses” field: if you have a host with multiple IP addresses, Log Manager will need to send the configuration to all of them.
If you need to configure a host with no installed agents for sending logs to NetEye Log Manager, you need to select the “No agent” option in the host Safed profile configuration field. If a host is configured as “No agent“, you will still need to deploy the Rsyslog configuration to accept the logs from that host.
Once you have added a general configuration template to all those hosts that will use Safed, you will first need to redeploy the hosts in Director. Then go to Log Manager > Host where you will see a list of all hosts (Fig. 178) that are ready for Safed deployment. There are five actions you can perform, two of which affect all hosts:
The “Deploy to N Host(s)” action will distribute the Safed configuration(s) simultaneously to all Safed Agents on the registered hosts list that do not have the most up-to-date configuration. The following icingacli command will carry out this action for scripting:
icingacli logmanager commit safedAgents
The “Deploy Server Configuration” action will write out the configuration for the Centralized Syslog Server, allowing it to know which hosts it should accept logs from. The configuration also forwards relevant fields such as which hostgroup a host belongs to so that they can be used for sorting and filtering with Elasticsearch and Log Analytics. The following icingacli command will carry out this action for scripting:
icingacli logmanager commit server
Then for each row in the table, these actions will only affect the host in that row:
Click on the host’s name to go to that host’s configuration panel in Director.
Click on the “Airplane” icon ( ) in the “Options” column to deploy the appropriate Safed configuration to that particular host.
Click on the “Compass” icon ( ) to go to the host’s Log Check panel.
Additionally, the “Retention Policy” column shows the number of days that that host is configured to retain logs, and the last cutoff date before which logs will be automatically deleted.
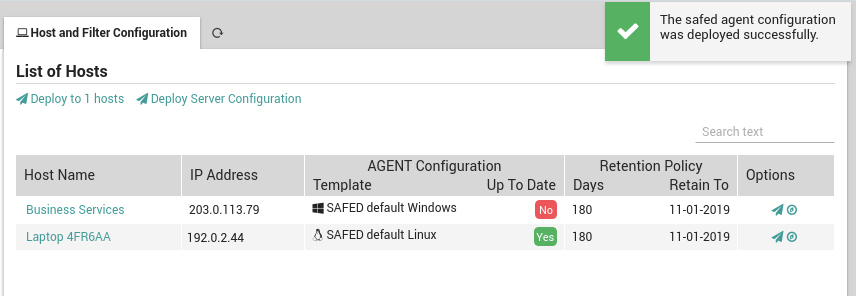
Fig. 179 Deploying Safed configurations to hosts
Deploying Safed Configurations to Hosts
To deploy the Safed configuration(s), click on either the “Deploy to N Host(s)” action (or the “Airplane” icon for a single host). If all host(s) successfully receive the new Safed configurations, you will see a green banner at the top right of the screen. Otherwise, a red banner (Fig. 180) will appear that describes the problem. This occurs when at least one host could not be configured, in which case all the remaining hosts after the failed host will not receive the new configuration. You should then proceed to resolve the problem and deploy again as described in the section below so that all hosts can be properly updated.
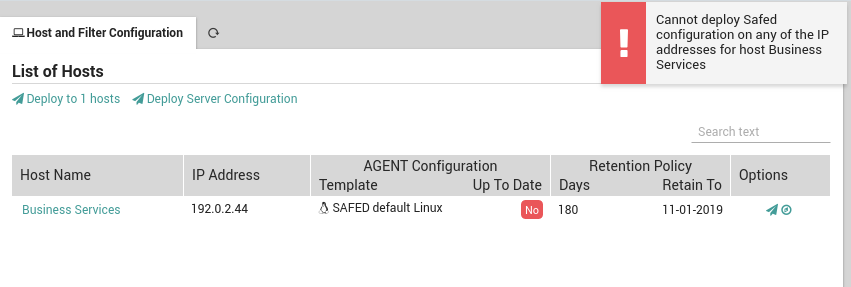
Fig. 180 A red banner indicating Safed cannot configure a host.
In addition, another warning will occur if one or more hosts have not been completely configured. For instance, when creating a host in Director it is not mandatory to include the host’s IP address. However, Log Manager requires an IP address in order to send the configuration to the host. Thus in addition to the error above, you will see the message “No ip assigned” in the IP address field as shown in Fig. 181.
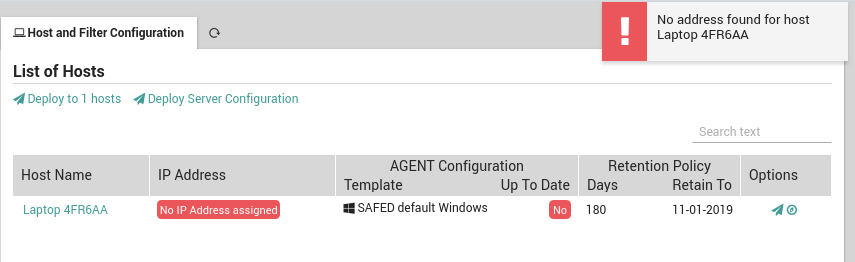
Fig. 181 A red message in the host’s row indicating an IP address is missing.
Redeploying a Partial Safed Configuration Deployment
If a deployment does not run to completion, it can be difficult to know which hosts have received the new configuration and which have not. NetEye uses a checksum technique to keep track of which hosts have received the latest general configuration template assigned to them in their host configuration at Log Manager > Safed Agent.
Whenever a general configuration template is created or updated, a checksum is calculated and stored with the template. Then once a template is deployed to one or more hosts, the Log Manager waits for responses from those hosts. When a response from a host is received indicating the configuration change was successful, the Log Manager associates the checksum with that host.
Thus selecting the action “Deploy to N Host(s)” will cause the template to be deployed to all those hosts whose checksum does not match the template’s checksum, i.e., those that do not have the latest configuration.
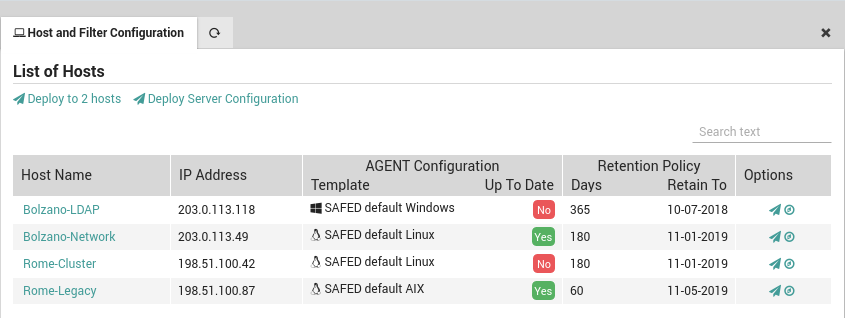
Fig. 182 Deploying to a subset of hosts.
You can review whether or not an agent configuration on a given host is up to date by looking at the appropriate column marked with a green “yes” or a red “no” as shown in Fig. 182.
Log check
Log Integrity Checks
The “Log Check” section provides a list of all log files with the corresponding validation result. The Log Check performs a real-time validation to verify:
Whether the log date and date of last modification on the system are equal: This ensures that the log file has not been altered by anyone.
If the signature file exists and that the signature checksum recalculation returns the same value as the content of the log file: The hash from the GPG key guarantees that the file has not been changed after signature calculation.
That the timestamp of the signature corresponds to the date after the day when the log files have been collected. This is because during the date of logging, the log file is continuously written to and the final signature can only be created and stored once this process terminates.
That the integrity of the entire folder is valid. An MD5 checksum is calculated for the whole folder of a day and stored in the archive of the next day. The hash of the next day’s checksum is calculated together with the checksum of the previous day. ANY modification on the SHA-512 file will lead to corruption of the hash result for that next day, and the same will occur for ANY modification of any log file and their signatures.
The log check system in NetEye 4 assumes that the logs collected by rsyslog are organized in a folder with the following logical structure:
host_name/year/month/day/
At midnight, a script signs the just-completed day’s folder following these steps:
Compression of all log files stored in that day’s folder.
Creation of a .sig signature file for each compressed file using GPG.
Creation of the file “YYYYMMDD.hashes” which is saved in the folder for the next day, using the same path format as above. Inside this file, the hashes of all the files’ contents from the just-finished day are stored in the form “[hash] [full-path]”. for Example:
ABACC417349AE2.....0413E6FA4E89A9 /var/.../ host_name/year/month/day/log1.log.gz
There are three different systemd timers installed by default that periodically execute these tasks:
icingaweb2-module-logmanager-extend-blockchain.timer - runs every day after midnight and extends automatically the log block chain (see Log Manager’s Technical Overview).
icingaweb2-module-logmanager-verify-blockchain-light.timer - runs every 12 hours starting from 01:00 and carries out a light check of the logs blockchain.
icingaweb2-module-logmanager-verify-blockchain-deep.timer runs every 24 hours and performs a deep check of the logs blockchain.
Usage of Log Check
When you click on the “Log Check” action in the Log Manager dashboard, the “Light Check” and “Deep Check” panels will appear to the right (Fig. 183). The signature check is performed by selecting a single host to test, or on all hosts by selecting the “All hosts” option in the dropdown menu.
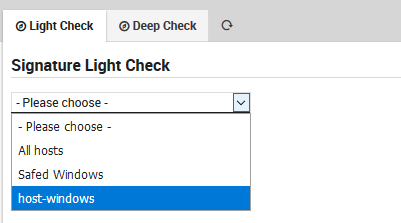
Fig. 183 Integrity checks with the Light and Deep check options.
When the check is complete, a check symbol will appear in the top-right corner of the page: if all requested checks are correct, then a green symbol is shown. Otherwise if at least one of these checks fails, then a red symbol will appear.
Light Check Option
The light check examines all log files verifying that the signature file exists and is not corrupted.

Fig. 184 The Light check panel.
Deep Check Option
The deep check verifies logs using the following logic: - It first conducts a light check on the logs as described above. - It verifies that the date of last modification (established by the file system) of each file contained in the just-finished day is not later than midnight (plus a small tolerance threshold) of the following day. - It checks for each hash/path pair in the YYYYMMDD.hashes file in the following day’s directory that the hash corresponds exactly to a recomputed hash of the file at the indicated path, and that the number of files in the directory has not changed.
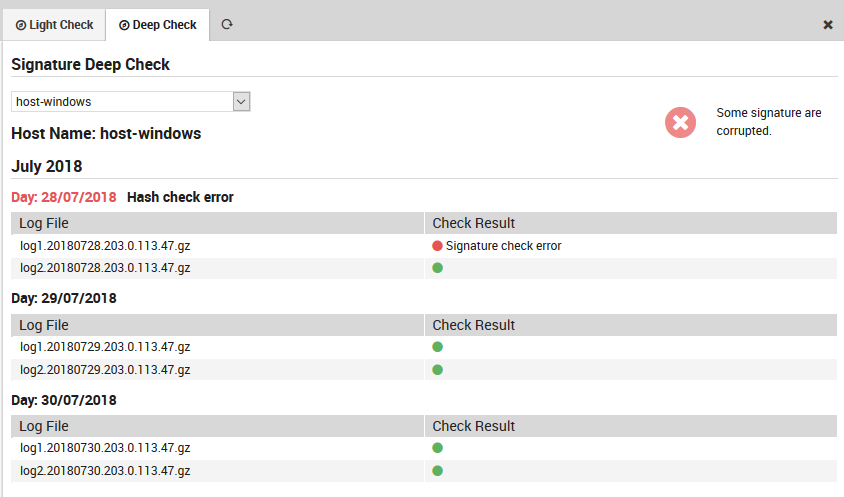
Fig. 185 The Deep check panel.
Example of errors discovered by the log check can be seen in Fig. 185.
Retention Policy for Log Manager
Warning
The Log Manager Retention Policy is now deprecated and is only applied to logs managed via rsyslog. The retention policy of logs managed via Real Time Log Signing must be configured with the Elasticsearch Index Lifecycle Management.
The NetEye Log Manager data retention policy defines the amount of time that information should be retained for operational or regulatory compliance needs. This policy can be defined separately for each host in NetEye. The retention policy applies to each host that has logs collected from NetEye Log Management. These logs can be stored both in the filesystem (by rsyslog) and in Elasticsearch.
The default retention policy for all hosts is 365 days (one year) and is automatically applied to all those hosts for which the user does not explicitly specify a retention policy. This value can be changed by modifying the “Default retention policy duration” field in the configuration form of the Log Manager module at Configuration > Modules > logmanager > Configuration that represents the time span (number of days) for which the logs of a host should be kept. The retention policy can also be set for either individual hosts or host templates via the “Retention policy days” field that can be found in the host creation/edit form (remember that the retention policy for a host has precedence over its host template).
To force retention on all hosts configured in Log Manager, you can use the following command:
# icingacli logmanager retentionpolicy apply
Note
There are two different systemd timers installed by default that periodically execute these tasks:
icingaweb2-module-logmanager-retention.timer - every day after midnight - that enforces automatically the retention policies (see Log Manager’s technical overview) and verifies if the retention policies are correctly applied.
The main purpose of this command is to delete all logs generated before the time frame set by the retention policy. For example, if you set a retention policy of 10 days (i.e., setting the retention value to 10 whether on the host, host template or Log Manager default) and then launch the command on the 20th of May, it will delete all logs created before the 10th of May.
More precisely, the command first retrieves a list of all hosts in the monitoring module, and then for each one checks if a retention policy was set on the host or host template, using the default retention policy if none was otherwise set. The retention policies are then applied to logs from the single hosts, deleting them accordingly.
Retention Policy Verification
As part of the initial installation of NetEye, a default host (HOST_NAME=”neteye-local”) is created. The Logmanager module now provides the retention-policy-verify command, which is automatically attached as a service to the neteye-local host. In addition, the module also provides the JSON file that represents the action executed by the previously mentioned command. The action consists of calling this icingacli command:
# icingacli logmanager retentionpolicy verify
This check ensures that all log files saved in rsyslog’s data directory and all Elasticsearch logs older than the date computed with the specified retention policy have been correctly deleted. If all hosts reply that their logs were correctly deleted, the script will return ‘0’. Otherwise, it will return a ‘1’ and print the list of hosts that returned an error.
The output of the command can be seen in the Plugin Output section (under Overview > Services > Neteye Local Self Monitoring) of the default service to which the custom command relates to. This command checks whether the Log Manager retention policy was correctly applied to the logs generated by the hosts present in NetEye.
If the verification leads to positive results, the Plugin Output will be the message:
OK: Retention policy correctly applied.
On the other hand, if something went wrong during the deletion of the logs, the output will be the following:
CRITICAL - These are the hosts that returned an error when trying to delete their <log_type> logs: <host_name>
where log_type can be either rsyslog or elasticsearch depending on which kind of log the host has generated, and host_name is the name of the host that generated that log.
How to Implement a Retention Policy
Warning
The Log Manager Retention Policy is now deprecated and is only applied to logs managed via rsyslog. The retention policy of logs managed via Real Time Log Signing must be configured with the Elasticsearch Index Lifecycle Management.
Suppose you would like to set a new company-wide retention policy for all hosts in your system. The GDPR requires data minimization, and your company has determined its policy should be 6 months maximum, but with a 2 year limit for a specific set of services run on a set of hosts dedicated to multi-year customer subscriptions.
This How To will show you the steps necessary to set up this new policy. For further information about how Retention works, please see the Retention documentation.
Note
Only rsyslog and Elastic Stack logs are governed by NetEye’s retention policy mechanism.
Decide on a Retention Policy
Retention is determined host by host. But to avoid inefficiency when a large number of hosts are involved, the retention policy is applied hierarchically from most to least specific:
A policy set on an individual host (most specific) will always prevail.
If a host does not have a specific policy, then one of its host templates’s policy will apply (with the standard hierarchical priorities of host templates)
If there is not at least one policy on either the host or one of its templates, the default policy will apply
In our use case, the default should be 6 months (180 days), and for all hosts set under one particular host template the retention policy should be 2 years (730 days). We will thus need to change the system-wide default from 365 to 180, and set the retention policy for that particular host template to 730, leaving the retention policy field on all hosts and all other host templates blank.
Implement the Retention Policy in the GUI
To implement the above policy, let’s set the appropriate fields (these can be done in any order):
To change the default retention policy from 365 days to 180, navigate to Configuration > Modules > logmanager > Configuration and change the value in the field “Default retention policy duration in days” to 180.
To change the policy on the host template, navigate to Icinga Director > Host objects > Host Templates > [template] > Modify > Custom properties and set the field “Retention policy days” to 730 for the template you selected.
Deploy the changes from the previous step: Icinga Director > Activity log > Deploy pending changes. This is not necessary for the default policy, but if you change the retention policy on either a host template or a host, you will need to deploy before it will take effect since these are configured in Director.
You can now verify that the new retention policy has taken effect by navigating to Log Manager > Host and checking that relevant hosts have the correct number of days set in the Retention Policy column of the Log Manager Host Configuration panel.
You can also check that the retention policy is being carried out regularly. A specific service named retention-policy-neteyelocal is set up on the local monitoring machine to check that the retention policy is being correctly applied. If it detects that logs are not being deleted, the corresponding monitoring check on the dashboard will show red instead of green.
Optional: Enforce the Retention Policy in a Shell
Although the retention policy is enforced automatically each day after midnight, you can manually do the same thing when desired. The following shell commands use the Log Manager API (root access required).
This will apply the retention policy to all hosts:
# icingacli logmanager retentionpolicy apply
This will check that no log older than the retention period specified for the corresponding host is still retained:
# icingacli logmanager retentionpolicy verify